
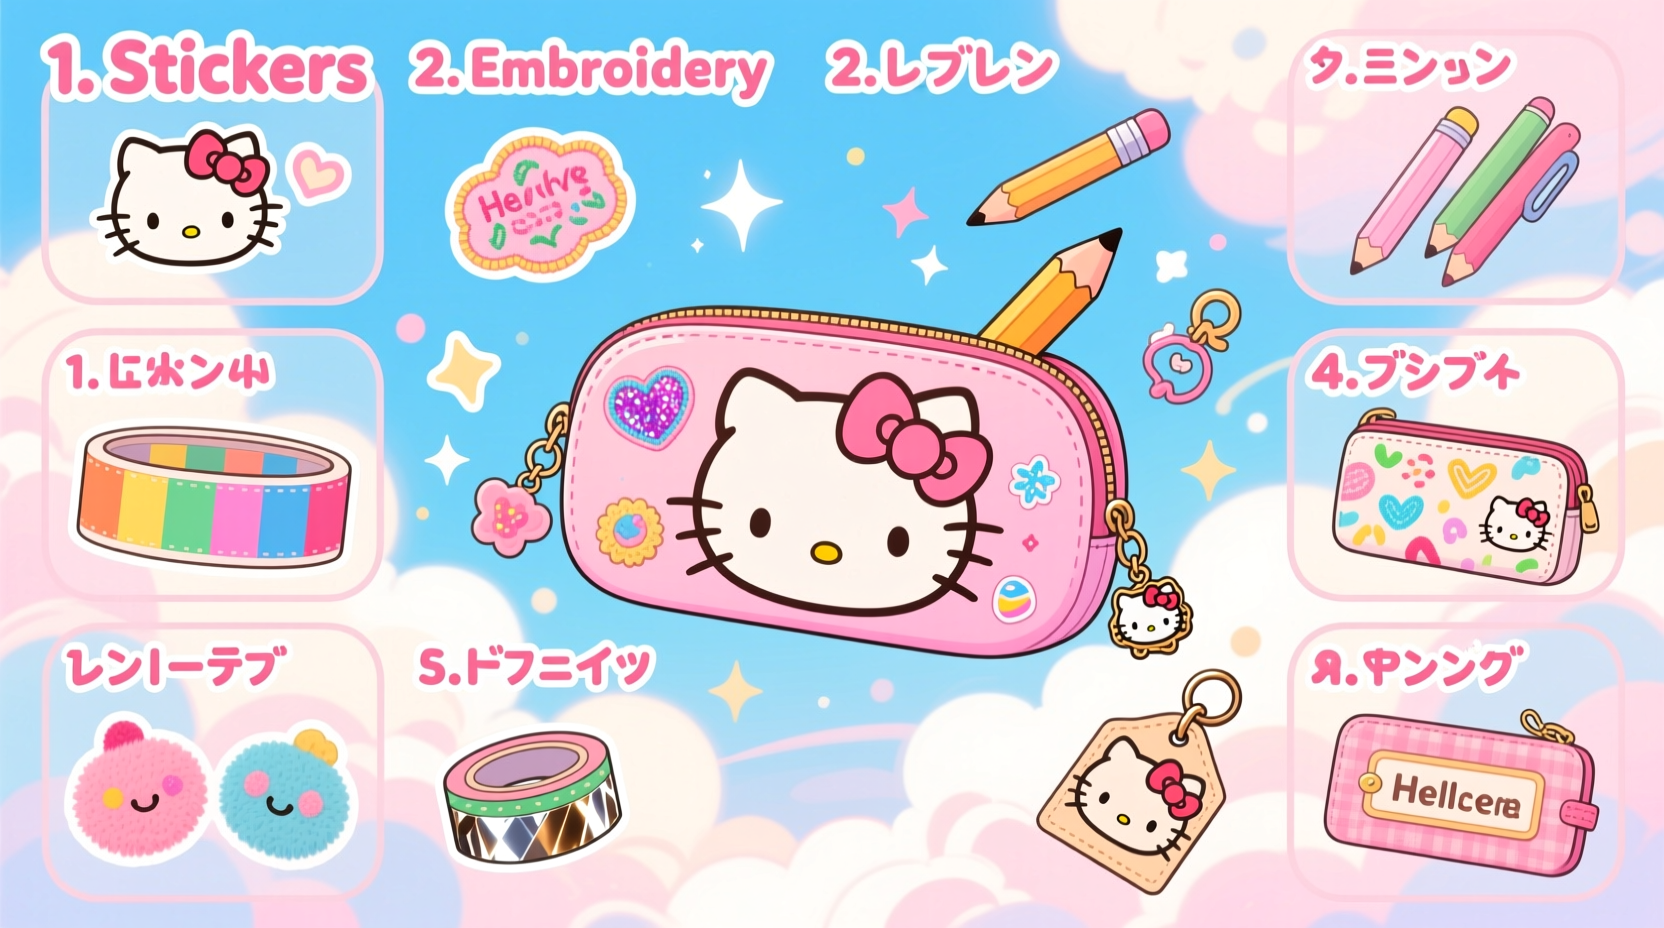
A Hello Kitty pencil case is more than just a school or office accessory—it’s a canvas waiting to reflect your personality. Whether you’ve had yours for years or just picked up a new one, customizing it transforms an ordinary item into a statement piece. With simple materials and a little creativity, you can turn your classic Sanrio design into something truly one-of-a-kind. These personalized touches not only make your stationery stand out but also bring joy every time you reach for a pen.
Why Personalize Your Pencil Case?
Personalization adds emotional value. When you invest time in making something uniquely yours, it becomes more meaningful. A customized pencil case can boost motivation, spark conversations, and even serve as a confidence booster during long study or work sessions. Plus, in a sea of identical accessories, yours will be instantly recognizable.
Unlike high-cost fashion items, personalizing a pencil case is low-risk, budget-friendly, and accessible to all skill levels—even beginners can achieve impressive results. From stickers to hand-drawn art, the possibilities are limited only by imagination.
1. Decorate with Iron-On Patches
Iron-on patches are a quick, durable way to add flair. Choose designs that match your interests—kawaii animals, glitter stars, anime characters, or even motivational words like “Dream” or “Create.” Most patches come with heat-activated backing, so all you need is a household iron and a thin cloth to protect the fabric.
Apply firm pressure for 15–20 seconds per patch. This method works best on fabric-based pencil cases. Avoid using this technique on plastic or vinyl unless the manufacturer specifies heat resistance.
2. Use Washi Tape for Instant Patterns
Washi tape is a crafter’s best friend—removable, repositionable, and available in endless colors and patterns. Stripes, polka dots, florals, or even metallic finishes can completely transform the look of your pencil case without permanent changes.
Cut pieces to size and layer them creatively. Try crisscrossing tapes for a geometric effect or framing the zipper with contrasting strips. Since washi tape isn’t permanent, you can change the design whenever your mood shifts.
3. Add 3D Stickers or Foam Decals
For dimension and texture, 3D stickers or foam decals are ideal. Unlike flat stickers, these pop off the surface, giving your pencil case a playful, tactile quality. Look for water-resistant varieties if you plan to wash or wipe the case occasionally.
Place them strategically—Hello Kitty’s bow could be replaced with a glittery foam bow, or her face could be surrounded by floating hearts and stars. Avoid overcrowding; sometimes less is more when aiming for charm over clutter.
4. Hand-Paint a Mini Masterpiece
If you enjoy drawing, painting directly onto your pencil case allows for full creative freedom. Use fabric paint or acrylics mixed with a fabric medium to ensure flexibility and durability. Sketch your design lightly in pencil first, then outline with fine brushes.
Popular themes include turning Hello Kitty into different professions (astronaut, artist, chef), adding seasonal elements (snowflakes in winter, cherry blossoms in spring), or creating a comic-style scene around her.
“Custom artwork on everyday objects turns routine into ritual. It’s not just about function—it’s about feeling connected to what you use.” — Lila Chen, DIY Lifestyle Designer
5. Embellish with Glitter and Gems
Add sparkle with craft glue and loose glitter, rhinestones, or self-adhesive gems. Outline Hello Kitty’s silhouette with gold glitter, or place tiny gems along the zipper pull for a luxe touch.
To avoid mess, apply glue in small sections and sprinkle glitter over it. Shake off excess and let dry completely before sealing with a clear fabric sealant spray. This prevents shedding and keeps your supplies from getting coated in sparkles.
6. Create a Photo Collage with Mod Podge
Print out tiny photos of friends, pets, or favorite quotes and arrange them into a collage. Cut them into uniform shapes—circles or squares work well—and adhere them using Mod Podge, a decoupage medium that acts as both glue and sealer.
Layer the entire surface or create a dedicated corner “memory zone.” Once dry, apply 2–3 top coats of Mod Podge to protect the images from wear and moisture. This idea is especially meaningful for gifts or sentimental keepsakes.
7. Stitch On Embroidered Details
For fabric pencil cases, embroidery adds a handmade, premium feel. You don’t need advanced skills—simple stitches like backstitch (for lines) or French knots (for dots) can spell out initials or create tiny flowers near Hello Kitty’s ears.
Use colorful threads that contrast with the background. Pre-wash the case to prevent future shrinkage, and stabilize the fabric with an iron-on interfacing if it’s too stretchy. If needlework isn’t your strength, consider iron-on embroidered patches instead.
8. Customize the Zipper Pull
The smallest detail can make the biggest impact. Replace the standard zipper pull with a themed charm—another mini Hello Kitty, a cat-shaped bead, or a tassel in your favorite color. Attach it using a jump ring or thin chain, which you can find in jewelry-making kits.
This upgrade takes under five minutes but elevates the overall aesthetic. Bonus: a longer pull makes opening the case easier, especially for younger users.
9. Use Fabric Markers for Bold Lettering
Fabric markers allow you to write names, quotes, or doodles directly on the case. Choose permanent, non-toxic markers designed for textiles. Test on a hidden area first to check for bleeding.
Write empowering phrases like “Stay Cute,” “Art in Progress,” or your name in bubble letters. Combine text with small icons—stars, cats, rainbows—to fill blank spaces. Let the ink set for 24 hours, then heat-set with an iron (on reverse side) for longevity.
10. Mix and Match Themes Seasonally
Treat your pencil case like a seasonal wardrobe. Switch up decorations based on holidays or moods—pastel eggs for Easter, pumpkins for Halloween, snowmen for winter. Use removable methods like stickers, tape, or magnetic charms so you can refresh the look anytime.
This approach keeps your accessories feeling fresh and aligned with your current interests. It’s also a great way to reuse older craft supplies instead of buying new ones.
Step-by-Step Guide: Creating a Washi Tape & Sticker Design
- Clean the surface: Wipe the pencil case with a damp cloth and let it dry.
- Plan the layout: Arrange washi tape strips and stickers on the surface without sticking them down.
- Apply washi tape: Start from one edge, pressing firmly as you go to avoid air bubbles.
- Add stickers: Place larger decals first, then fill gaps with smaller ones.
- Seal (optional): For extra durability, apply a clear sealant spray in a well-ventilated area.
- Let dry overnight: Allow all adhesives to fully bond before regular use.
Do’s and Don’ts of Pencil Case Customization
| Do’s | Don’ts |
|---|---|
| Test paints or adhesives on a small hidden area first | Use permanent markers on non-porous surfaces without sealing |
| Work in a clean, dry environment | Overload the case with heavy embellishments that may peel |
| Allow adequate drying time between layers | Expose painted areas to moisture before they’re fully cured |
| Store decorated cases flat or upright to avoid pressure on designs | Iron directly on glued or painted decorations |
Real Example: Maya’s Back-to-School Transformation
Maya, a high school sophomore, had a plain pink Hello Kitty pencil case she’d used since middle school. She wanted something fresher for her final year. Using leftover washi tape from her planner and some gem stickers from a birthday party favor bag, she created a galaxy-themed design—deep blue tape as the background, silver stars, and a central glitter moon.
She added her nickname in cursive with a fabric marker and attached a star-shaped zipper charm. The project took 20 minutes and cost nothing. Her classmates loved it so much that three asked her to help customize theirs. Maya said, “It felt good to make something that felt grown-up but still cute.”
Frequently Asked Questions
Can I remove decorations if I change my mind?
Yes—most non-permanent methods like washi tape, stickers, and iron-on patches can be peeled off carefully. Residue can usually be removed with rubbing alcohol or adhesive remover. Permanent paints and glued elements are harder to undo, so test in small areas first.
Will paint crack or peel over time?
Possibly, if not applied correctly. Always mix acrylic paint with a fabric medium, allow proper drying time, and heat-set it with an iron. Avoid folding or creasing painted areas frequently to extend durability.
Is it safe to wash a decorated pencil case?
Hand wash only, gently. Remove any loose embellishments first and avoid scrubbing decorated areas. Air dry flat. Machine washing is not recommended, as it can damage adhesives and cause peeling.
Final Thoughts: Make It Yours, Keep It Fun
Your pencil case doesn’t have to stay the way it came from the store. With these 10 ideas, you can express your style, celebrate your hobbies, or simply enjoy the process of creation. The best part? There’s no wrong way to do it. Whether you prefer subtle elegance or bold, glittery statements, your personalized case becomes a reflection of who you are.


 浙公网安备
33010002000092号
浙公网安备
33010002000092号 浙B2-20120091-4
Comments
No comments yet. Why don't you start the discussion?