
Mobile phone chargers are essential for daily life, but not all perform as expected. Over time, chargers degrade, or counterfeit units may deliver inconsistent power, risking device damage or inefficient charging. Measuring the output voltage of your charger is a simple yet effective way to verify its performance. With just a basic multimeter and a few minutes, you can ensure your charger operates safely and efficiently.
This guide walks through the entire process—from identifying tools to interpreting results—with precision and safety in mind. Whether you're troubleshooting slow charging, testing a secondhand adapter, or simply curious about your charger’s output, this method delivers reliable insights.
Why Measure Your Charger's Voltage?
Chargers convert household AC (alternating current) into DC (direct current) at a lower voltage suitable for phones—typically 5V for standard USB chargers. However, fluctuations due to poor manufacturing, wear, or circuit faults can lead to under-voltage (slow charging) or over-voltage (risk of overheating or component failure).
Verifying voltage ensures compatibility with your device and helps identify failing or counterfeit chargers. According to the IEEE (Institute of Electrical and Electronics Engineers), consistent power delivery within ±5% of nominal voltage (e.g., 4.75–5.25V for a 5V charger) is critical for safe operation.
“Measuring output voltage is the first line of defense against unreliable charging sources.” — Dr. Lena Torres, Power Systems Engineer
Tools and Materials You’ll Need
To measure your charger’s voltage, gather the following:
- Digital multimeter – Must support DC voltage measurement (most do)
- Working mobile phone charger – USB-A or USB-C, wall plug type
- USB cable (optional) – If testing via cable rather than direct pin contact
- Small metal probe or paperclip (if needed) – For accessing USB port contacts
- Insulated gloves (recommended) – For added safety when handling live circuits
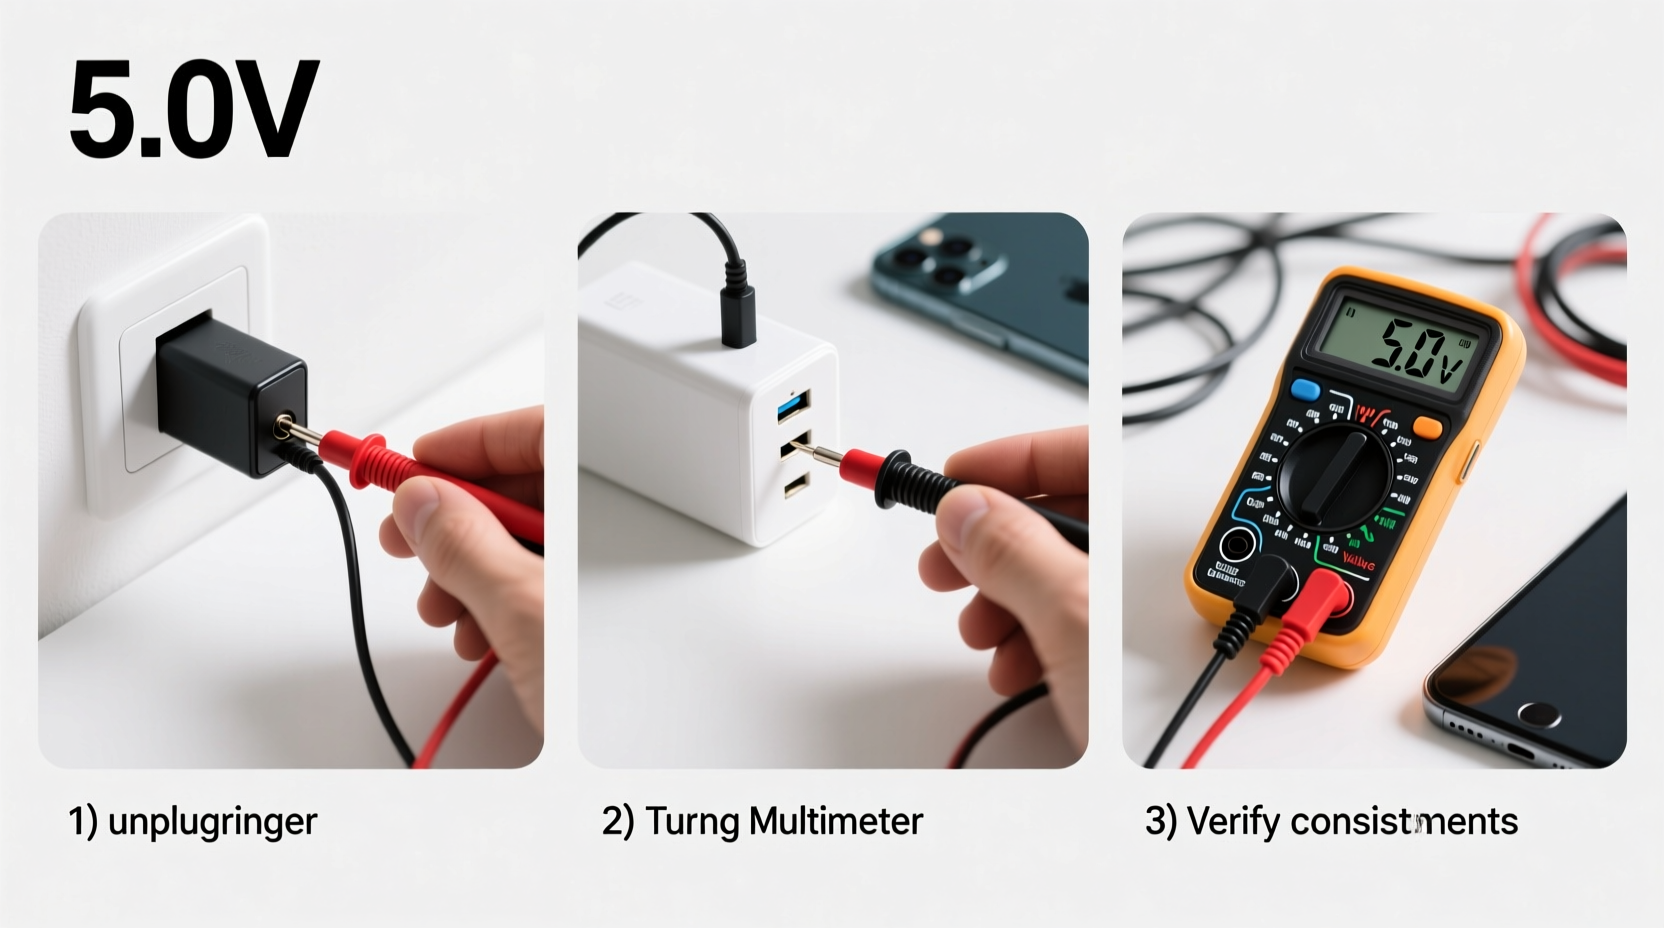
Step-by-Step: How to Measure Charger Voltage Safely
Follow these steps carefully to obtain an accurate reading without damaging equipment or risking injury.
- Unplug the charger from the wall outlet. Always start with the charger disconnected to prevent accidental short circuits during setup.
- Set your multimeter to DC voltage mode. Rotate the dial to “V⎓” or “DCV.” Select a range higher than 5V—usually 20V is ideal for precise readings on a 5V system.
- Identify the USB output terminals. On a standard USB port:
- Red wire or inner pin = VCC (+5V)
- Black wire or outer pin = GND (Ground)
- Insert multimeter probes. Attach the black probe to the ground (GND) point and the red probe to the voltage (VCC) terminal. If using a USB cable, strip back the end to expose red (power) and black (ground) wires, then touch probes directly.
- Plug the charger into a wall outlet. Now that probes are in place, power up the circuit. The multimeter should display a voltage reading.
- Read and interpret the result. A healthy charger will show between 4.75V and 5.25V. Significantly lower (<4.5V) suggests internal failure; higher (>5.3V) indicates potential danger.
- Unplug the charger before removing probes. Never disconnect probes while the charger is live to avoid sparks or meter damage.
Common Pitfalls and What They Mean
Mistakes during measurement can lead to false conclusions. Here’s what to watch out for:
| Pitfall | Effect | Solution |
|---|---|---|
| Multimeter set to AC instead of DC | Incorrect or zero reading | Double-check selector dial is on DC voltage |
| Loose probe contact | Fluctuating or no reading | Ensure firm, stable contact with metal terminals |
| Using damaged or frayed cables | Low voltage due to resistance | Test with known-good cable or directly at charger port |
| Testing under load vs. no load | No-load voltage may read high; real-world performance differs | For accuracy, test both open-circuit and with a small load (e.g., connected phone) |
Mini Case Study: Diagnosing a Slow-Charging iPhone
Mark noticed his iPhone took over four hours to charge fully, even though it showed \"charging\" status. He tested the charger using a multimeter and recorded only 3.8V at the USB port. After replacing the charger with a certified one, the voltage read 5.1V, and charging time dropped to 90 minutes. The low voltage had been limiting current flow, preventing fast charging protocols from engaging. This confirmed the original charger was faulty despite appearing functional.
Do’s and Don’ts When Testing Chargers
| Do’s | Don’ts |
|---|---|
| Use insulated tools and dry hands | Touch exposed metal while powered |
| Check both no-load and loaded voltage | Assume a working light means correct voltage |
| Label and store verified chargers separately | Use chargers showing >±0.3V deviation from 5V regularly |
| Clean USB ports before testing | Force probes into delicate connectors |
FAQ: Common Questions About Measuring Charger Voltage
Can I damage my charger by measuring voltage?
No, measuring voltage with a multimeter draws negligible current and does not harm the charger when done correctly. Just ensure probes don’t short between terminals.
What if my charger reads 0 volts?
A zero reading usually means the charger isn’t producing output. Possible causes include blown fuses inside the unit, broken wiring, or failed internal components. Unplug immediately and do not reuse.
Do fast-charging adapters show different voltages?
Yes. Adapters supporting Quick Charge or USB-PD may output higher voltages (9V, 12V, etc.) only when negotiated with a compatible device. In idle mode, they default to 5V. To test higher modes, a load box or supported device must initiate handshake protocols.
Final Checklist Before You Begin
- ✅ Confirm multimeter battery is charged
- Weak batteries cause inaccurate readings.
- ✅ Inspect charger casing for cracks or burns
- Physical damage increases risk—do not test visibly compromised units.
- ✅ Verify probe condition
- Frayed wires or bent tips reduce reliability.
- ✅ Start with the highest DC voltage range
- Prevents overload if unexpected high voltage is present.
- ✅ Record results for future comparison
- Track changes over time to catch degradation early.
Conclusion: Take Control of Your Charging Safety
Understanding your charger’s actual output empowers you to protect your devices and optimize performance. Voltage measurement is a quick, low-cost practice that reveals hidden issues invisible to casual use. By applying this guide, you gain confidence in your tech ecosystem and reduce dependency on guesswork or manufacturer claims.


 浙公网安备
33010002000092号
浙公网安备
33010002000092号 浙B2-20120091-4
Comments
No comments yet. Why don't you start the discussion?