
Apple Pay has transformed the way millions of people make purchases—offering speed, convenience, and robust security. Whether you're buying groceries, grabbing coffee, or shopping online, Apple Pay allows you to leave your physical wallet at home. But before you can enjoy contactless payments, you need to set it up correctly on your iPhone or iPad. This guide walks you through every step of enabling Apple Pay, from device compatibility checks to adding your first card and making your initial transaction.
Check Device Compatibility and Requirements
Not all Apple devices support Apple Pay. Before beginning setup, verify that your device meets the necessary criteria. Apple Pay is available on a wide range of iPhones and iPads, but functionality varies depending on model and region.
| Device | Apple Pay Support | Required iOS/iPadOS Version |
|---|---|---|
| iPhone 6 and later | Yes (in-store, online, in-app) | iOS 8.1 or later |
| iPad Air 2 and later | Yes (online and in-app only) | iPadOS 13 or later |
| iPad mini 4 and later | Yes (online and in-app only) | iPadOS 13 or later |
| iPad Pro models | Yes (online and in-app only) | iPadOS 13 or later |
In addition to hardware, ensure your device is updated to the latest version of iOS or iPadOS. You’ll also need an iCloud account signed in with two-factor authentication enabled. Your bank or card issuer must support Apple Pay—most major U.S. and international institutions do, including Visa, Mastercard, American Express, and many regional banks.
Step-by-Step Setup on iPhone
Setting up Apple Pay on your iPhone is straightforward and typically takes less than five minutes. Follow these steps carefully to add your first card.
- Open the Wallet app – Located on your home screen, this is where you manage all your passes, tickets, and now, payment cards.
- Tap the \"+\" icon in the upper-right corner to begin adding a new card.
- Select the type of card – Choose from credit, debit, prepaid, or transit cards.
- Use your iPhone’s camera to scan the card details, or enter them manually.
- Review and agree to the card terms provided by your bank and Apple.
- Verify your card – Your bank may require verification via SMS, email, phone call, or within their mobile app.
- Wait for approval – Once verified, your card will be ready to use in minutes.
After setup, you can designate this card as your default for transactions. Simply press and hold the side button (or Touch ID) until the payment interface appears, then authenticate using Face ID, Touch ID, or passcode.
Adding Cards to Apple Pay on iPad
While iPads don’t support in-store contactless payments via NFC, they’re fully capable of handling online and in-app purchases through Apple Pay. The process mirrors that of the iPhone but is initiated through Settings rather than the Wallet app.
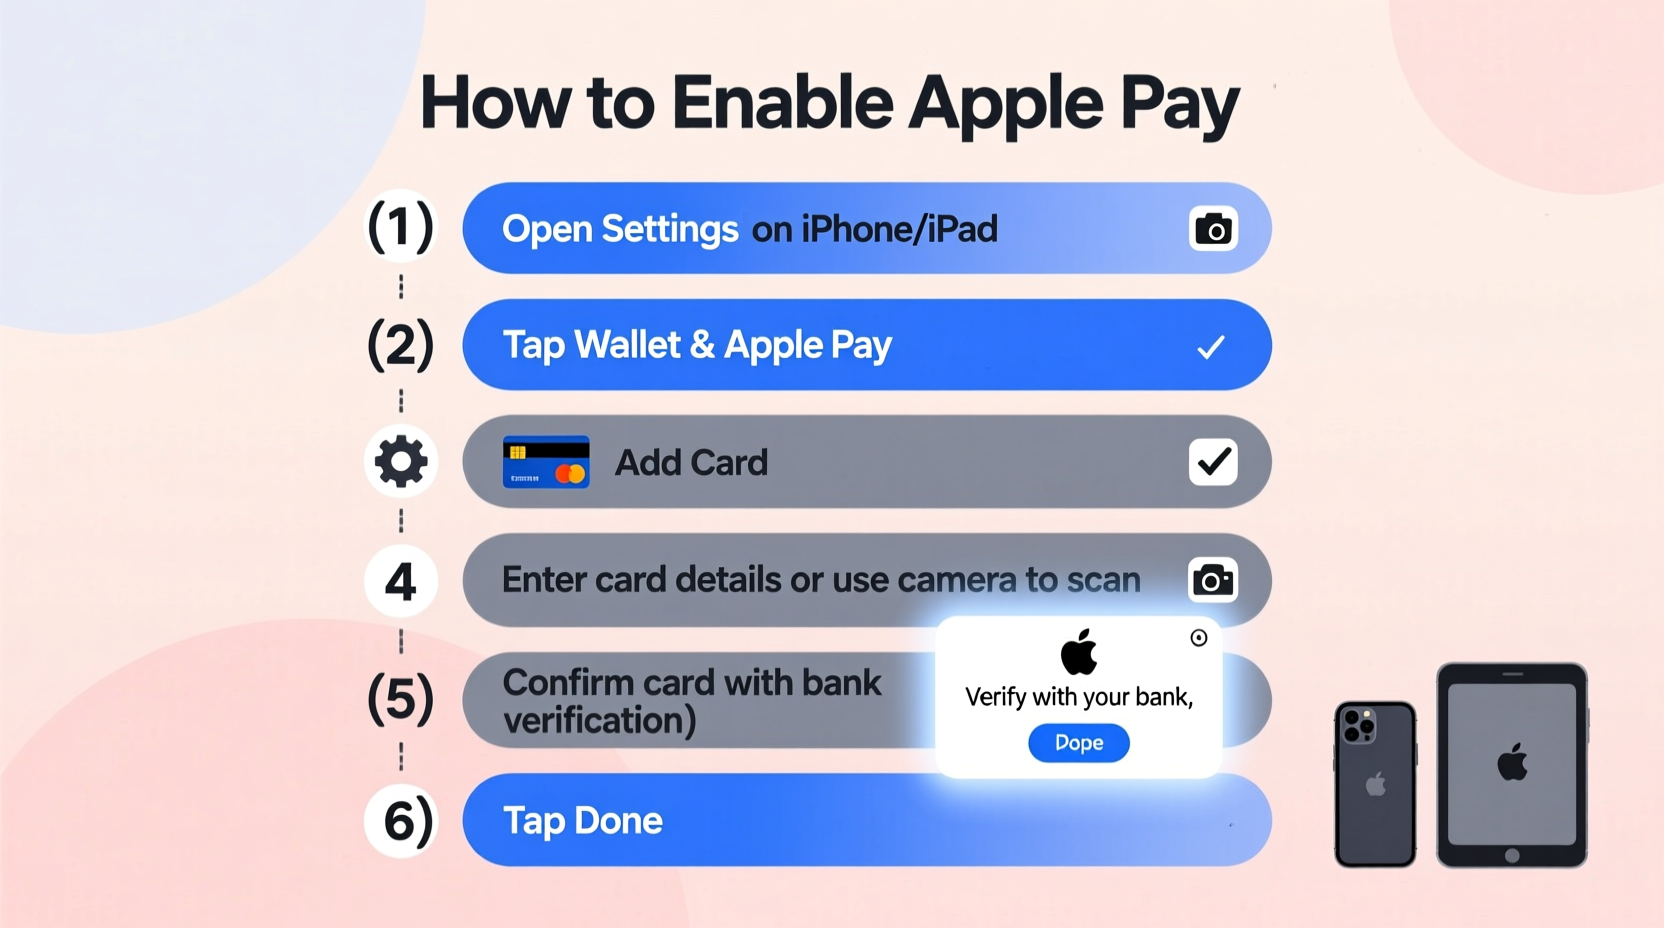
- Go to Settings > Wallet & Apple Pay.
- Tap Add Credit or Debit Card.
- Scan your card or input details manually.
- Agree to the terms and complete verification with your bank.
- Once approved, the card syncs across your Apple devices via iCloud.
You can now use Apple Pay within Safari, apps, and subscriptions on your iPad. When checking out, simply tap the Apple Pay button and authenticate with your passcode or biometric login if supported.
Tips for Secure and Smooth Usage
Apple Pay is designed with privacy and security at its core. Unlike traditional card transactions, your actual card number is never shared with merchants. Instead, a unique Device Account Number is assigned, encrypted, and securely stored in the Secure Element chip on your device.
- Enable Find My iPhone to remotely lock or erase your device if lost, protecting your payment information.
- Use strong passcodes and biometric authentication to prevent unauthorized access.
- Monitor transactions regularly through your bank’s app or statement history.
- Remove old cards from Wallet when no longer needed to reduce clutter and risk.
“Apple Pay reduces fraud exposure because each transaction uses dynamic encryption and tokenization. Even if intercepted, the data is useless.” — David Lin, Cybersecurity Analyst at TechShield Solutions
Common Issues and Troubleshooting
Despite its reliability, users occasionally face issues when setting up or using Apple Pay. Here are common problems and how to resolve them:
- “Card Not Eligible” Message: Confirm your card issuer supports Apple Pay. Contact customer service or visit their website for confirmation.
- Verification Fails: Ensure your phone number and email on file with your bank are current. Resend the verification request if needed.
- NFC Not Responding in Stores: Make sure you’re holding your iPhone near the contactless reader. For Face ID models, double-press the side button; for Touch ID, rest your finger on the sensor.
- Apple Pay Button Missing Online: Check that your browser supports Apple Pay (Safari on iOS/iPadOS) and that your card is selected as the default.
If problems persist, restart your device, update iOS or iPadOS, and re-add the card. In rare cases, contacting Apple Support directly may be necessary.
Real-World Example: Sarah’s First Apple Pay Experience
Sarah, a busy professional in Chicago, decided to try Apple Pay after seeing her colleague pay for lunch with just a glance at the register. She followed the setup steps on her iPhone 13, adding her Chase debit card. Within three minutes, she received confirmation that her card was active.
The next morning, she stopped at her favorite coffee shop. At checkout, the cashier said, “Apple Pay?” She held her phone near the terminal, authenticated with Face ID, and heard a soft chime confirming the payment. No fumbling for cash or swiping a card. “It felt like the future,” she later told a friend. “And I didn’t even realize how much time I save daily until I started using it.”
Frequently Asked Questions
Can I use Apple Pay without cellular service?
Yes. Apple Pay works offline for in-store transactions because payment data is stored locally in the Secure Element. However, you need internet access initially to add a card.
Is there a spending limit with Apple Pay?
No inherent limit exists, but individual terminals may impose contactless transaction caps (e.g., $100). For higher amounts, you might need to enter a PIN or use another payment method.
Can I use Apple Pay on my Apple Watch?
Absolutely. The Apple Watch supports Apple Pay independently. Set it up via the Watch app on your iPhone under \"Wallet & Apple Pay.\"
Final Checklist Before You Start Paying
- ✅ Device Compatibility Confirmed
- Ensure your iPhone or iPad supports Apple Pay.
- ✅ iOS/iPadOS Updated
- Run the latest software version for optimal performance.
- ✅ Bank Supports Apple Pay
- Verify with your financial institution.
- ✅ Two-Factor Authentication Enabled
- Required for iCloud and Apple ID security.
- ✅ First Card Successfully Added
- Verified and ready in the Wallet app.
Start Using Apple Pay Today
Enabling Apple Pay is one of the simplest upgrades you can make to your daily routine. It’s faster than pulling out a wallet, more secure than swiping a magnetic stripe, and increasingly accepted worldwide—from subway kiosks to luxury retailers. With your iPhone or iPad now configured, you’re ready to experience seamless, secure payments wherever you go. Take the next step: add your primary card today and make your first tap-to-pay purchase. You might wonder how you ever lived without it.


 浙公网安备
33010002000092号
浙公网安备
33010002000092号 浙B2-20120091-4
Comments
No comments yet. Why don't you start the discussion?