
Worn-out soles don’t mean the end of your favorite shoes. With the right approach, you can extend their life significantly by replacing the sole yourself. Far from being a task reserved for cobblers, sole replacement is achievable at home with basic tools, patience, and attention to detail. Whether it’s a pair of leather dress shoes, work boots, or casual loafers, restoring the sole preserves both function and appearance—often at a fraction of professional repair costs.
This guide walks through every phase of the process, from selecting materials to final finishing, ensuring durable, long-lasting results that mimic professional craftsmanship.
Why Replace Soles at Home?
Shoe repair shops often charge $50–$100 for sole replacement, depending on the style and material. Doing it yourself not only saves money but also allows control over material quality and fit. Many high-quality rubber or leather soles are available online, giving you options beyond what local shops may offer.
Beyond cost, there’s environmental value. Extending a shoe’s life reduces waste and supports sustainable consumption. As footwear production contributes significantly to textile pollution, repairing instead of discarding aligns with eco-conscious habits.
“Every well-maintained shoe represents less landfill waste and more thoughtful ownership.” — Daniel Reyes, Sustainable Footwear Advocate
Essential Tools and Materials Checklist
Before starting, gather all necessary supplies. Having everything ready prevents interruptions and ensures consistent workflow. Here’s what you’ll need:
- Utility knife or box cutter
- Screwdriver or flat chisel (for prying)
- Fine-grit sandpaper (120–220 grit)
- Cleaning cloth or rag
- Shoe adhesive (contact cement like Barge All-Purpose Cement or Aquaseal)
- Clamps or heavy books/weights
- New sole kit (pre-cut or raw sheet to customize)
- Masking tape
- Rubber gloves and workspace protection (newspaper or plastic sheet)
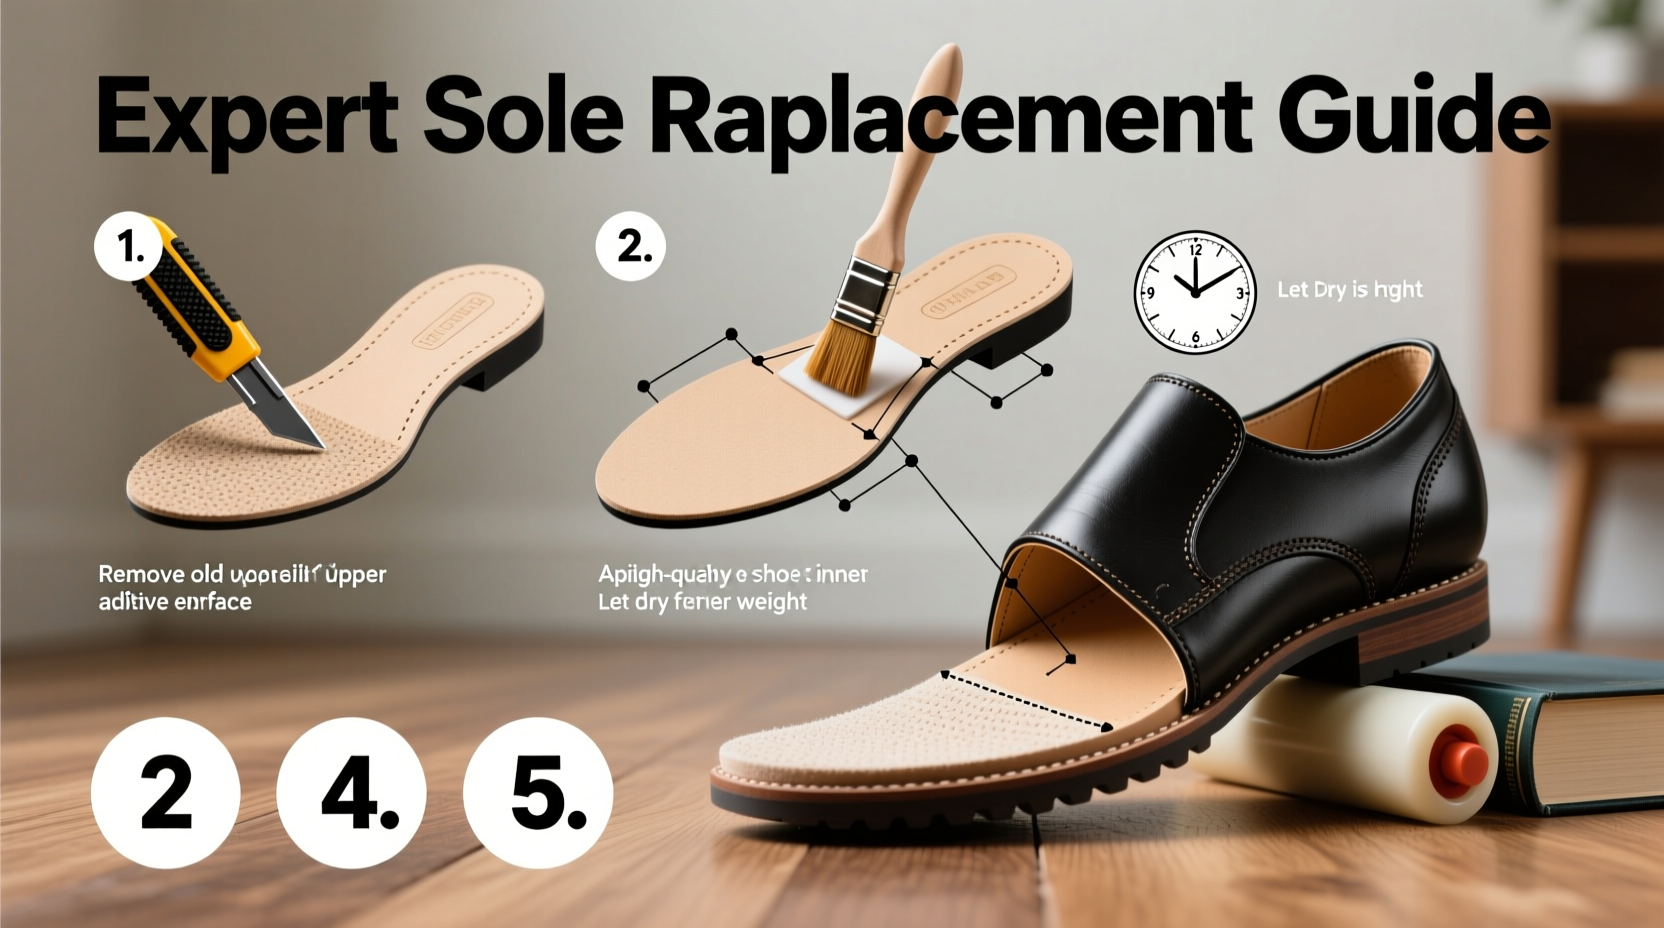
Step-by-Step Process: Replacing the Sole
- Remove the Old Sole
Use a screwdriver or flat tool to gently pry up the existing sole from the midfoot toward the heel and toe. Work slowly to avoid damaging the upper or midsole. If the sole was stitched, cut stitches carefully with a seam ripper or sharp blade. - Clean the Shoe Base Thoroughly
Once detached, clean any residual glue with acetone (test on a small area first) and wipe dry. Then, lightly sand the entire bonding surface to create texture for better adhesion. Dust off particles with a dry cloth. - Trace and Cut the New Sole
Place the shoe’s bottom on the new sole material and trace its outline with a pencil. Add about 1/8 inch beyond the edge if you plan to fold or bevel later. Cut precisely along the line using a sharp utility knife on a cutting mat. For curved areas like heels, make relief cuts to allow shaping. - Dry-Fit and Adjust
Position the new sole under the shoe without glue. Check alignment, especially at the arch and heel. Trim excess where needed. Tape the sole in place temporarily to simulate real positioning during gluing. - Apply Adhesive
Wear gloves and apply a thin, even layer of contact cement to both the shoe’s base and the top of the new sole. Let each side dry for 10–15 minutes until tacky. This drying time is crucial—rushing leads to weak bonds. - Bond the Sole
Carefully align the sole and press it onto the shoe. Start from the center and work outward to avoid air bubbles. Apply firm pressure across the entire surface, then clamp or place under heavy books for 24 hours. Avoid moving the shoe during this period. - Trim and Finish Edges
After curing, trim any overhang with a utility knife at a slight angle for a clean edge. Sand lightly for smoothness. Optionally, use a heat gun or hairdryer to slightly melt rubber edges for a factory-like seal (only on synthetic soles).
Material Comparison: Choosing the Right Sole
The type of sole you choose affects durability, comfort, and water resistance. Consider your shoe’s purpose when selecting.
| Material | Lifespan | Best For | Pros | Cons |
|---|---|---|---|---|
| Leather | 6–12 months | Dress shoes | Elegant look, breathable, molds to foot | Less slip-resistant, absorbs moisture |
| Crepe Rubber | 8–14 months | Casual shoes, vintage styles | Quiet, flexible, good grip | Wears faster on pavement |
| Vibram-style Rubber | 12–24+ months | Work boots, outdoor use | Extremely durable, water-resistant, excellent traction | Heavier, less formal |
| Synthetic Compounds | 10–18 months | All-purpose | Affordable, lightweight, customizable | May degrade in extreme heat |
Real Example: Restoring a Pair of Oxford Shoes
Mark, a teacher from Portland, had a favorite pair of brown oxford shoes with fully worn soles but pristine uppers. Instead of spending $85 at a cobbler, he ordered a pre-cut leather sole kit and Barge Cement online for under $25. Over a weekend, he followed the steps above—removing the old sole, prepping the surface, gluing, and clamping.
After 24 hours of curing, he trimmed the edges and buffed them with fine sandpaper. The result? A like-new appearance with improved comfort due to the fresh cushioning layer. Two years later, the soles still show minimal wear thanks to occasional conditioning and careful use.
Common Mistakes to Avoid
- Rushing the glue cure time: Applying pressure too soon breaks the bond. Always wait until the adhesive is fully tacky before joining surfaces.
- Using the wrong adhesive: Not all glues work on all materials. Contact cement is ideal for rubber and leather; cyanoacrylate (super glue) fails under stress and flex.
- Skipping surface prep: Smooth, greasy, or dusty surfaces prevent proper adhesion. Sanding and cleaning are non-negotiable.
- Over-trimming before bonding: Always leave extra material until after gluing. It's easier to remove than add back.
“The key to a lasting repair isn't just the product—it's patience. Let the materials do their job.” — Lena Patel, DIY Footwear Instructor
Frequently Asked Questions
Can I replace soles on shoes with glued-on construction?
Yes. Most modern shoes use cemented soles, which are actually easier to reattach at home. Just ensure old adhesive is fully removed and surfaces are properly prepped.
How long will a DIY sole replacement last?
With quality materials and correct technique, expect 6 months to 2 years depending on usage. Daily wear shortens lifespan; occasional or light use extends it.
Is it possible to resole sneakers?
It’s challenging but doable. Sneakers often have complex layered soles. Focus on replacing the outsole only, and use flexible adhesives like Aquaseal SR for elasticity.
Final Tips for Long-Term Success
Once your shoes are repaired, maintain them properly. Rotate footwear to reduce continuous strain on one pair. Condition leather soles monthly with neutral polish or wax to resist moisture. Store in a dry, ventilated area away from direct heat.
Inspect soles every few months. Address small separations early with spot-gluing before full detachment occurs. Prevention beats reconstruction.
Conclusion
Replacing a shoe sole at home is a rewarding skill that blends practicality, economy, and craftsmanship. With methodical preparation and the right materials, anyone can achieve results that rival professional repairs. Beyond saving money, you gain deeper appreciation for your belongings and contribute to a more sustainable lifestyle.


 浙公网安备
33010002000092号
浙公网安备
33010002000092号 浙B2-20120091-4
Comments
No comments yet. Why don't you start the discussion?