
Custom ribbon logos on dog collars are more than just decorative elements—they're powerful branding tools for pet businesses and heartfelt personal touches for individual pet owners. Whether you're launching a boutique collar line, promoting a rescue organization, or simply want your pup to wear a personalized accessory, printed ribbons offer durability, visibility, and charm. However, turning an idea into a professionally printed ribbon requires careful planning and execution. This guide walks you through every phase, from concept to collar attachment, ensuring a polished, lasting result.
1. Define Your Purpose and Audience
Before diving into design, clarify why you’re creating a custom ribbon logo. Are you building brand recognition for a pet product line? Celebrating a rescue nonprofit? Or crafting a one-of-a-kind gift? Your purpose shapes every decision—from colors and fonts to material and quantity.
Consider your audience. A playful, colorful design may appeal to young dog owners, while minimalist, elegant ribbons suit luxury brands. Rescue organizations often benefit from ribbons that include contact information or slogans like “Adopt, Don’t Shop.”
2. Design Your Logo for Ribbon Printing
Ribbon printing has technical constraints that differ from standard graphic design. Understanding these early prevents costly revisions later.
- Size limitations: Typical ribbon widths range from 3/8” to 1” (1–2.5 cm). Your design must be legible at this scale.
- Repeat patterns: Ribbons are printed in continuous lengths, so your logo will repeat along the strip. Ensure spacing between logos is consistent and visually balanced.
- Color limitations: While full-color digital printing exists, many ribbon printers use Pantone-matched screen printing, which limits you to 1–6 colors per run.
Design software like Adobe Illustrator or free tools such as Inkscape allow you to create vector-based artwork that scales cleanly. Set your canvas to the exact ribbon width and repeat length (commonly 1.5” to 3”). Use bold lines and high-contrast colors for readability.
“Clarity trumps complexity on small-format prints. If it doesn’t look sharp at thumbnail size, it won’t work on a collar.” — Jordan Lee, Textile Print Designer
3. Choose the Right Material and Printing Method
Not all ribbons are created equal. The material affects durability, texture, color vibrancy, and cost. Below is a comparison of common ribbon types used for dog collars:
| Material | Durability | Print Quality | Best For |
|---|---|---|---|
| Polyester Satin | High | Excellent (vibrant colors) | Commercial brands, outdoor use |
| Nylon Webbing | Very High | Good (slightly textured) | Active dogs, rugged collars |
| Cotton Grosgrain | Moderate | Fair (matte finish) | Eco-friendly brands, vintage styles |
| Recycled PET | High | Good | Sustainable brands, eco-conscious buyers |
As for printing methods:
- Woven Labels: Threads are interlaced to form the logo. Extremely durable but limited in color and detail.
- Screen Printing: Best for bold designs with few colors. Cost-effective for large orders.
- Digital Heat Transfer: Allows full-color, photo-quality prints. Ideal for small batches but less fade-resistant.
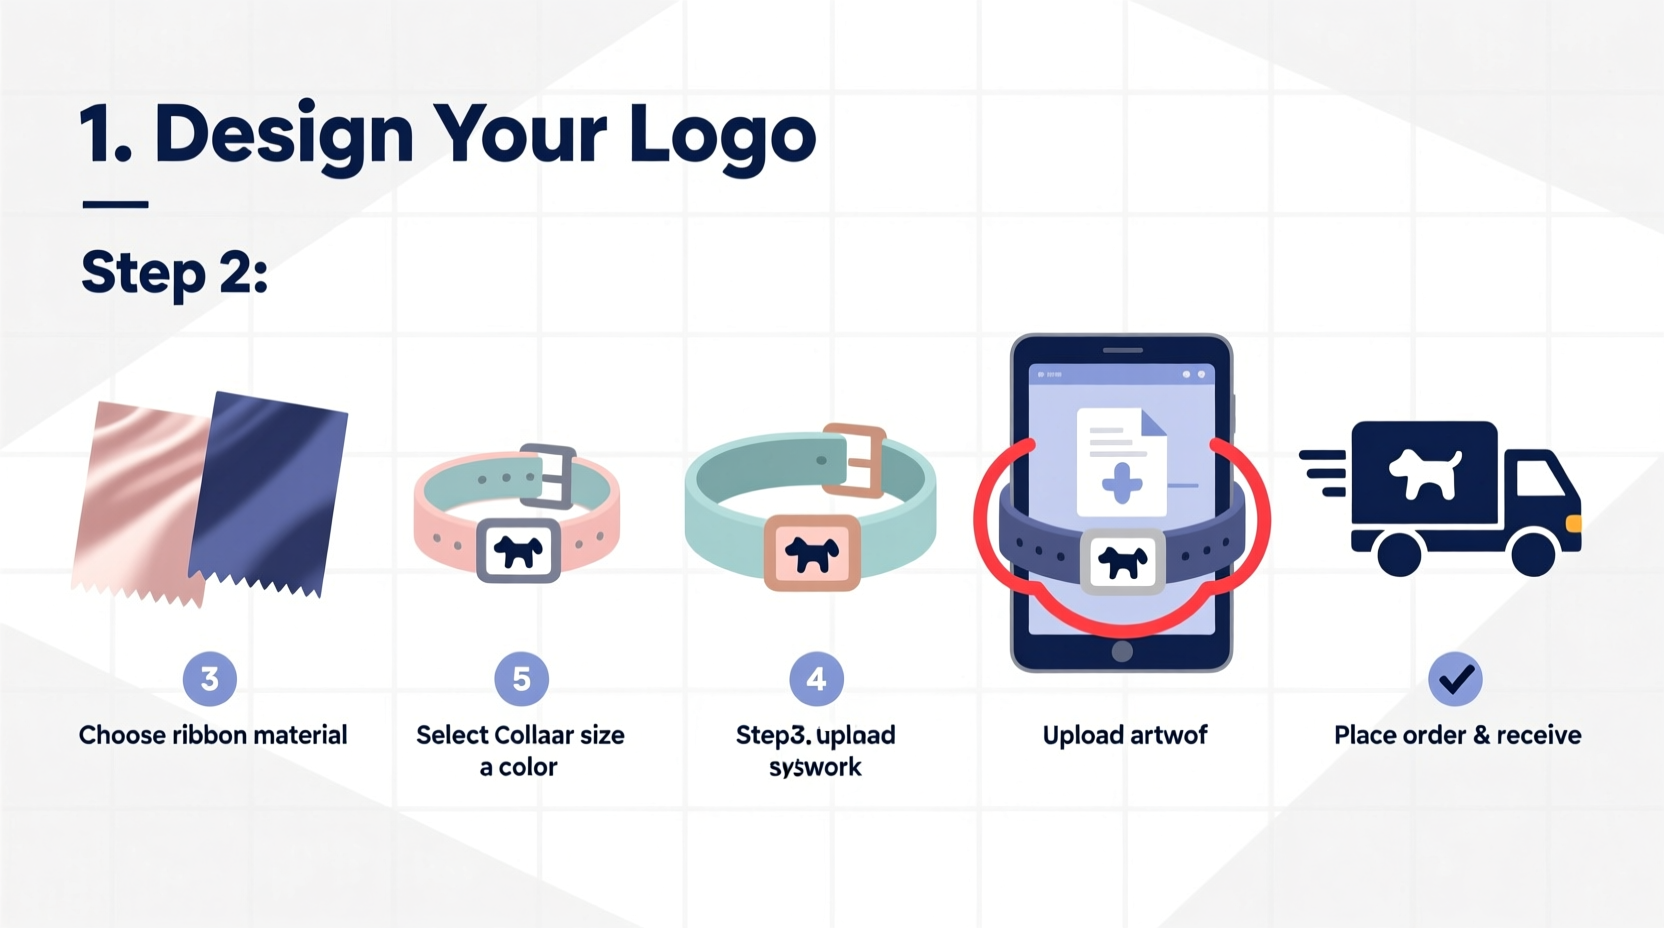
4. Step-by-Step Process: From Idea to Finished Ribbon
Follow this timeline to ensure a smooth production process:
- Week 1: Concept & Design
Create 2–3 logo variations optimized for narrow formats. Get feedback from potential users or clients. - Week 2: Select Supplier
Research ribbon manufacturers specializing in pet accessories or custom textile printing. Compare MOQs (Minimum Order Quantities), turnaround times, and sustainability practices. - Week 3: Submit Artwork & Approve Proof
Send vector files in CMYK or Pantone format. Review digital or physical proofs carefully—check alignment, color accuracy, and repeat spacing. - Week 4–5: Production & Shipping
Most printers take 10–15 business days for production plus shipping. Rush services may be available. - Week 6: Quality Check & Integration
Inspect received ribbons for flaws. Test wash resistance and UV fading if needed. Attach to collars using stitching or heat bonding.
Mini Case Study: Paws & Reflect Collars
Paws & Reflect, a startup based in Portland, wanted to launch a line of reflective collars for nighttime safety. They designed a subtle paw-print logo with their website URL woven into satin ribbon. After testing three suppliers, they chose a California-based printer offering low MOQs (100 yards) and eco-certified materials. By integrating the ribbon into a modular collar system, they reduced waste and allowed customers to swap designs. Within six months, branded collars accounted for 70% of their online sales—proof that thoughtful ribbon integration can drive both function and marketing.
5. Attach and Maintain Your Custom Ribbons
How you attach the ribbon impacts longevity and safety. Sewing is the most secure method—use heavy-duty thread and reinforce stress points near buckles. For DIY projects, fabric glue can work temporarily but isn’t recommended for daily wear.
Once attached, care matters. Hand-wash collars when possible, using mild detergent. Avoid bleach and direct sunlight during drying, as both can fade printed logos. Store unused ribbons in sealed containers away from humidity.
Checklist: Preparing for Ribbon Printing
- ☐ Finalize logo design in vector format (AI, EPS, SVG)
- ☐ Confirm ribbon width and repeat length
- ☐ Choose 1–6 primary colors (Pantone codes preferred)
- ☐ Research at least 3 reputable ribbon printers
- ☐ Request sample swatches and proofs
- ☐ Verify minimum order quantity and lead time
- ☐ Plan attachment method (sewing, gluing, slotting)
- ☐ Test durability with water and light exposure
Common Pitfalls to Avoid
- Overcomplicating the design: Tiny text or intricate details vanish on narrow ribbons.
- Ignoring material compatibility: Some inks don’t adhere well to recycled or silicone-coated fabrics.
- Skipping physical proofs: Digital previews can misrepresent color and texture.
- Underestimating MOQs: Some suppliers require 500+ yards, which may exceed startup budgets.
FAQ
What’s the smallest readable text size on a dog collar ribbon?
For a 3/8” wide ribbon, avoid text smaller than 8 pt in a bold sans-serif font. Even then, limit words to 3–5 characters (e.g., “PAWS” not “PawsAreAmazing”).
Can I print photos or gradients on ribbon?
Yes, but only with digital heat transfer or advanced inkjet methods. Traditional screen printing struggles with gradients and photo realism. Expect higher costs and lower wash-fastness.
How long do printed ribbons last on dog collars?
With quality materials and proper care, expect 1–2 years of daily use. Polyester and nylon ribbons resist fading better than cotton. UV-protective coatings can extend lifespan.
Final Thoughts
Custom ribbon logos transform simple dog collars into statements of identity, care, and professionalism. The process demands attention to detail—from scalable design and material selection to proofing and attachment—but the payoff is a durable, eye-catching product that stands out in a crowded pet market. Whether you're a solo crafter or a growing brand, investing in high-quality ribbon printing builds trust and recognition one walk at a time.


 浙公网安备
33010002000092号
浙公网安备
33010002000092号 浙B2-20120091-4
Comments
No comments yet. Why don't you start the discussion?