
Switching bands on your 49mm Apple Watch is more than just a style choice—it's a way to personalize your device, improve comfort during workouts, or adapt to formal occasions. While the process seems straightforward, improper installation can lead to misalignment, accidental damage, or an insecure fit that risks losing your watch. Getting it right ensures both safety and long-term wearability. This guide walks you through every stage of installing a new band with precision, offering expert-backed techniques and practical tips to achieve a seamless, secure attachment every time.
Understanding Your 49mm Apple Watch Band Mechanism
The 49mm Apple Watch—commonly found in the Ultra and Series 9 models—uses Apple’s proprietary quick-release spring bar system. Two spring-loaded connectors on the watch case engage with slots in the band, allowing for tool-free changes. These connectors are spring-tensioned, meaning they retract when pressed and expand to lock into place within the band lugs.
It’s crucial to recognize that not all bands are compatible with the 49mm size. While most third-party bands are designed specifically for this dimension, some older or generic models may have slightly misaligned lug holes, which can cause strain on the connectors. Always verify compatibility before attempting installation.
“Proper alignment and gentle pressure are key. Rushing the process is the most common cause of connector damage.” — Jordan Lee, Wearable Device Technician at TechWear Solutions
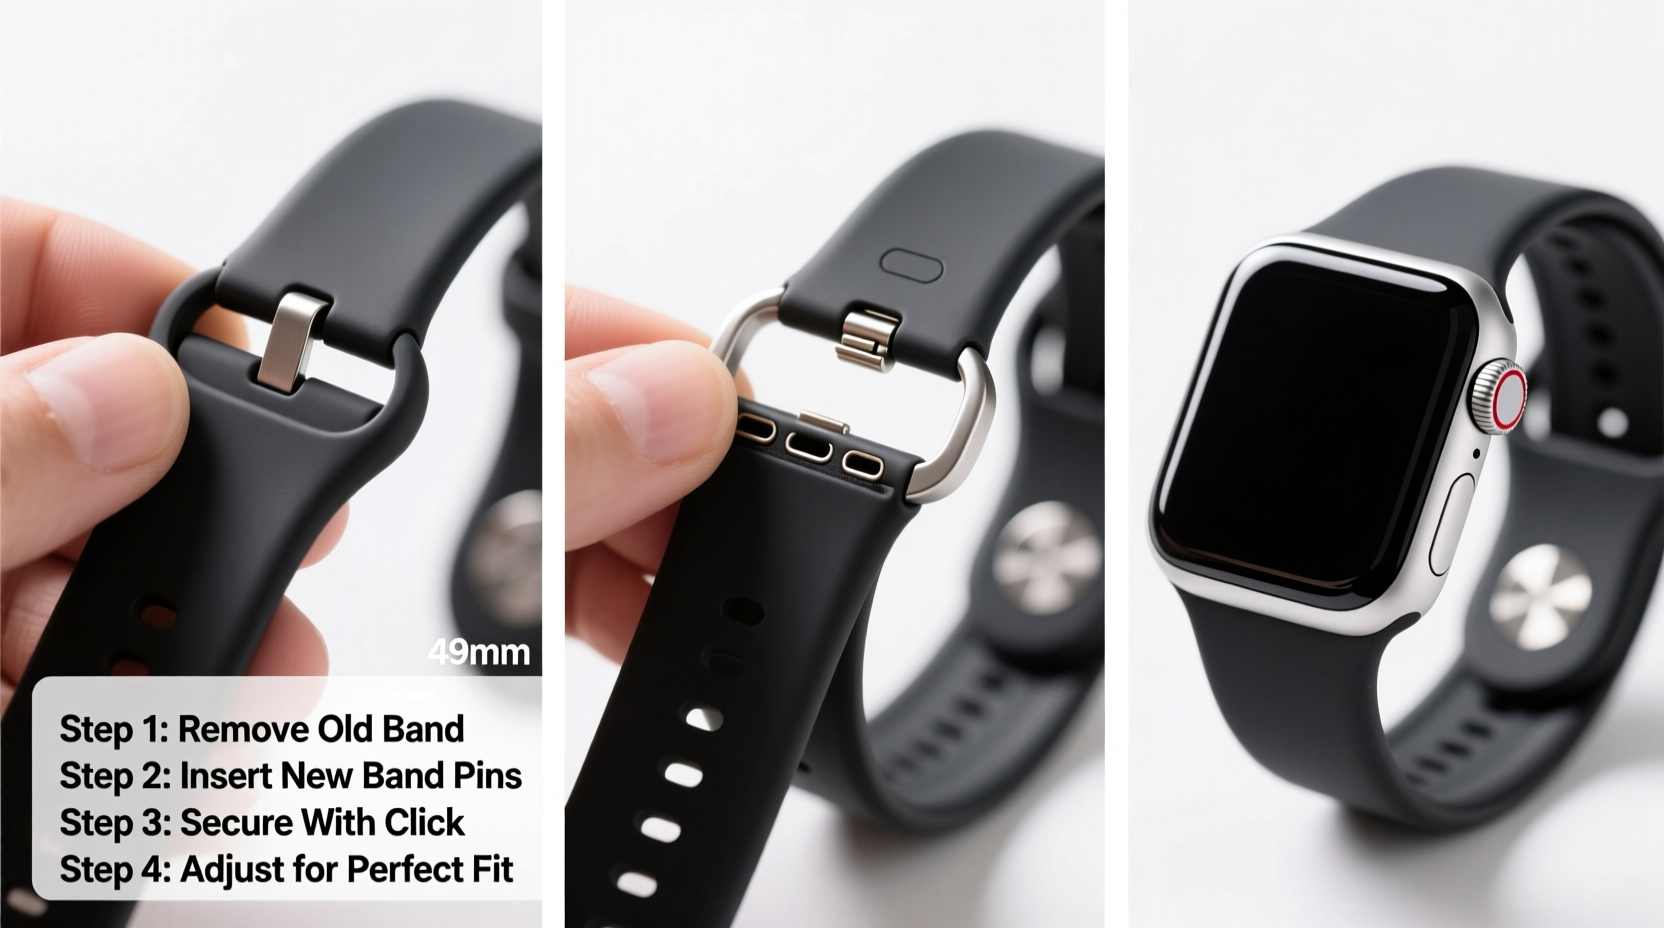
Step-by-Step Installation Process
Follow this precise sequence to install any compatible band on your 49mm Apple Watch safely and securely.
- Power down your watch (optional but recommended): While not required, turning off your Apple Watch prevents accidental screen activation during handling, reducing the risk of scratches.
- Remove the current band: Locate the release button near the watch case. It’s a small, recessed pin adjacent to the band attachment point. Press and hold it while gently sliding the band outward. Repeat on the opposite side.
- Inspect the connectors: After removal, examine the spring bars inside the watch case. They should extend slightly outward. If one appears retracted or stuck, do not force a new band on. Use a non-metallic tool like a plastic spudger to carefully nudge it out.
- Align the new band: Hold the new band so its lugs face the watch. Position one side first—align the slot in the band with the spring bar. You should feel a soft click as it seats into place.
- Attach the second side: With one side secured, tilt the free end of the band toward the opposite connector. Apply even, firm pressure until the spring bar clicks into the lug. You’ll hear and feel a distinct snap when properly seated.
- Test the connection: Gently tug on the band from multiple angles. There should be no lateral movement or looseness. The band must remain firmly attached without wobbling.
Do’s and Don’ts When Installing Apple Watch Bands
| Do’s | Don’ts |
|---|---|
| Use both hands for balanced pressure when attaching | Force the band if alignment feels off |
| Clean the connectors monthly with a dry microfiber cloth | Use metal tools to adjust spring bars |
| Verify band compatibility (e.g., 49mm/48mm vs. 45mm) | Install bands with visible cracks or worn lugs |
| Check fit after installation by wearing for 5 minutes | Leave the watch unattended post-installation without testing |
Real-World Example: Installing a Trail Loop Band for Outdoor Use
Consider Mark, an avid hiker who recently upgraded to the Apple Watch Ultra 2 (49mm). He wanted a rugged, breathable band suitable for multi-day treks. He purchased a nylon Trail Loop band designed for 49mm models. At first, he struggled to attach it, thinking the tight fit meant it wasn’t compatible. After reviewing the correct technique, he realized he wasn’t aligning the lug correctly with the top connector. By holding the band at a 30-degree angle and applying steady upward pressure, the band clicked securely into place. The snug fit prevented slippage during climbs, and the lightweight material stayed comfortable in humid conditions. His mistake was assuming force equaled progress; the solution was patience and proper alignment.
Tips for a Long-Lasting, Comfortable Fit
Once installed, the longevity of your band and the integrity of your watch depend on ongoing care and correct usage.
- Adjust the band regularly: Skin swelling due to heat or activity can change how tightly a band fits. Re-adjust during long wear sessions to avoid constriction.
- Avoid moisture buildup: Especially with silicone or nylon bands, remove the watch after sweating and let both skin and band air-dry to prevent irritation.
- Rotate bands weekly: Using multiple bands reduces wear on individual connectors and extends the life of each accessory.
- Store bands flat: Coiling or bending bands for long periods can deform the lugs, making future installations difficult.
Essential Checklist Before & After Installation
Use this checklist to ensure every installation is safe, secure, and optimized for comfort.
- ✅ Confirm the band is rated for 49mm Apple Watch models
- ✅ Power off or lock the screen to prevent accidental input
- ✅ Clean the watch case connectors with a dry, soft brush
- ✅ Align one lug first, then pivot the other into place
- ✅ Listen and feel for the double-click confirmation
- ✅ Test stability by gently pulling the band in different directions
- ✅ Wear for a few minutes to assess comfort and fit
- ✅ Store the old band properly if keeping it for later use
Frequently Asked Questions
Can I use a 45mm band on my 49mm Apple Watch?
No. While some users report partial fitting, 45mm bands are narrower and will not align properly with the 49mm lugs. Forcing a mismatched band can damage the spring mechanism or create an unstable connection that risks dropping your watch.
Why does my band keep coming loose?
This usually indicates incomplete engagement of the spring bar. Double-check that both sides are fully snapped in. If the issue persists, inspect the band lugs for deformation or the connectors for debris. A thorough cleaning often resolves minor fit issues.
Are third-party bands as reliable as Apple originals?
High-quality third-party bands from reputable brands (such as Nomad, Satechi, or STM) are engineered to meet Apple’s specifications and perform just as reliably. However, cheaper variants may use inferior plastics or imprecise molds. Always read reviews and check return policies before purchasing.
Final Thoughts: Confidence in Every Click
Installing a band on your 49mm Apple Watch shouldn’t be a moment of anxiety. With the right knowledge, you can switch bands confidently—whether going from a sleek Milanese loop for the office to a durable Alpine Loop for weekend adventures. Each successful installation enhances not only the look of your device but also its functionality and comfort. The key lies in attention to detail: verifying compatibility, aligning precisely, and listening for that satisfying click.


 浙公网安备
33010002000092号
浙公网安备
33010002000092号 浙B2-20120091-4
Comments
No comments yet. Why don't you start the discussion?