
The Apple Watch 10 represents the latest evolution in wearable technology—offering advanced health tracking, seamless connectivity, and refined design. One of the most personal aspects of the device is its strap, which affects both comfort and functionality. Whether you’re upgrading from an older model or customizing your look, properly installing and securing your Apple Watch 10 strap ensures a secure fit, prevents accidental loss, and enhances daily wearability.
While the process may seem straightforward, small oversights—like improper alignment or using incompatible straps—can lead to discomfort or even damage. This guide walks through each phase of installation with precision, offers security best practices, and includes expert-backed recommendations for long-term durability.
Understanding Apple Watch 10 Strap Compatibility
Before installation, confirm that your strap is compatible with the Apple Watch 10. Unlike earlier models, the Apple Watch 10 maintains backward compatibility with all previous modern bands, but sizing must match your case size precisely. The Apple Watch 10 comes in two primary sizes: 42mm and 46mm (exact dimensions may vary slightly based on regional naming). Using a mismatched strap can result in loose fitting or excessive tension on the connectors.
All Apple Watch bands use a standard quick-release mechanism, meaning third-party straps labeled as “Apple Watch compatible” should work—provided they specify support for Series 9 and newer models. However, quality varies significantly among aftermarket options.
“Using certified or high-quality straps not only ensures proper fit but also reduces wear on the watch’s internal lugs.” — David Lin, Wearable Device Engineer
Do’s and Don’ts When Choosing a Strap
| Action | Reason |
|---|---|
| ✅ Do verify strap size matches your Apple Watch 10 case | Prevents poor alignment and strain on attachment points |
| ✅ Do choose materials suited to your lifestyle (e.g., fluoroelastomer for workouts) | Enhances comfort and longevity |
| ❌ Don’t force a strap if it doesn’t click smoothly | May damage the spring bar mechanism inside the watch |
| ❌ Don’t reuse worn or deformed pins from old straps | Compromises structural integrity and safety |
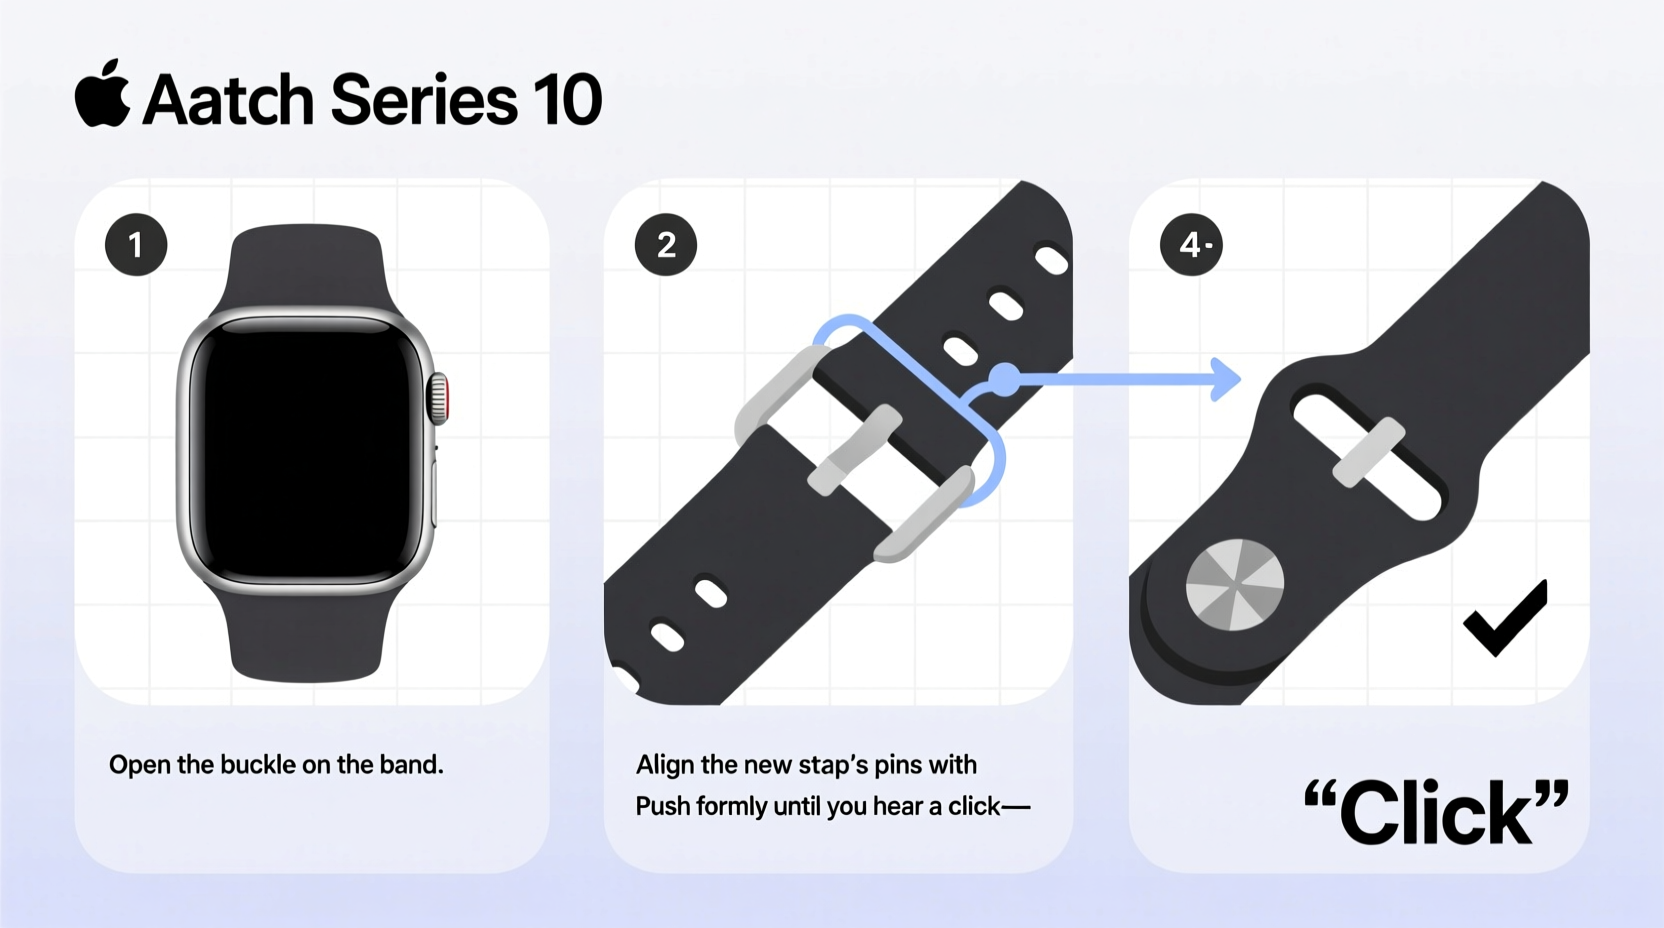
Step-by-Step Installation Process
Installing a new strap on your Apple Watch 10 requires no tools and takes less than a minute once you understand the mechanism. Follow this timeline for flawless setup:
- Power down your watch (optional): While not required, turning off the device minimizes accidental input during handling.
- Position the watch face-down: Place it gently on a soft, lint-free surface like a microfiber cloth to protect the display.
- Locate the release button on the current strap: On each side of the watch case, just above or below the band connection point, you’ll see a small circular button—this controls the spring bar.
- Press and hold the release button: Use your fingertip or a soft-tipped tool to depress the pin. Slide the old strap outward away from the case as you press.
- Repeat on the opposite side: Fully detach both ends of the existing band.
- Align the new strap’s connector: Ensure the metal end of the replacement band is oriented correctly—most have a smooth outer edge and a grooved inner side.
- Insert one side first: Slide one end into the slot until it clicks securely. You should feel resistance followed by a distinct snap.
- Attach the second side: Press the release button on the other side, insert the remaining connector, then release. Confirm both sides are flush and stable.
After installation, gently tug the strap in multiple directions to test stability. There should be minimal lateral movement. If the band feels loose or wobbly, remove and reinsert carefully, ensuring full engagement with the internal latch.
Securing the Strap for Daily Safety
Proper installation is only half the battle. To prevent slippage or detachment during activity, follow these post-installation steps:
- Adjust the clasp position: For bands with adjustable holes (like sport loops or classic buckles), ensure the fit allows one finger between the strap and your wrist. Too tight restricts circulation; too loose increases risk of snagging.
- Check symmetry: Both sides of the strap should sit evenly relative to the watch case. Asymmetry often indicates partial insertion.
- Test during motion: Shake your arm gently or simulate a workout motion to verify the strap stays locked.
- Inspect regularly: Examine the connection points weekly for signs of wear, especially if used in sweaty or aquatic environments.
Mini Case Study: Preventing a Near-Miss Incident
Sarah, a fitness instructor in Seattle, switched to a third-party nylon band after her original Sport Band frayed from daily use. During a spin class, she noticed the watch felt looser than usual. Mid-workout, the left connector disengaged completely, causing the watch to dangle by one side. Fortunately, she caught it before it fell. Upon inspection, she realized the aftermarket strap’s connector was slightly undersized, preventing full lock-in. She returned the band and replaced it with an Apple-certified Solo Loop, which has remained secure through six months of rigorous training sessions.
This incident highlights how minor dimensional differences—even within “compatible” products—can compromise safety.
Essential Checklist Before Wearing
Use this checklist every time you install or change your Apple Watch 10 strap to ensure optimal performance and safety:
- ✔️ Confirmed strap is designed for Apple Watch 10 (42mm or 46mm)
- ✔️ Watch case and strap connectors are clean and free of debris
- ✔️ Both release buttons were fully depressed during removal
- ✔️ New strap inserted straight and clicked into place on both sides
- ✔️ No visible gaps between strap and case housing
- ✔️ Strap adjusted to snug yet comfortable fit on wrist
- ✔️ Tested under mild stress (gentle pull/twist) without detachment
Frequently Asked Questions
Can I mix different types of straps (e.g., leather on one side, metal on the other)?
No. Apple Watch straps are designed as complete units. Mixing components from different styles or brands is not supported and can create imbalance, uneven pressure, or failure at the connection point.
How tight should my Apple Watch 10 strap be?
The ideal fit allows room for one finger between the strap and your skin. It should stay in place during movement but not leave marks or restrict blood flow. For optical sensor accuracy, especially during heart rate monitoring, ensure consistent skin contact without excessive pressure.
Is it safe to wear my Apple Watch 10 while sleeping with a fabric strap?
Yes, provided the strap is clean and fits securely. Fabric bands like the Nike Sport Loop or Solo Loop are breathable and suitable for overnight wear, particularly when tracking sleep patterns. Avoid wearing wet or damp straps for extended periods to prevent irritation.
Final Thoughts: Make Security a Habit
Your Apple Watch 10 is more than a timepiece—it’s a companion for health, communication, and productivity. A securely installed strap isn’t just about convenience; it’s a critical component of device safety and personal peace of mind. Taking a few extra seconds to verify fit and function can prevent costly accidents or data loss from a dropped watch.
Whether you prefer the sleekness of a Milanese Loop or the durability of a Sport Band, treat every strap change as an opportunity to reinforce good habits. Inspect, align, click, and test—make this routine second nature.


 浙公网安备
33010002000092号
浙公网安备
33010002000092号 浙B2-20120091-4
Comments
No comments yet. Why don't you start the discussion?