
Apple Watch owners know how crucial a secure, functional clasp is for daily comfort and safety. Whether you're jogging, commuting, or simply going about your day, a broken or loose clasp can compromise both wearability and peace of mind. While many assume this requires professional repair or a full band replacement, most issues stem from a worn or damaged clasp mechanism that can be replaced at home with minimal tools and effort.
Replacing a broken Apple Watch band clasp isn’t just cost-effective—it’s also faster than waiting for service appointments or new shipments. With the right approach, you can restore your band’s integrity in under 30 minutes. This guide walks you through every stage: identifying the issue, sourcing parts, disassembling the band, installing the new clasp, and testing for durability.
Understanding the Clasp Mechanism
Apple Watch bands use precision-engineered clasps designed for repeated opening and closing. The most common types include:
- Lug-style buckles – Found on leather and nylon bands, these resemble traditional watch straps.
- Folding clasps – Used on stainless steel and Milanese loops, offering a sleek, secure closure.
- Pin-and-tuck closures – Common on sport bands, where a pin secures into pre-drilled holes.
The clasp typically attaches via small metal lugs or spring bars connecting it to the band ends. Over time, stress from daily use, moisture exposure, or improper handling can weaken solder joints or bend components, leading to failure. Recognizing early signs—like resistance when fastening, visible wobbling, or spontaneous unlatching—can prevent total detachment and potential loss of your watch.
“Most clasp failures are mechanical, not structural. A well-executed replacement can extend a premium band’s life by years.” — Daniel Reeves, Wearable Device Technician
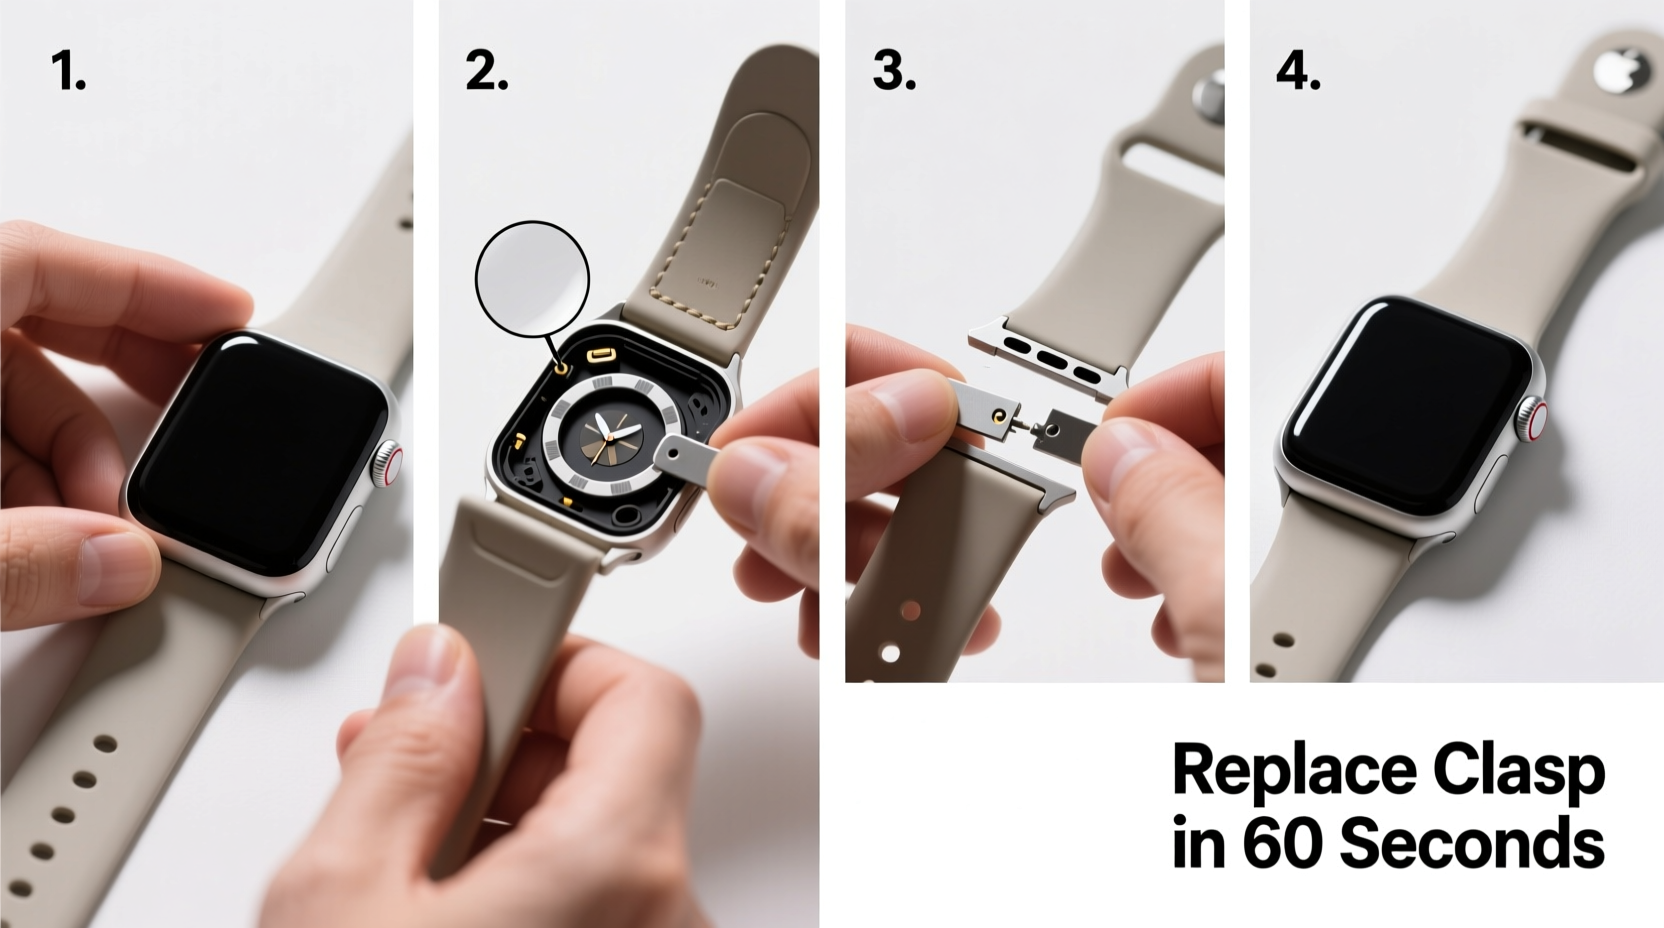
Step-by-Step Replacement Process
Follow this detailed sequence to replace a damaged clasp safely. This method applies to most two-piece bands (e.g., Sport Loop, Leather Link, Stainless Steel), excluding integrated single-piece designs like the Modern Buckle.
- Power down your Apple Watch
While not strictly necessary, turning off the device reduces risk during handling, especially if working near sensitive sensors. - Remove the band from your Apple Watch
Press the release button on the back of the current band near the watch case. Slide the band straight out. Repeat for both sides. - Inspect the clasp attachment points
Determine whether the clasp connects via spring bars (small metal pins) or fixed lugs. Spring bars require a removal tool; fixed lugs may be riveted or screwed. - Detach the old clasp
- For spring bar models: Use a spring bar removal tool to compress the bar and slide it out of the clasp and band lug.
- For riveted models: Carefully drill out the tiny rivets using a 0.8mm bit. Work slowly to avoid damaging surrounding material.
- Clean the band ends
Use a soft brush and isopropyl alcohol to remove debris or adhesive residue from the connection area. Let dry completely before proceeding. - Align the new clasp
Match the orientation of the original. Ensure the latch faces inward toward the wrist and operates smoothly before securing. - Attach the replacement clasp
- If using spring bars: Insert one end into the band lug, then compress and align with the clasp hole. Release gently.
- If riveting: Place alignment jig (if provided), insert new micro-rivets, and crimp securely with a hand press.
- Reattach the band to your Apple Watch
Slide the reassembled band into the watch case until it clicks. Confirm both sides lock firmly. - Test functionality
Open and close the clasp 10–15 times. Check for smooth action, proper tension, and no lateral movement.
Essential Tools and Materials Checklist
To complete the replacement efficiently, gather these items beforehand:
- Replacement clasp compatible with your Apple Watch band model
- Spring bar removal tool (for detachable models)
- Mini screwdriver set or precision drill (for riveted attachments)
- Micro-rivet kit and crimping tool (if applicable)
- Isopropyl alcohol and lint-free cloth
- Magnifying glass or head-mounted loupe
- Non-slip mat or tray to prevent losing small parts
Do’s and Don’ts: Avoiding Common Mistakes
| Do’s | Don’ts |
|---|---|
| Verify compatibility between replacement clasp and band model | Assume all stainless steel clasps are interchangeable |
| Work on a clean, well-lit surface | Rush the process—precision matters |
| Label left and right pieces during disassembly | Use excessive force when removing spring bars |
| Double-check clasp orientation before final attachment | Reuse worn spring bars or damaged rivets |
| Carry out a stress test post-installation | Wear the watch immediately after repair without verification |
Real-World Example: Repairing a Loose Stainless Steel Link Clasp
Sarah, a fitness instructor in Seattle, noticed her Apple Watch Series 8 frequently slipped off mid-class. Upon inspection, she found the folding clasp on her stainless steel band had developed play due to repeated flexing during workouts. Rather than ordering a $299 replacement band, she sourced a third-party OEM-grade clasp for $32.
Using a spring bar tool and online reference photos, she removed the old clasp in under 10 minutes. After aligning the new component correctly—ensuring the locking lever faced the inner curve of the wrist—she reinstalled it with fresh spring bars. The entire process took 22 minutes. Two months later, the band remains secure through high-impact sessions, proving that targeted repairs can preserve both function and investment.
Frequently Asked Questions
Can I replace an Apple Watch clasp without voiding my warranty?
Yes, as long as the repair doesn't involve modifications to the watch case or internal components. Apple’s warranty covers manufacturing defects but not accidental damage or wear items like clasps. Performing a band-level repair does not affect coverage for other parts.
Where can I find genuine or high-quality replacement clasps?
Look for suppliers with verified customer reviews and product specifications matching your band model. Reputable sources include iFixit, PowerMax, and authorized Apple parts resellers. Avoid generic listings labeled “fits Apple Watch” without exact model confirmation.
Is it worth repairing a premium band instead of buying a new one?
Absolutely. High-end bands like Milanese Loop or Leather Link often cost more than $150. If the band material is intact and only the clasp is faulty, replacement saves up to 80% compared to a new band. It’s also more sustainable, reducing electronic waste.
Final Thoughts and Next Steps
Replacing a broken Apple Watch band clasp is a practical skill that empowers users to maintain their devices independently. Beyond saving money, it fosters a deeper understanding of wearable design and encourages responsible ownership. With careful attention to detail and the right tools, even intricate mechanisms become manageable.
Don’t let a small hardware failure disrupt your routine or drain your wallet. Take control of your tech maintenance today—repair what you love, wear it longer, and enjoy the confidence of a perfectly secure fit.


 浙公网安备
33010002000092号
浙公网安备
33010002000092号 浙B2-20120091-4
Comments
No comments yet. Why don't you start the discussion?