
Preserving memories has never been easier than in the digital age. With Google Photos, you can securely store, organize, and instantly share your favorite moments across devices and with loved ones. Whether you're capturing a family vacation or documenting everyday life, knowing how to upload and share photos efficiently ensures your memories stay accessible and protected. This guide walks you through every stage—from initial setup to advanced sharing options—with practical steps that work on both mobile and desktop platforms.
1. Setting Up and Uploading Photos Automatically
The first step in using Google Photos effectively is ensuring your photos are backed up consistently. The app supports automatic backups across smartphones, tablets, and computers, which means your images are saved even if your device is lost or damaged.
To begin, install the Google Photos app from the App Store (iOS) or Google Play Store (Android). Sign in with your Google account. Once logged in, go to Settings > Backup & Sync. Toggle on “Backup & Sync” to activate automatic uploads.
You can choose between two storage options: High Quality (free, with slight compression) or Original Quality (uses Google Drive storage quota but preserves full resolution). For most users, High Quality offers excellent image fidelity while keeping storage free.
Photos already on your device will begin uploading immediately. New photos taken afterward are uploaded as soon as the device connects to Wi-Fi, unless you’ve enabled mobile data backup.
Manual Uploads for Specific Albums or Files
If you prefer selective control over what gets uploaded, manual uploads give you precision. Open the Google Photos app, tap the \"+\" icon, then select \"Import from device.\" Browse your phone’s gallery, pick specific images or videos, and confirm the upload. These files are added directly to your library without affecting existing albums.
On desktop, visit photos.google.com, click the “Upload” button in the top left, and drag and drop files or use the file browser. This method is ideal for transferring large batches of old photos stored on external drives or laptops.
2. Organizing Your Library for Easy Access
Google Photos uses AI to automatically group similar images—by people, pets, places, and events—but organizing manually improves retrieval speed and personalization.
Create albums for major events like weddings, birthdays, or trips. To do this, tap the \"+\" icon and select “Album.” Choose the photos you want included, add a title and optional description, then save. You can edit these albums anytime, adding or removing media.
Use labels and descriptions in album titles to make them searchable. For example, “Italy Trip – June 2024” is more useful than “Vacation 1.” You can also pin important albums to the top of your library for quick access.
| Organization Method | Best For | Tips |
|---|---|---|
| Auto-organized folders (e.g., Memories) | Reliving past moments | Customize frequency of memory notifications |
| User-created albums | Specific events or themes | Name clearly; update regularly |
| Favorites | Quick access to key images | Star important shots for easy filtering |
| People & Pets recognition | Grouping by individuals | Review and label faces for accuracy |
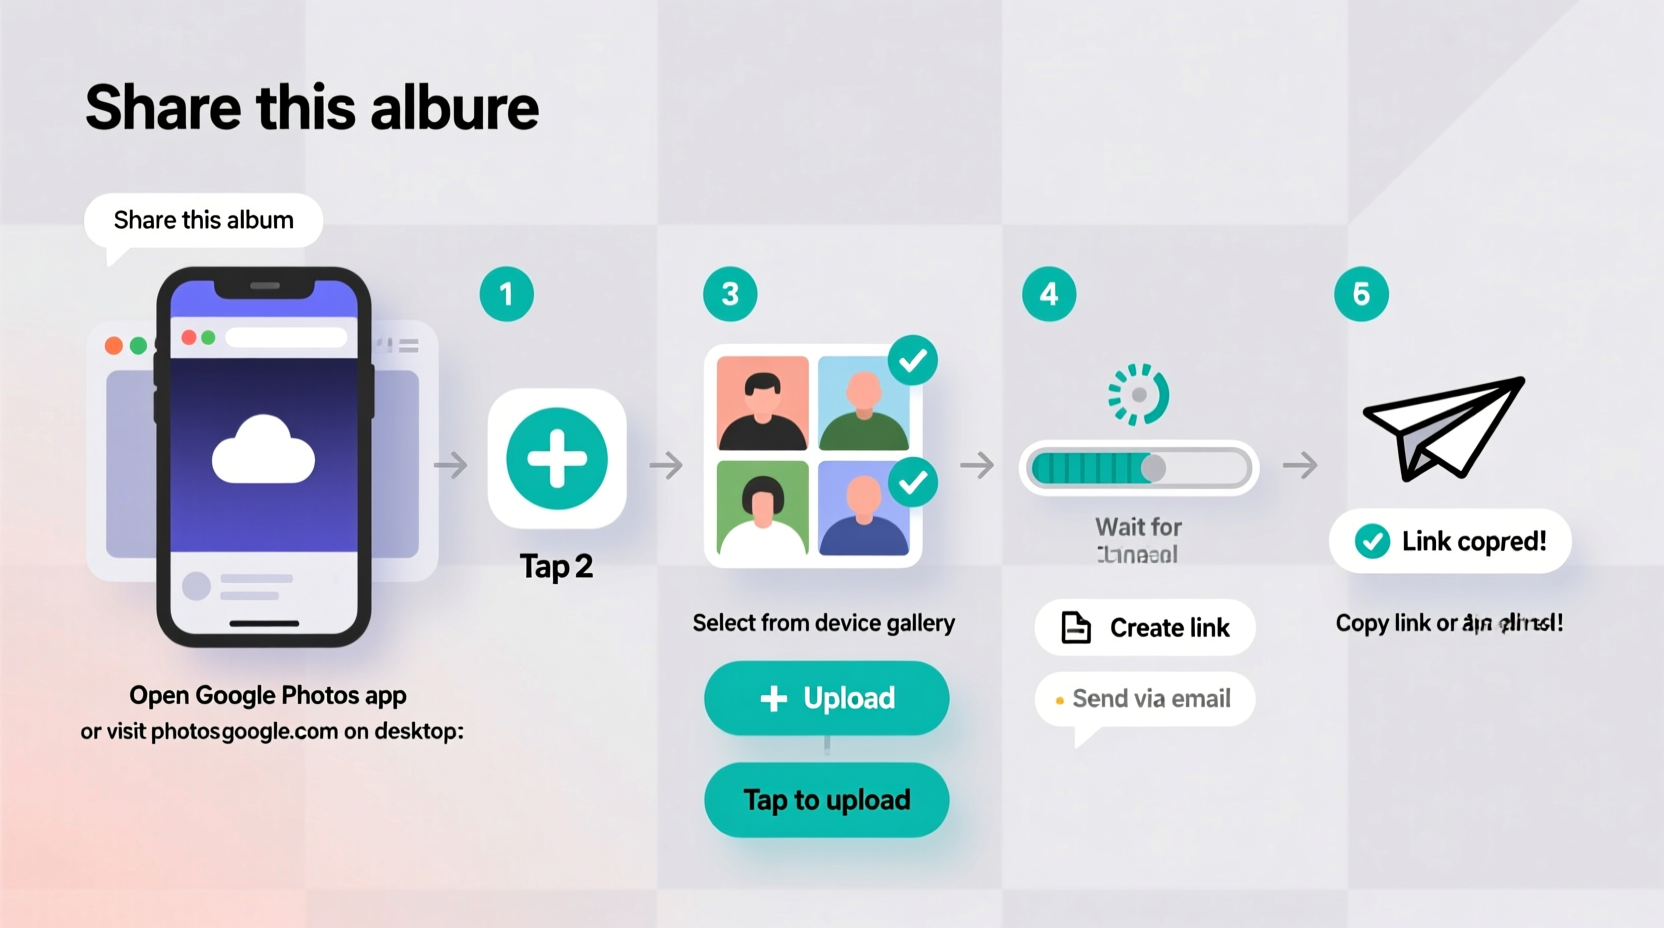
3. Sharing Photos and Albums with Others
Sharing is where Google Photos truly shines. You can send individual photos or entire albums to friends and family, allowing them to view, download, or even contribute their own images.
To share a single photo, open it, tap the share icon, and choose a contact or platform (like WhatsApp, email, or SMS). Alternatively, generate a shareable link by selecting “Copy link.” Anyone with the link can view the photo—even without a Google account—though you can set expiration dates and restrict editing rights.
For collaborative experiences, create a shared album. Tap “Create album,” add initial photos, then tap the “Add people” option. Invitees receive a notification and can upload their own photos directly into the album. This feature is perfect for group trips, family reunions, or school projects.
“Shared albums transform passive viewing into active participation—everyone becomes part of the story.” — Lena Park, Digital Archivist & UX Researcher
Controlling Privacy and Permissions
When sharing, always consider privacy. By default, shared links are view-only. However, you can allow contributors to add photos or disable downloads. Adjust these settings under the three-dot menu in any shared album.
You can also remove people from an album at any time or delete a shared link entirely. Regularly review who has access, especially for sensitive content such as baby photos or private gatherings.
4. Step-by-Step Guide: From Capture to Share
Follow this streamlined process to move seamlessly from taking a photo to sharing it with others:
- Capture the moment using your smartphone camera.
- Wait for auto-backup (ensure Backup & Sync is enabled).
- Open Google Photos and verify the photo appears in your library.
- Edit if needed using built-in tools like crop, brightness adjustment, or filters.
- Select the photo(s) and tap the share icon.
- Choose recipient via direct message or generate a link.
- Set permissions: decide whether viewers can download or add photos.
- Send or post the link via social media, messaging apps, or email.
5. Real Example: Sharing a Family Reunion Album
Sarah planned her family’s annual reunion and wanted everyone to have access to all the photos. She created a new album titled “Miller Family Reunion 2024” and uploaded her first batch of pictures after arriving home. Then, she tapped “Share,” entered the emails of 15 relatives, and invited them to contribute.
Over the next few days, uncles, cousins, and grandparents added their own snapshots—from candid kitchen moments to group portraits. Sarah reviewed submissions, removed duplicates, and pinned standout images. Two weeks later, she used Google Photos’ “Create Movie” feature to compile a highlight reel, which she shared on YouTube with a private link.
This collaborative approach ensured no single person bore the burden of collecting photos, and every family member felt involved in preserving the experience.
FAQ
How much storage does Google Photos offer for free?
As of 2024, Google provides 15 GB of free storage shared across Gmail, Drive, and Photos. If you use “High Quality” uploads, those count toward zero storage usage until June 2021 data. After that date, all uploads use your quota. “Original Quality” uploads always consume storage space.
Can I share photos with someone who doesn’t use Google Photos?
Yes. When you generate a shareable link, anyone with the URL can view the photo or album—even without a Google account. You can set the link to expire after a week or keep it active indefinitely.
Are my photos safe and private in Google Photos?
Your photos are encrypted in transit and at rest. Only you (and those you explicitly share with) can access your private library. Google does analyze image content for searchability and suggestions, but this processing occurs within strict privacy safeguards.
Conclusion
Uploading and sharing photos through Google Photos doesn’t need to be complicated. With automatic backups, smart organization, and flexible sharing tools, you can safeguard your memories and bring people together around them. Whether you’re sending a quick snapshot to a friend or building a lasting digital archive, mastering these features empowers you to focus less on logistics and more on living—and capturing—meaningful moments.


 浙公网安备
33010002000092号
浙公网安备
33010002000092号 浙B2-20120091-4
Comments
No comments yet. Why don't you start the discussion?