
When designing dynamic lighting displays—whether for home ambiance, stage effects, gaming setups, or architectural accents—the choice between addressable LED strips and standard RGB strips plays a decisive role in what’s visually possible. While both types deliver vibrant colors and energy-efficient illumination, their capabilities diverge sharply when it comes to creating custom light patterns. Understanding the technical differences, control mechanisms, and practical implications helps ensure you select the right technology for your project.
How Standard RGB LED Strips Work
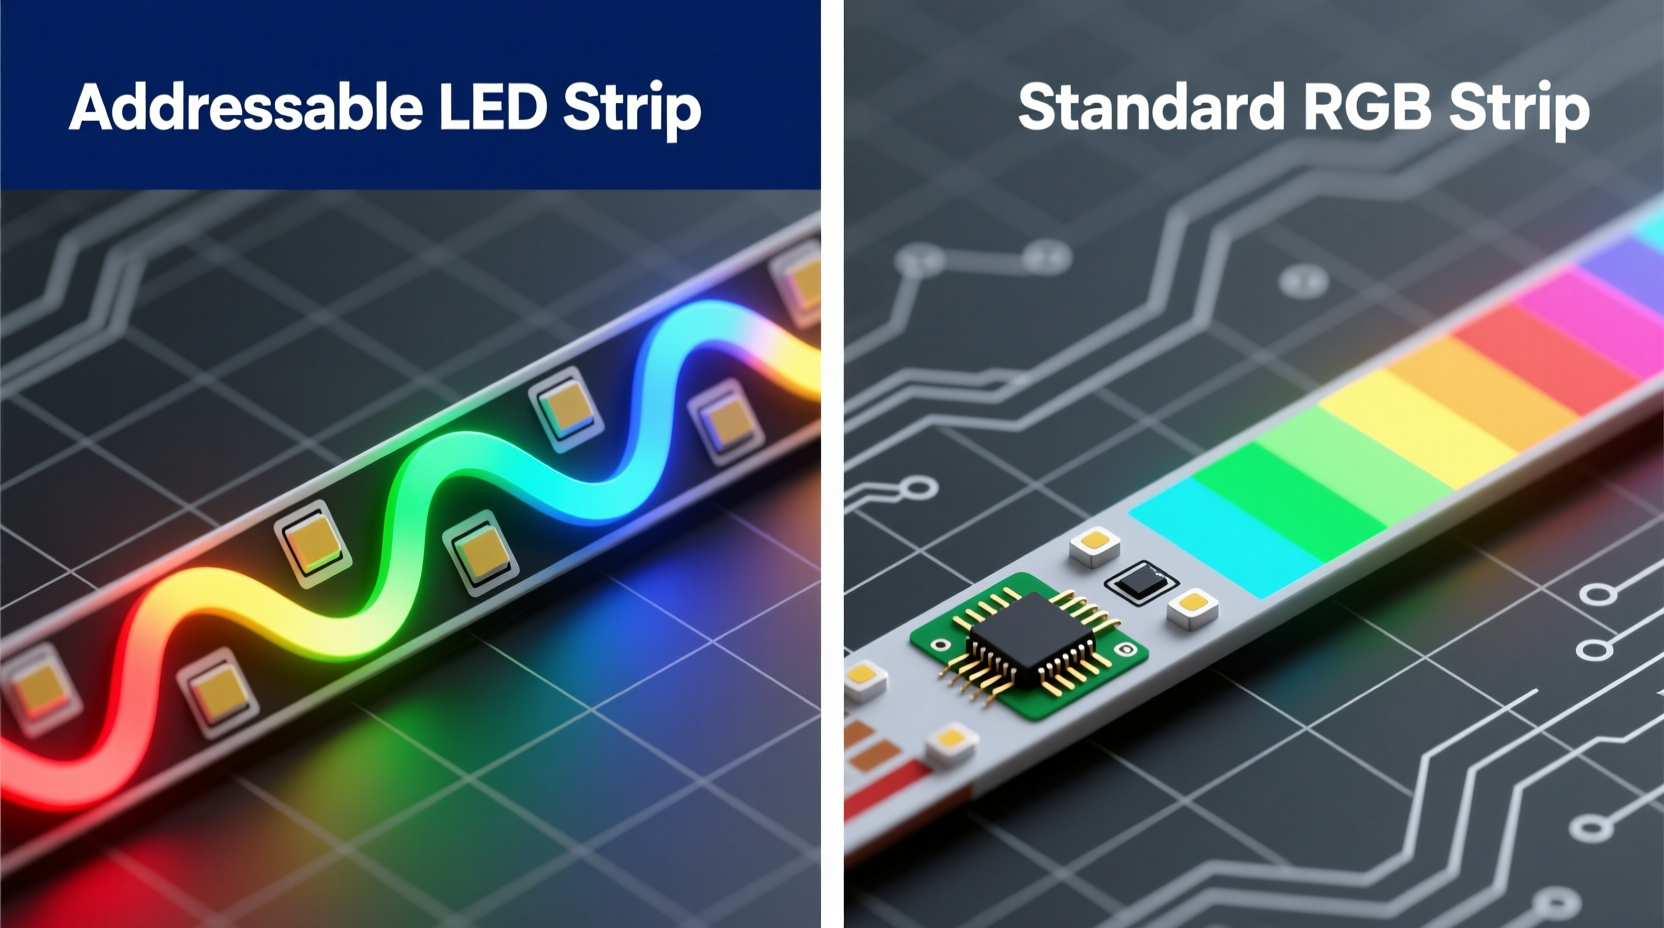
Standard RGB LED strips are built with groups of red, green, and blue LEDs wired in parallel across the length of the strip. These LEDs operate as a single unit: when a signal is sent, every segment lights up with the same color and brightness. Control is typically managed via a simple PWM (pulse-width modulation) driver that adjusts the intensity of each color channel to produce a blended output.
This setup is cost-effective and straightforward, making it ideal for ambient lighting where uniform color across the entire strip is acceptable. However, because all LEDs respond collectively, creating gradients, moving waves, or pixel-level animations isn’t feasible. You can fade from one color to another or pulse the entire strip, but fine-grained control ends there.
The Power of Addressable LED Strips
Addressable LED strips, such as those based on the WS2812B (commonly branded as NeoPixels), SK6812, or APA102 chips, assign a unique digital address to each LED—or sometimes every few LEDs—on the strip. This allows individual control over color and brightness using microcontrollers like Arduino, ESP32, or Raspberry Pi.
Instead of sending analog voltage levels, these strips use digital data protocols. A single data line transmits a sequence of commands specifying exactly what each LED should display. The first LED reads its instruction, then passes the remaining data down the line to the next, creating a daisy-chain effect. This enables complex behaviors: chasing dots, rainbow swirls, sound-reactive effects, and even text scrolling across the strip.
Because each LED functions as an independent pixel, addressable strips open the door to true programmable lighting. Whether you're syncing lights to music, animating logos, or simulating fire or water effects, the level of customization is unmatched by standard RGB solutions.
Key Differences in Performance and Flexibility
The core distinction lies in granularity of control. Below is a breakdown of how the two technologies compare across critical factors relevant to custom pattern creation.
| Feature | Standard RGB | Addressable LED |
|---|---|---|
| Individual LED Control | No – all LEDs change together | Yes – each LED can be uniquely programmed |
| Custom Patterns Possible? | Limited to solid colors, fades, flashes | Yes – gradients, chases, animations, text |
| Controller Complexity | Simple remote or basic dimmer | Requires microcontroller and coding |
| Cost per Meter | $5–$10 | $10–$25+ |
| Power Consumption | Lower (uniform control) | Higher (especially at full brightness) |
| Installation Difficulty | Beginner-friendly | Moderate to advanced |
| Best For | Ambient lighting, backlighting, simplicity | Dynamic displays, art installations, interactivity |
“With addressable LEDs, we moved from painting with broad brushes to drawing with a fine pen. Suddenly, lighting became a storytelling medium.” — Julian Reed, Interactive Lighting Designer
Real-World Example: Gaming Room Setup
Consider a gamer who wants to enhance their battle station with synchronized lighting. Using standard RGB strips, they could set a cool blue glow behind the monitor and match it with white under-desk lighting. It looks good, but static.
Now imagine upgrading to addressable strips. With a small Arduino board and free software like FastLED, the user programs the lights to react to in-game events: flashing red during combat, pulsing green when health is low, or displaying a wave animation when switching desktops. They even code a startup sequence that mimics a lightsaber ignition. The result isn’t just decorative—it’s immersive.
This transformation showcases why addressable LEDs dominate in environments where personalization and responsiveness matter. The initial learning curve pays off in long-term creative freedom.
Step-by-Step Guide to Implementing Custom Patterns
If you’re ready to explore what addressable LEDs can do, follow this practical workflow to create your first custom lighting pattern.
- Choose Your Strip Type: Select an addressable strip like WS2812B (5V) or SK6812 (5V or 12V). Consider density (e.g., 30, 60, or 144 LEDs per meter) based on desired smoothness.
- Select a Microcontroller: Use an ESP32 for Wi-Fi integration or Arduino Nano for standalone projects. Ensure it has sufficient GPIO pins and memory.
- Install Necessary Libraries: For Arduino IDE, install the FastLED or Adafruit NeoPixel library to simplify coding.
- Wire the Hardware: Connect the strip’s VCC and GND to a suitable power supply (never power long strips through USB). Link the data line to a designated pin on the controller.
- Write or Adapt Code: Start with a sample sketch like “RainbowCycle” or “CylonBounce.” Modify variables such as speed, color order, or direction.
- Upload and Test: Deploy the code and observe behavior. Debug timing issues or incorrect addressing.
- Expand Functionality: Add sensors (sound, motion) or connect to apps via MQTT for real-time updates.
When Standard RGB Might Still Be the Better Choice
Despite the advantages of addressable LEDs, standard RGB remains a smart option in certain scenarios. Projects requiring only basic color changes, large-scale installations on tight budgets, or users without programming experience benefit from plug-and-play simplicity.
For instance, a restaurant installing warm white accent lighting along ceiling beams doesn’t need animated sequences. Similarly, a renter looking to add temporary backlighting behind a TV may prefer a $15 RGB kit with a remote rather than investing time and money into coding and soldering.
Additionally, standard RGB strips often support higher current and longer runs without signal decay. Some high-density addressable strips require data amplifiers beyond 5 meters, adding complexity. In contrast, RGB strips can span longer distances with proper voltage injection, albeit still limited by voltage drop.
Expert Tips for Maximizing Custom Pattern Quality
- Use adequate power supplies: Undervoltage causes flickering and inconsistent colors. Calculate total wattage (LED count × 0.3W per LED) and oversize the supply by 20%.
- Implement proper grounding: Tie the ground of your power supply to the microcontroller to avoid communication glitches.
- Break long runs into segments: Drive multiple shorter strips from one controller to maintain signal integrity.
- Optimize code efficiency: Avoid delay() functions; use millis()-based timing so animations remain smooth and responsive.
- Diffuse the light: Use silicone diffuser tubes or 3D-printed channels to blend individual pixels into seamless gradients.
Frequently Asked Questions
Can I mix addressable and standard RGB strips in one project?
Yes, but they require separate controllers and power management. You’ll need to coordinate signals independently, which adds wiring complexity. It’s usually better to standardize unless specific zones demand different capabilities.
Do addressable LEDs consume more power than RGB?
Not inherently per LED, but because you can run more complex animations and brighter patterns simultaneously, overall consumption tends to be higher. A fully lit white WS2812B draws about 60mA, while a standard RGB LED might draw 20–30mA depending on color. Plan accordingly.
Is soldering required for addressable LED projects?
Most reliable installations involve soldering connections, especially for permanent setups. However, clip-on connectors exist for prototyping. Soldering reduces failure points and improves durability, particularly in vibration-prone areas like vehicles or moving stages.
Checklist: Choosing the Right Strip for Custom Patterns
- ☐ Define the purpose: Is animation or interaction needed?
- ☐ Assess technical comfort: Are you willing to learn basic coding?
- ☐ Measure installation length: Will signal degradation affect performance?
- ☐ Estimate budget: Include controller, power supply, and accessories.
- ☐ Determine environmental needs: Indoor/outdoor? Moisture exposure? Heat sources?
- ☐ Plan for future upgrades: Can the system expand later?
- ☐ Test a short segment before full deployment.
Conclusion: Why Addressable Wins for Custom Patterns
For anyone serious about crafting unique, evolving light designs, addressable LED strips are not just better—they’re essential. While standard RGB strips serve well in static, functional roles, they lack the precision and expressiveness required for modern visual experiences. From subtle breathing effects to full-motion graphics wrapped around furniture or walls, addressable LEDs transform light into a dynamic design element.
The investment in time and materials pays dividends in versatility. Once configured, these systems can be reprogrammed endlessly—no rewiring, no hardware swaps. A single strip can emulate neon signs, mimic natural phenomena, or become part of a smart home ecosystem.


 浙公网安备
33010002000092号
浙公网安备
33010002000092号 浙B2-20120091-4
Comments
No comments yet. Why don't you start the discussion?