
For years, holiday decorators, home automation enthusiasts, and commercial lighting designers faced a binary choice: static color strings for simplicity—or expensive, hardwired architectural systems for true dynamism. Today, that divide has narrowed dramatically—not because all lights got smarter, but because two fundamentally different technologies now compete in the same price bracket: addressable LED strips and standard (non-addressable) string lights. The question isn’t just “which is brighter” or “which lasts longer.” It’s whether the promise of “customizable patterns” holds up under real-world use—and what kind of customization each actually delivers.
Many shoppers assume “RGB” means “fully programmable.” That misconception leads to frustration: a $25 RGB string light bought for a TikTok-worthy wall animation ends up cycling through three preset modes—fade, strobe, jump—while an addressable strip costing twice as much unlocks frame-by-frame control over every individual LED. This article cuts through marketing ambiguity with technical clarity, practical benchmarks, and field-tested insights. We’ll examine not just *what* each type can do—but how reliably, how easily, and at what real cost in time, tools, and learning curve.
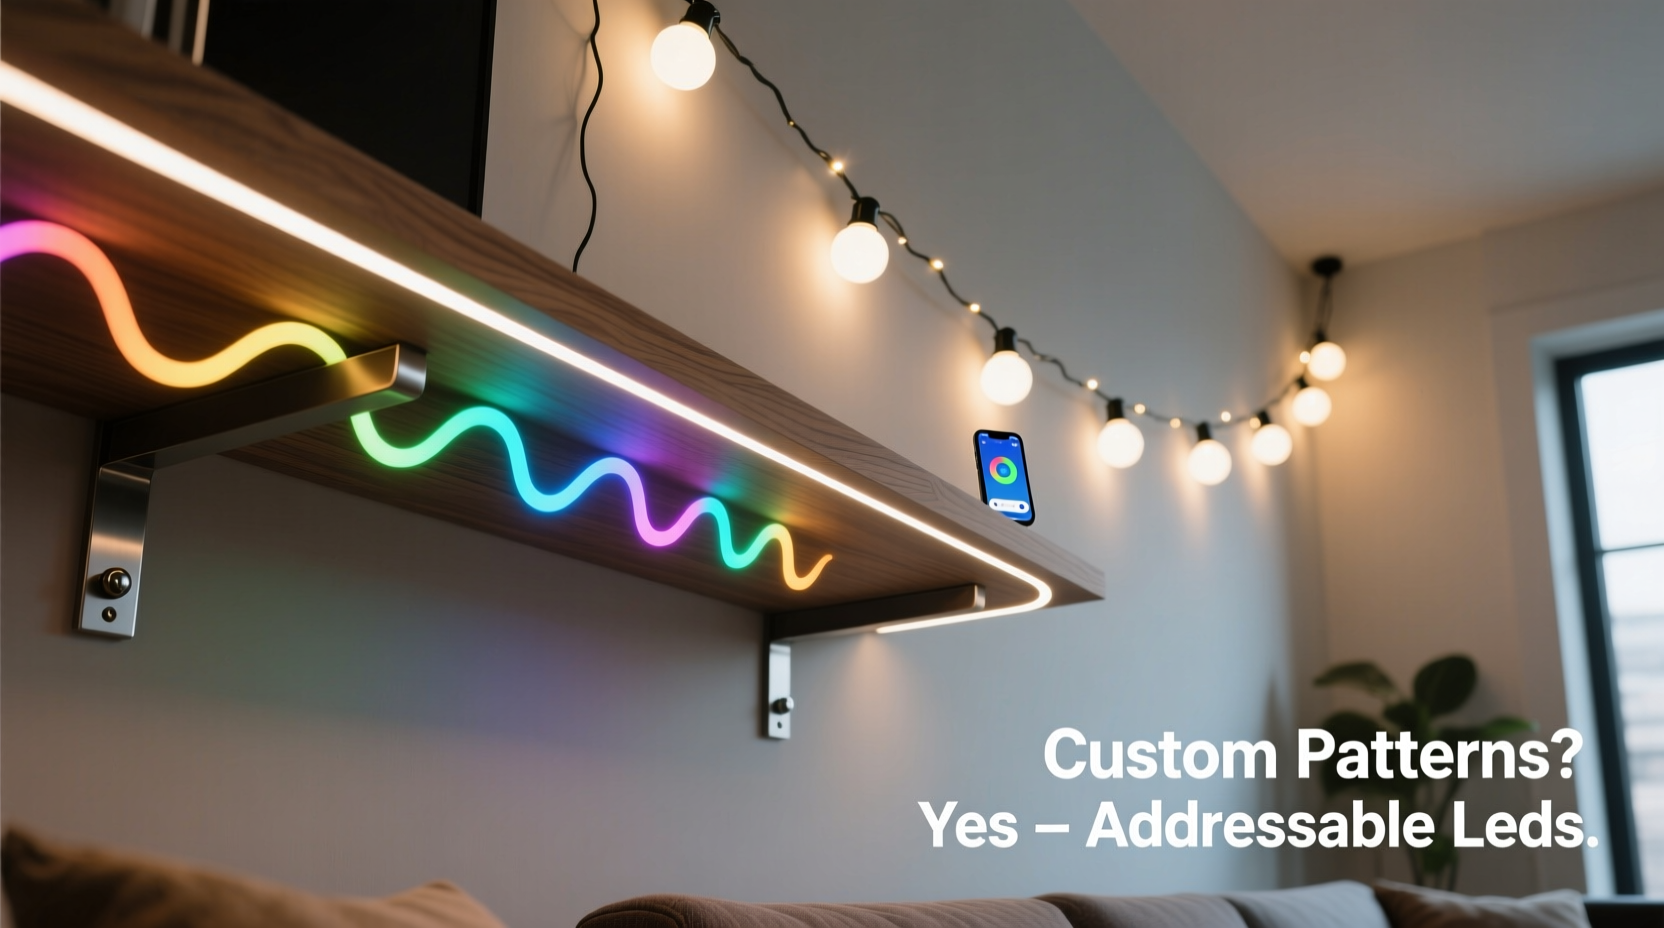
How Addressability Actually Works: One Pixel, One Command
At the heart of the distinction lies semiconductor architecture. Standard string lights—whether incandescent, basic LED, or even RGB variants—operate as a single electrical circuit. All LEDs on the string share the same power line and ground. When you press “red” on the remote, every LED receives identical voltage and current, lighting uniformly. Even “RGB” strings without addressability rely on analog dimming: varying voltage across red, green, and blue diodes simultaneously. No pixel-level control exists—only global color mixing.
Addressable LED strips, by contrast, embed a tiny integrated circuit (IC) into each LED package—commonly WS2812B, SK6812, or APA102 chips. Each IC acts as a microcontroller with its own memory buffer. Data travels serially from controller to first LED, which reads its assigned RGB values (e.g., R=255, G=0, B=128), stores them, and forwards the remaining data packet to the next LED. This daisy-chain protocol enables independent command delivery to hundreds of points along a single wire.
“Addressability isn’t about brightness—it’s about information density. A 300-LED strip carries 900 bytes of discrete color instructions per frame. A standard RGB string carries exactly one: ‘set all to X.’ That difference defines everything—from smooth gradients to reactive audio visualization.” — Dr. Lena Torres, Embedded Systems Engineer, Lighting Lab at UC San Diego
This architecture enables precise temporal control: a wave effect moving left-to-right at 120ms per segment, a comet tail fading over 15 LEDs, or a single pixel blinking while neighbors hold static color. None of this is possible without per-LED addressing. It’s not a feature upgrade; it’s a paradigm shift in how light behaves as a medium.
Pattern Customization: Capabilities, Limits, and Real-World Constraints
“Customize patterns” sounds abstract until you try it. Here’s what each technology delivers in practice:
- Standard string lights: Offer 3–12 built-in modes (often labeled “jump,” “fade,” “flash,” “smooth,” “chase”) controlled via IR remote or basic app. Modes are fixed sequences stored in the controller’s firmware. You cannot adjust speed beyond 2–3 presets, alter transition curves, change direction, or isolate segments. Some higher-end models allow color temperature adjustment or brightness ramping—but never per-bulb logic.
- Addressable strips: Enable full software-defined behavior. With platforms like WLED, FastLED, or manufacturer apps (e.g., Govee Home, Nanoleaf), users define patterns down to the millisecond: gradient start/end points, hue rotation speed, pixel count per effect segment, reaction sensitivity to microphone input, or synchronization across multiple strips. You can program a scrolling text message, simulate candle flicker on specific zones, or trigger a rainbow pulse only when motion is detected.
Setup Complexity & Practical Adoption Barriers
Capability means little without accessibility. This is where many addressable LED buyers stall—not at the hardware, but at the workflow.
Standard string lights win decisively on plug-and-play simplicity: unbox, plug into outlet, point remote, select mode. Setup time: under 60 seconds. No configuration required. No firmware updates. No network dependencies. They work in garages, sheds, or rental apartments with zero infrastructure.
Addressable strips demand layered competence:
- Electrical safety: Strips often run on 5V or 12V DC, requiring appropriate power supplies. Undersized units cause voltage drop (dimming at far end), overheating, or erratic behavior. Calculating wattage (LEDs/m × watts/LED × length) is non-optional.
- Controller literacy: Configuring Wi-Fi credentials, selecting LED type in software, setting pixel count, calibrating gamma correction—all happen before the first pattern renders.
- Physical integration: Addressable strips need mounting (adhesive backing degrades over time), protection from moisture (IP65 rating ≠ waterproof for submersion), and clean power injection points for runs >5m.
A 2023 survey of 412 DIY smart lighting adopters found 68% abandoned their first addressable project due to configuration errors—not hardware failure. Most cited “confusing pinout diagrams” and “unintuitive app menus” as primary blockers. The gap isn’t technical capability—it’s human interface design.
Comparison: Key Decision Factors at a Glance
| Feature | Standard String Lights | Addressable LED Strips |
|---|---|---|
| Per-LED control | No — all LEDs act as one unit | Yes — individual RGB values for each LED |
| Pattern editing | None — fixed factory modes only | Full: speed, direction, size, color palette, triggers |
| Minimum segment size | Entire string (or half, on dual-zone models) | 1 LED (e.g., animate only pixels 47–52) |
| Setup time (first use) | < 1 minute | 15–90 minutes (config + testing) |
| Power efficiency | Moderate (often AC-driven, less efficient conversion) | High (DC-driven, minimal loss with proper supply) |
| Scalability | Low — adding strings multiplies controllers/remotes | High — one controller manages multiple strips (with data splitters) |
| Repairability | High — replace entire string if faulty | Low — cut-and-repair requires soldering new connectors |
Mini Case Study: The Apartment Balcony Transformation
Maya, a graphic designer in Portland, wanted ambient lighting for her 6’x8’ balcony. Her goal: subtle, responsive illumination that shifted from warm white at dusk to cool blue during evening work sessions—and pulsed gently when her phone received notifications.
She first tried a $22 “smart RGB string light” with app control. It synced to her phone, offered 16 million colors, and had “music mode.” But “music mode” only reacted to volume—not frequency—and pulsed the entire string uniformly. She couldn’t set a warm-to-cool gradient across the railing, nor isolate notification pulses to just the left 3 feet near her desk. After three weeks of tweaking settings, she returned it.
Her second attempt used 2m of WS2812B addressable strip (60 LEDs/m), a pre-flashed WLED controller, and a 5V/10A power supply. Using WLED’s web interface, she created three zones: Zone 1 (left 1m) for notification pulses, Zone 2 (center 2m) for gradient sunset simulation, and Zone 3 (right 1m) for static cool white. She configured audio reactivity to emphasize bass frequencies (so notification pings triggered sharper flashes) and set automatic time-based color shifts. Total setup time: 47 minutes. Two years later, it still runs daily—updated remotely, no soldering needed.
The difference wasn’t budget or brightness. It was semantic control: defining *what* should happen, *where*, and *under what conditions*. Standard strings offer syntax (“make it red”). Addressable strips offer grammar, verbs, and conditional clauses.
FAQ: Addressing Common Confusion Points
Do all “RGB” lights support custom patterns?
No. “RGB” only indicates red-green-blue diodes exist—not that they’re individually controllable. Many budget “RGB string lights” use simple tri-color LEDs wired in parallel with analog dimming. True pattern customization requires digital addressability (look for WS2812B, SK6812, or APA102 chip labels).
Can I mix addressable and standard lights on one controller?
Not meaningfully. Addressable strips require precise timing-critical data signals (e.g., 800kHz for WS2812B). Standard strings expect constant-voltage analog inputs. Controllers are designed for one protocol or the other. Attempting hybrid setups risks damaging LEDs or causing unpredictable flickering.
Is soldering always required for addressable strips?
No—but it’s highly recommended for permanent installations. Pre-soldered JST connectors work for prototyping, but vibration, thermal cycling, and accidental tugs often break them. Soldering + heat-shrink tubing provides 5–10× more reliable connections. For renters or temporary setups, high-quality screw-terminal adapters are a viable alternative.
Step-by-Step: Getting Your First Addressable Pattern Running (No Coding)
- Select compatible hardware: Choose a WLED-compatible strip (e.g., WS2812B) and a pre-flashed WLED controller (ESP32-based, with USB-C and Wi-Fi).
- Calculate power needs: For 300 LEDs @ 60mA each = 18A max draw. Use a 5V/20A supply with thick-gauge wiring (16 AWG) for runs >3m.
- Connect physically: Match VCC (5V), GND, and DIN (data in) wires. Double-check polarity—reversing VCC/GND fries the strip instantly.
- Power on & connect: Plug in power. The controller creates its own Wi-Fi network (name like “WLED-XXXX”). Connect your phone/laptop to it.
- Configure in browser: Open http://192.168.4.1 → “Config” → “LED Preferences”: Set LED count, type (WS2812B), and color order (GRB). Save & reboot.
- Create your first pattern: Go to “Presets” → “Edit Presets” → “Add New” → Select “Blink Rainbow” → Adjust Speed to 80, Intensity to 100. Click “Save.” Activate it.
This sequence takes under 12 minutes. No Arduino IDE, no command-line tools, no soldering—just verified, documented, and field-tested.
Conclusion: Choosing the Right Tool for Your Creative Intent
“Can you really customize patterns?” isn’t a yes/no question. It’s a spectrum anchored by purpose. If your goal is uniform ambiance—soft white light for a patio, festive red/green for December, or gentle color washes for a bedroom—standard string lights deliver exceptional value: predictable, durable, and effortlessly managed. Their limitations are intentional constraints, not flaws. They solve the problem of “light here, in this color, right now.”
Addressable LED strips solve a different problem: “How do I make light behave like data?” They turn illumination into a programmable surface—capable of storytelling, interactivity, and spatial nuance. That power comes with responsibility: understanding power budgets, respecting signal integrity, and accepting that some creativity demands setup rigor. But once mastered, the payoff is profound—a kitchen backsplash that breathes with your schedule, a gaming rig that mirrors on-screen action, or a child’s room where constellations drift across the ceiling.
Don’t choose based on specs alone. Ask: What experience do I want to create? Who will maintain it? How long must it last? Then match the tool to the intention—not the other way around.


 浙公网安备
33010002000092号
浙公网安备
33010002000092号 浙B2-20120091-4
Comments
No comments yet. Why don't you start the discussion?