
Choosing the right lights to outline windows for Christmas isn’t just about aesthetics—it’s about safety, longevity, weather resistance, and how effortlessly they’ll stay in place through wind, rain, and temperature swings. While both rope lights and string lights are widely marketed for this purpose, their underlying construction, optical behavior, and installation realities create meaningful differences that most shoppers overlook until after the ladder is put away and the first bulb flickers out. This isn’t a matter of preference alone; it’s an engineering decision with measurable consequences for visibility, maintenance, and seasonal reliability.
How They’re Built: Core Differences That Matter
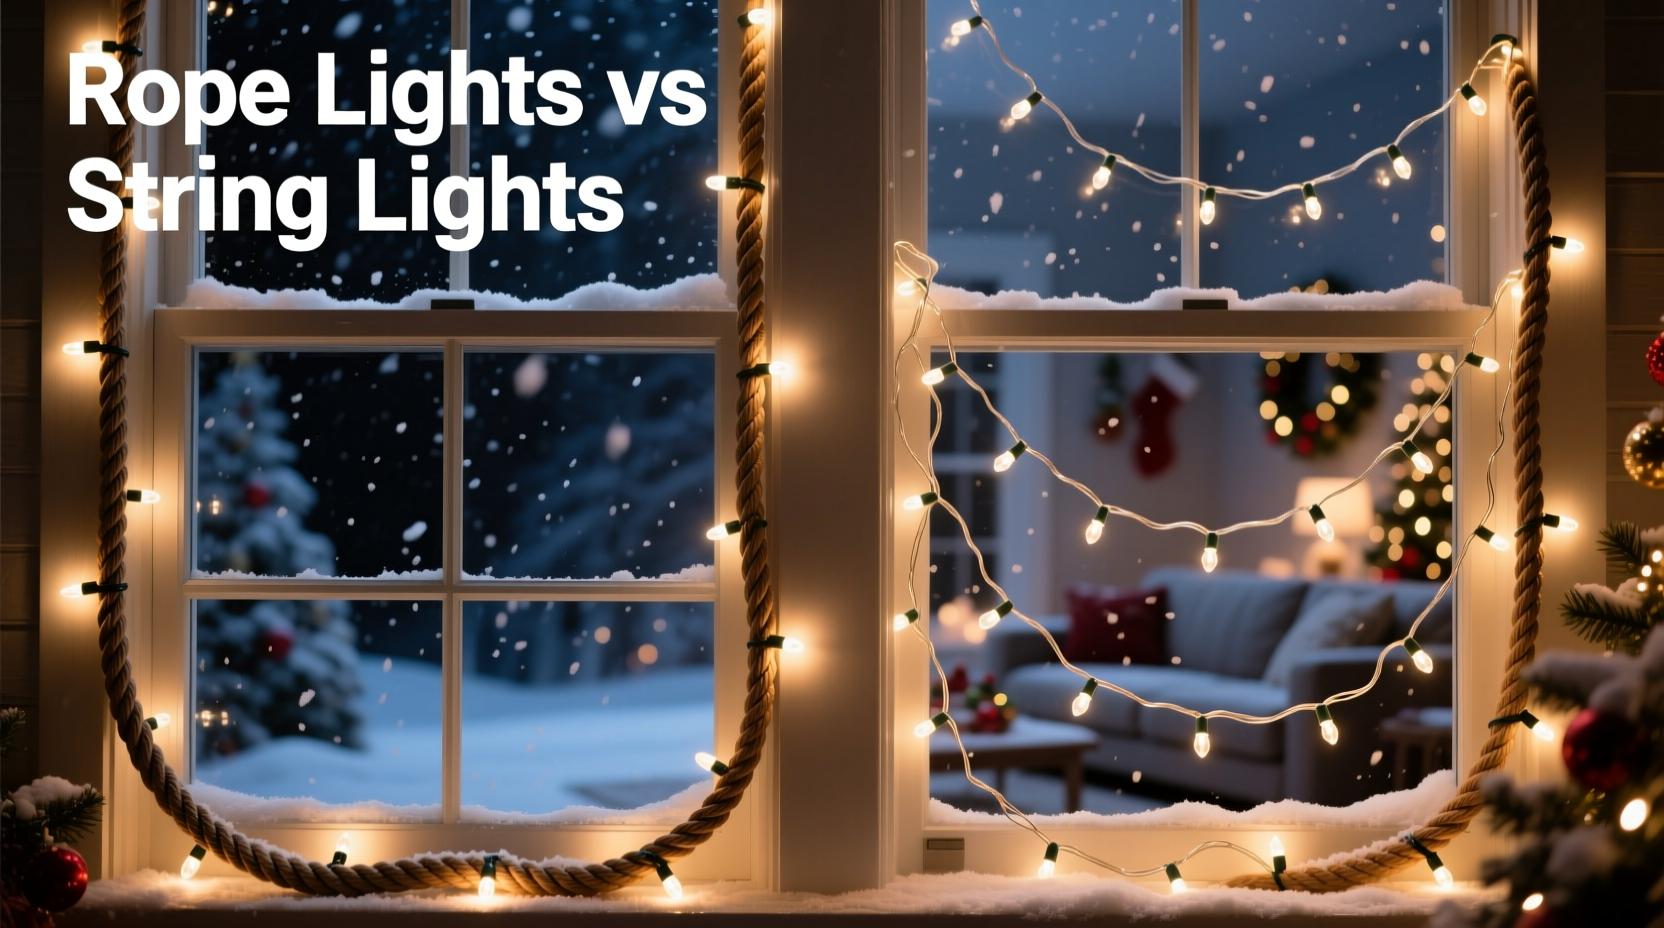
Rope lights consist of LED or incandescent bulbs sealed inside a flexible, translucent PVC or silicone tube—typically ⅜” to ½” in diameter—with built-in wiring, diffusers, and often UV inhibitors. The entire assembly functions as a single, continuous luminous line. String lights, by contrast, are discrete bulbs (C7, C9, mini LEDs, or net-style) spaced along insulated copper wire, with each socket independently wired or connected in series/parallel configurations.
This structural distinction drives nearly every practical difference. Rope lights offer inherent protection: the tube shields internal components from moisture, dust, insects, and physical abrasion. String lights expose sockets, wires, and bulb bases—vulnerable points where corrosion, loose connections, and water ingress commonly begin. In cold climates, condensation inside exposed string light sockets can freeze overnight, leading to microfractures in plastic housings or solder joint failures when temperatures rise.
Manufacturers design rope lights for architectural applications—including window perimeters—while most string lights are engineered for general decorative use: draping, wrapping, or hanging. That subtle shift in intent translates into different IP ratings, bending radii, and mounting tolerances.
Installation & Adhesion: What Works on Real Windows
Window outlining demands precision alignment, clean sightlines, and secure attachment without damaging trim, paint, or siding. Here, rope lights hold a clear advantage—not because they’re inherently “easier,” but because their uniform cross-section and rigidity allow predictable, repeatable mounting.
Rope lights typically feature integrated mounting channels, adhesive backing (often 3M VHB tape rated for -40°F to 176°F), or compatible clips designed for straight-edge application. Their stiffness helps them maintain contact with window frames—even slightly uneven ones—without sagging or lifting at corners. String lights, especially those with larger bulbs like C9s, require careful spacing and frequent fastening. Mini-light strings stretch, droop, and shift with wind; their thin wire lacks lateral stability, causing gaps near mullions or inconsistent spacing above sashes.
A common mistake is assuming “more bulbs = better outline.” But clustered mini-lights create visual noise, while evenly diffused rope light produces a crisp, professional-grade perimeter glow—especially critical for homes with narrow or multi-pane windows where clarity matters more than density.
Performance Comparison: Light Quality, Efficiency, and Lifespan
A side-by-side comparison reveals why professionals increasingly specify rope lights for architectural outlining:
| Feature | Rope Lights | String Lights |
|---|---|---|
| Light Uniformity | Continuous, even diffusion; no visible hotspots or dark gaps | Discrete points of light; spacing creates rhythmic shadows, especially on reflective glass |
| Weather Resistance | IP65–IP67 standard; sealed against rain, snow, and freeze-thaw cycles | IP44 typical; vulnerable at sockets, plug connections, and cut ends |
| Lifespan (LED) | 30,000–50,000 hours (with proper voltage regulation) | 15,000–25,000 hours; reduced by series-wiring failures and moisture damage |
| Energy Use (per 30 ft) | 12–22W (low-voltage DC or 120V AC options) | 18–45W (depends on bulb count and type; incandescent strings consume significantly more) |
| Bending Radius | 3–6 inches (tighter turns possible with flexible silicone variants) | Depends on wire gauge—most mini-string minimum radius is 2–4 inches, but corners often require grommets or spacers to avoid kinking |
Crucially, rope lights eliminate the “one-bulb-out-kills-the-string” problem. Even in parallel-wired LED strings, a failed socket can cause adjacent sections to dim or flicker. Rope lights operate as a single circuit or segmented zones—failure in one segment rarely affects others, and many models include diagnostic indicators or replaceable modules.
Real-World Case Study: The Chicago Bungalow Project
In December 2022, landscape lighting contractor Maya Rodriguez installed holiday lighting for a historic 1920s brick bungalow in Chicago’s Logan Square neighborhood. The home featured 12 double-hung windows with narrow, ornate wood trim—no room for bulky clips or visible wires. Rodriguez tested two approaches: a premium LED string light (C7, 120V, IP65-rated) on six windows, and ½” silicone-jacketed rope lights (RGBW, 24V DC, IP67) on the remaining six.
Within three weeks, three string-light circuits developed intermittent outages—traced to moisture intrusion at socket junctions where condensation had pooled beneath rubber gaskets. Two windows required full reinstallation due to lifted paint where adhesive failed under thermal stress. The rope lights remained fully operational throughout the season, including during a week-long stretch of sub-zero wind chills and heavy lake-effect snow. Post-season inspection revealed zero corrosion, no discoloration, and intact adhesive bonds—even on south-facing windows exposed to intense winter sun.
Rodriguez now specifies rope lights for all architectural outlining jobs unless clients explicitly request vintage-style bulb visibility. “It’s not about brightness—it’s about integrity of line,” she explains. “When you’re outlining a window, you’re drawing a frame. A broken frame doesn’t convey celebration. It conveys neglect.”
Expert Insight: What Lighting Engineers Prioritize
“Architectural outlining is fundamentally a linear lighting challenge—not a decorative one. Rope lights were engineered to solve exactly that: consistent lumen distribution along a defined path, with environmental resilience baked in from day one. String lights excel at ambiance, not precision. Confusing the two leads to seasonal frustration, not festive joy.” — Derek Lin, PE, Lighting Design Director at LuminaStructures Group
Lin’s team has specified exterior lighting for over 200 residential and municipal projects across North America’s harshest climates. His firm’s standard specification for window, roofline, and column outlining mandates rope lights with minimum IP66 rating, UV-stabilized jacketing, and UL-listed low-voltage drivers. “We don’t ban string lights—we just don’t use them where geometry and exposure demand reliability,” he adds.
Step-by-Step: Installing Rope Lights for Window Outlining (Professional Method)
- Measure precisely: Use a fiberglass tape measure—not cloth—to capture top, bottom, left, and right dimensions. Add 2% extra length for corner tension and thermal expansion.
- Clean the surface: Wipe trim with isopropyl alcohol (70%) to remove wax, dust, and oils. Let dry completely—moisture compromises adhesive bond strength by up to 60%.
- Test fit before peeling: Unspool rope light along the frame without removing backing. Adjust position, mark corner start/end points, and verify continuity with a multimeter if using DC systems.
- Apply in segments: Peel 12–18 inches of backing, press firmly with thumb applying 15–20 psi pressure, then move to next section. Avoid stretching or compressing the rope—this distorts internal conductor alignment.
- Secure corners with L-brackets: For sharp 90° turns, use stainless steel corner brackets (not plastic). Silicone-jacketed rope lights can be gently bent, but mechanical support prevents fatigue cracking over multiple seasons.
- Terminate properly: Seal cut ends with waterproof end caps and marine-grade heat-shrink tubing. Never leave bare wire exposed—even indoors, humidity migrates.
FAQ: Practical Questions Answered
Can I cut rope lights to fit my window exactly?
Yes—but only at designated cut marks (usually every 12–24 inches, indicated by scissor icons or copper dots). Cutting elsewhere severs internal conductors. Always verify voltage compatibility and use manufacturer-specified end caps and power connectors. Never cut while powered.
Do rope lights get hot enough to damage vinyl or painted trim?
Modern LED rope lights operate at surface temperatures between 95–115°F (35–46°C) under continuous use—well below the deformation point of PVC trim (140°F+) or cured acrylic paint (250°F+). Incandescent rope lights, however, reach 180°F+ and are strongly discouraged for direct trim contact.
Are rope lights dimmable—and will they work with smart home systems?
Most 24V DC LED rope lights are fully dimmable with compatible PWM or 0–10V dimmers. AC-powered versions require trailing-edge dimmers. For smart integration, choose models with built-in Wi-Fi or Zigbee modules—or pair with a certified low-voltage smart controller. Avoid using standard wall dimmers with AC rope lights unless explicitly rated for inductive/resistive loads.
What About String Lights? When They *Are* the Right Choice
Rope lights aren’t universally superior—they’re situationally optimal. String lights remain the better choice when:
- You want visible, nostalgic bulb shapes (e.g., retro C7/C9 on a farmhouse porch);
- You’re outlining irregular, non-linear features like wrought-iron railings or arched doorways where flexibility outweighs uniformity;
- You need modular replacement—swapping a single bulb is faster than replacing a 10-foot rope light segment;
- You’re working on a tight budget: entry-level mini-string lights cost 40–60% less than comparable rope lights (though total cost of ownership over 3+ seasons often reverses this).
The key is matching the tool to the task—not defaulting to familiarity. If your goal is a clean, crisp, durable outline that reads as intentional architecture rather than festive clutter, rope lights deliver measurable advantages in execution, longevity, and visual authority.
Conclusion: Clarity Over Convenience
Christmas window outlining is one of the most visible expressions of seasonal intention. It signals care, attention to detail, and respect for your home’s character. Choosing rope lights isn’t about rejecting tradition—it’s about honoring craftsmanship with tools engineered for precision. They reduce seasonal stress, minimize mid-season troubleshooting, and deliver a consistently elegant result that elevates curb appeal without shouting for attention.
If you’ve struggled with sagging strings, flickering sections, or premature failures in past years, this season offers a chance to upgrade—not just your lights, but your approach. Measure once. Choose for integrity. Install with intention. And let your windows speak clearly, warmly, and reliably all December long.


 浙公网安备
33010002000092号
浙公网安备
33010002000092号 浙B2-20120091-4
Comments
No comments yet. Why don't you start the discussion?