
Building your first PC can be an exciting milestone. It offers full control over performance, aesthetics, and future upgrades. However, one invisible threat looms over every DIY builder: electrostatic discharge (ESD), commonly known as static electricity. A single zap—too small for you to feel—can permanently damage delicate components like motherboards, RAM, or GPUs. For beginners, understanding how to prevent static damage is just as important as knowing which parts to install. This guide walks through the science of ESD, proven prevention techniques, and real-world strategies that keep your build safe from start to finish.
Understanding Static Electricity and Its Risks
Static electricity occurs when electrical charges accumulate on the surface of a material, typically through friction. Walking across a carpet, removing a sweater, or even shifting in a plastic chair can generate thousands of volts of static charge. While harmless to humans, this energy can destroy sensitive microelectronics inside computer components.
Modern PC parts are built with intricate circuitry operating at low voltages. An unexpected surge from static discharge can melt microscopic pathways, corrupt firmware, or degrade performance over time. The worst part? Damage isn’t always immediate. A component may appear to function after exposure but fail weeks later under load—a phenomenon known as “latent failure.”
“Over 30% of unexplained hardware failures in new builds trace back to undetected ESD events during assembly.” — Dr. Alan Reeves, Senior Hardware Engineer at TechIntegrity Labs
The risk is highest during dry conditions, especially in winter months when indoor humidity drops below 40%. Synthetic fabrics, ungrounded workspaces, and improper handling compound the danger. Recognizing these risks is the first step toward prevention.
Essential Tools and Workspace Setup
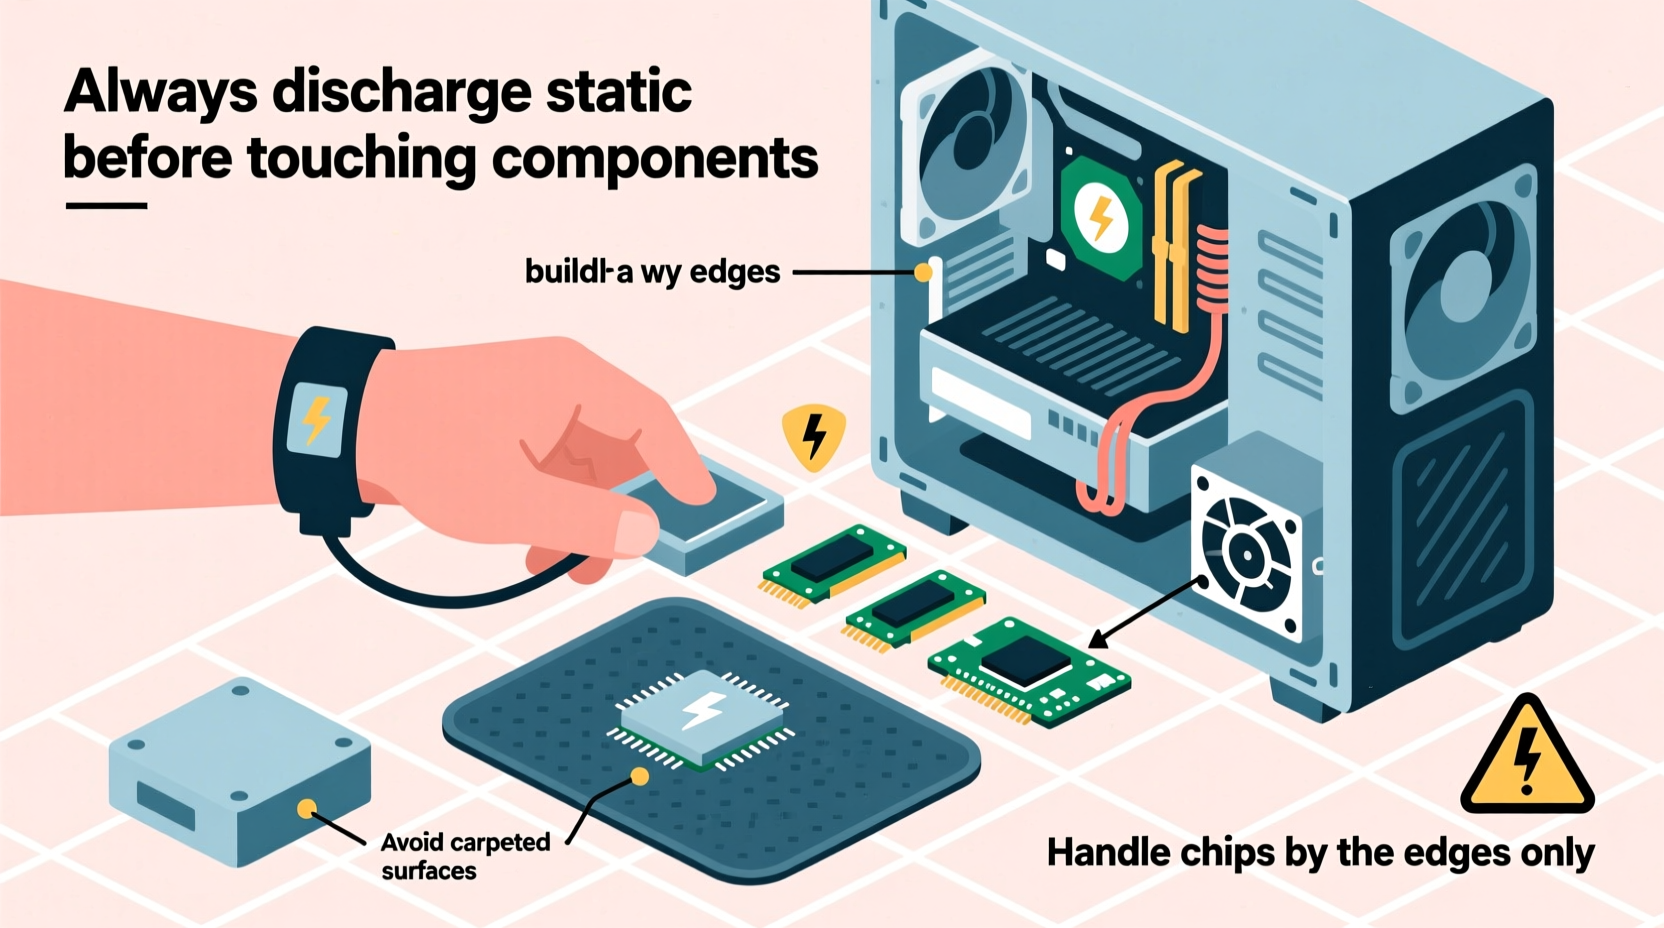
Your workspace plays a critical role in minimizing static buildup. Choose a clean, well-lit area free from clutter, pets, and distractions. Avoid working on carpets or upholstered furniture. Instead, set up on a hard surface such as a wooden table or laminate countertop.
Investing in basic ESD protection tools significantly reduces risk:
- Anti-static wrist strap: Clips to a grounded metal object and safely channels charge away from your body.
- Anti-static mat: Provides a grounded surface for placing components during assembly.
- Grounding plug or screwdriver: Used to safely ground yourself by touching a powered-off PSU connected to a grounded outlet.
While not all builders use professional-grade gear, skipping basic precautions increases vulnerability. Even if you’ve built PCs before without issues, relying on luck isn’t sustainable. Consistent safety habits ensure long-term success.
Step-by-Step Guide to Safe Assembly
Follow this logical sequence to assemble your PC while minimizing static exposure at every stage:
- Prepare the environment: Turn off HVAC systems that create dry air. Use a humidifier to maintain 40–60% relative humidity if possible.
- Power down and unplug: Ensure no power source is active. Plug your PSU into a wall outlet but leave it switched off.
- Ground yourself: Attach an anti-static wrist strap to bare skin and connect it to the PSU’s metal casing via its grounding screw.
- Handle components safely: Always hold motherboards, GPUs, and RAM by their edges. Avoid touching gold contacts or exposed circuitry.
- Install CPU and cooler first: These parts are less susceptible to ESD when handled briefly with clean hands, but still avoid contact with pins.
- Add RAM and M.2 drives: Insert modules carefully, ensuring alignment and minimal force.
- Mount motherboard: Secure it into the case before connecting cables.
- Install GPU, storage, and PSU: Connect power supplies last and double-check all connections.
- Final inspection: Review all seating, cable routing, and grounding points before powering on.
Throughout the process, keep components in their anti-static bags until ready for installation. Never place them directly on plastic, Styrofoam, or clothing. If you need to set a part down, do so on the motherboard box or anti-static mat.
Do’s and Don’ts When Handling Components
| Do’s | Don’ts |
|---|---|
| Wear cotton clothing (low static generation) | Wear wool, nylon, or polyester garments |
| Work on a non-conductive but grounded surface | Assemble on carpet or vinyl flooring |
| Touch bare metal of the case frequently to discharge | Move around excessively during assembly |
| Keep parts in anti-static packaging until use | Place components on plastic bags or foam |
| Use an anti-static wrist strap connected properly | Rely solely on “touching the case” without verification |
This comparison highlights common oversights. Many beginners assume that simply touching the case occasionally is enough. In reality, consistent grounding—especially during prolonged tasks like CPU installation—is essential.
Real-World Example: A Beginner’s Close Call
Jamal, a college student building his first gaming rig, followed online tutorials closely but skipped buying an anti-static strap. He worked on a glass desk in his dorm room, wearing a fleece hoodie. After assembling everything, the system powered on—but the RAM wasn’t detected. He reseated it multiple times with no success. Eventually, he tested the sticks in a friend’s PC and discovered one was dead.
A technician later explained that the combination of synthetic fabric, low humidity, and lack of grounding likely caused a static discharge when Jamal picked up the RAM module. The damage wasn’t visible, but the memory chip had failed internally. With a $90 replacement cost and lost time, Jamal learned the hard way that cutting corners on ESD protection isn’t worth the risk.
Expert-Recommended Prevention Checklist
To ensure every build remains safe, follow this verified checklist before starting:
- ✅ Choose a hard, flat workspace (wood, glass, or laminate)
- ✅ Wear natural fiber clothing (cotton preferred)
- ✅ Keep the room humidity between 40–60%
- ✅ Unplug all power sources (but leave PSU plugged into grounded outlet for grounding)
- ✅ Use an anti-static wrist strap connected to the PSU chassis
- ✅ Handle components only by their edges
- ✅ Store unused parts in anti-static bags
- ✅ Avoid unnecessary movement during assembly
- ✅ Test the system outside the case first (bench test) if possible
- ✅ Have a fire extinguisher nearby (for rare electrical faults)
This checklist combines industry standards with practical field experience. Completing each item reduces both direct and indirect risks associated with static buildup.
Frequently Asked Questions
Can I build a PC without an anti-static wrist strap?
Yes, but with caution. You can minimize risk by frequently touching the metal frame of the case to discharge static. However, this method is less reliable than using a proper strap. In dry environments or with highly sensitive components, skipping the strap increases the chance of damage. For consistent safety, invest in a $10–$15 wrist strap—it pays for itself in peace of mind.
Does humidity really affect static buildup?
Absolutely. Low humidity (below 40%) allows static charges to accumulate more easily because dry air doesn’t conduct electricity well. High humidity helps dissipate charges naturally. During winter, indoor heating dries the air significantly. Using a simple hygrometer and humidifier can make a measurable difference in ESD risk.
What should I do if I suspect static damage?
If your PC fails to POST (power on self-test), check all connections first. Reseat RAM, GPU, and power cables. If problems persist, isolate components by testing them individually in another system if possible. Unfortunately, there’s no fix for ESD-damaged silicon—replacement is the only option. Document your symptoms and consult the manufacturer for warranty claims, though most warranties exclude ESD-related failures.
Conclusion: Build Smart, Build Safe
Building a PC is a rewarding skill that blends technical knowledge with hands-on craftsmanship. But no matter how well you select your CPU or optimize airflow, one overlooked static zap can undo hours of work. By understanding how ESD works and adopting disciplined safety practices, you protect not just your investment but also your confidence as a builder.
The tools and habits outlined here aren’t reserved for professionals—they’re accessible, affordable, and effective for anyone. Whether you're upgrading an old machine or assembling your dream rig, treating static electricity with respect ensures your build powers on the first time and lasts for years. Take the extra five minutes to ground yourself, prepare your space, and handle components with care. Your future self—and your hardware—will thank you.


 浙公网安备
33010002000092号
浙公网安备
33010002000092号 浙B2-20120091-4
Comments
No comments yet. Why don't you start the discussion?