
Pothos (Epipremnum aureum) is one of the most popular houseplants for good reason: it's hardy, fast-growing, and forgiving of beginner mistakes. One of its most appealing traits is how easily it can be propagated—especially in water. Whether you want to expand your indoor jungle or share cuttings with friends, water propagation offers a clear, low-risk method to grow new plants from existing ones. This guide walks you through every stage of the process, from selecting the right stem to transplanting mature roots, ensuring success even if you've never tried propagation before.
Why Propagate Pothos in Water?
Water propagation has become a favorite among plant enthusiasts because it allows growers to observe root development in real time. Unlike soil propagation, where progress is hidden, water lets you monitor root health, detect rot early, and adjust conditions proactively. Pothos, in particular, adapts exceptionally well to aquatic environments during the rooting phase. Its natural vining habit and aerial roots make it predisposed to thrive when placed in water.
Additionally, water propagation requires minimal supplies and space. A clean jar, some filtered water, and a healthy parent plant are all you need to get started. It’s also an excellent way to rejuvenate leggy or overgrown pothos by taking cuttings and encouraging bushier growth on the original plant.
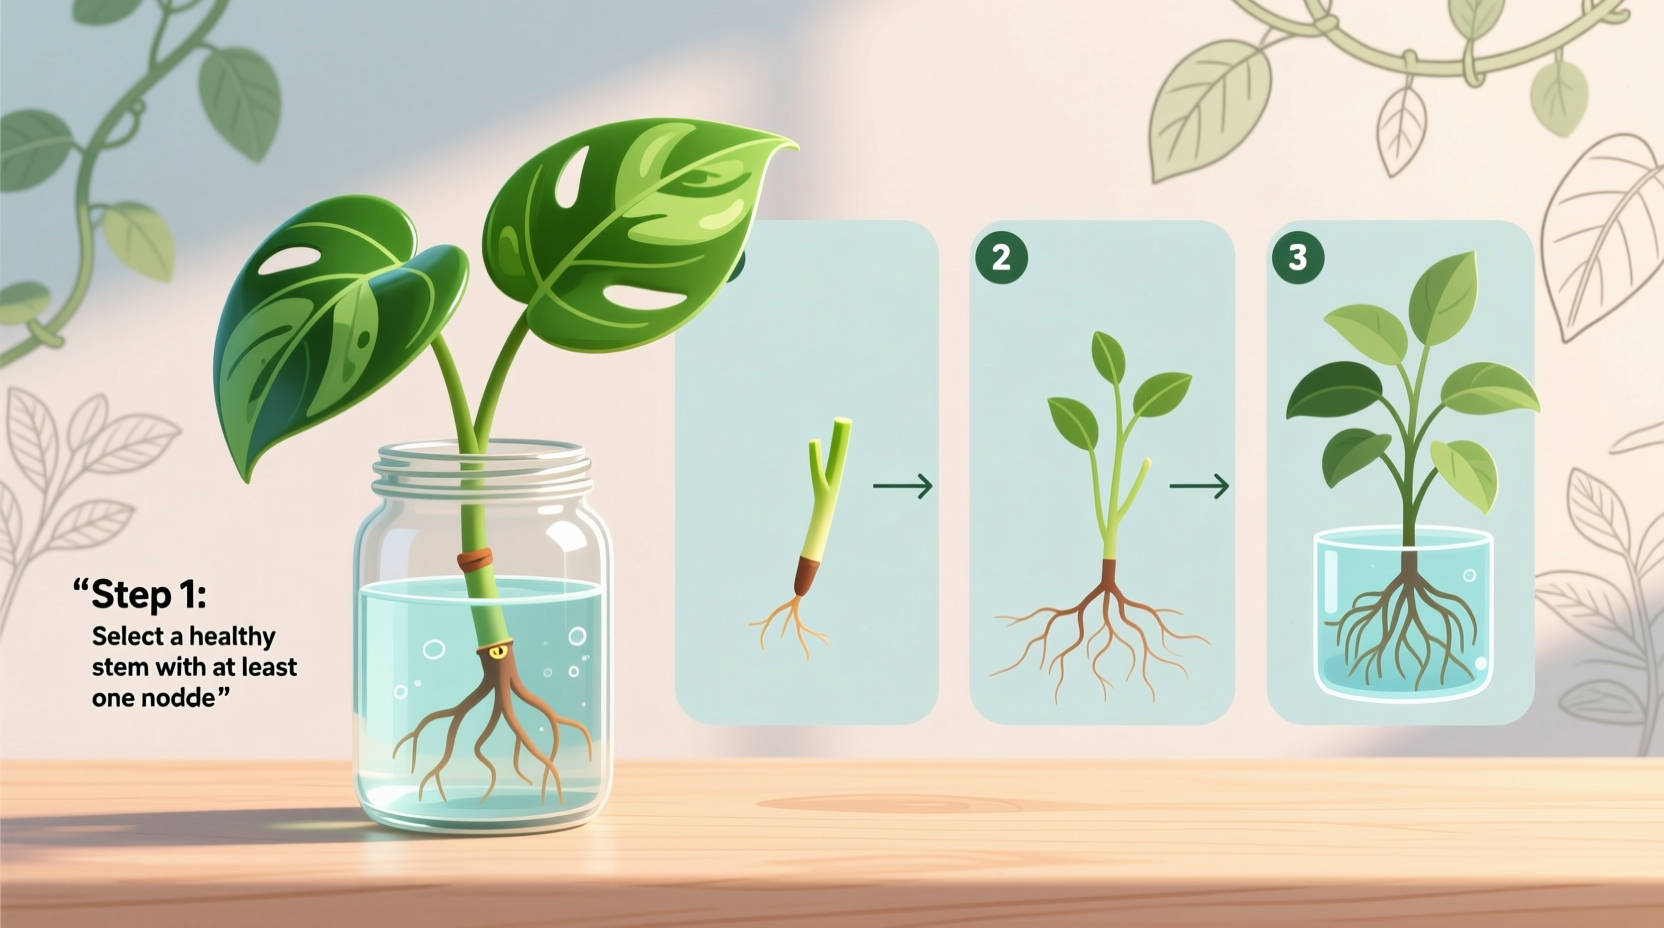
Step-by-Step Guide to Propagating Pothos in Water
Follow these steps carefully to maximize your chances of successful propagation. Each phase builds on the last, creating optimal conditions for root formation and long-term vitality.
- Select a Healthy Parent Plant: Choose a pothos with vibrant green leaves and no signs of yellowing, pests, or disease. The healthier the parent, the stronger the cutting.
- Gather Your Tools: You’ll need sharp scissors or pruning shears, a clean glass or jar, and optionally, liquid fertilizer or rooting hormone (though not required).
- Identify the Right Node: Locate a node—a small bump or nub along the stem where leaves and aerial roots emerge. This is where new roots will form. Ensure your cutting includes at least one node.
- Make the Cut: Cut just below a node using sterilized tools. Aim for a 4–6 inch stem with 3–5 leaves. Remove the lowest leaf if it would sit below the waterline.
- Place in Water: Submerge the node(s) in water, making sure no leaves are underwater, as this can lead to rot. Position the jar in bright, indirect light.
- Wait and Monitor: Change the water weekly to prevent stagnation and algae growth. Within 7–14 days, you should see tiny white roots emerging from the node.
- Allow Roots to Develop: Let roots grow to at least 1–2 inches before considering transplanting to soil or continuing growth in water.
Timeline of Root Development
| Timeframe | Expected Progress |
|---|---|
| Days 1–3 | Stem acclimating; no visible changes |
| Days 4–7 | Swelling at node; initial root primordia may appear |
| Days 8–14 | Visible white roots (0.25–0.5 inches) |
| Weeks 3–4 | Roots reach 1–2 inches; secondary roots begin forming |
| Week 5+ | Ready for transfer to soil or continued water cultivation |
Common Mistakes to Avoid
Even simple processes can go wrong if key details are overlooked. These common errors often derail otherwise promising propagation attempts.
- No node included: Without a node, no roots will form. Always confirm the presence of a node before placing the cutting in water.
- Submerging leaves: Leaves underwater will rot, contaminating the water and potentially killing the cutting.
- Using tap water immediately: Chlorine and fluoride in untreated tap water can damage developing tissues. Let water sit out for 24 hours or use filtered/bottled water.
- Low light conditions: While pothos tolerates low light, propagation proceeds much slower without adequate indirect sunlight.
- Infrequent water changes: Stagnant water breeds bacteria and algae. Weekly changes are essential for hygiene and oxygenation.
“Propagation success starts with precision—not just in cutting technique, but in ongoing care. A single overlooked node can mean the difference between thriving roots and total failure.” — Dr. Lena Torres, Botanist & Urban Horticulture Consultant
Do’s and Don’ts of Pothos Water Propagation
| Do’s | Don’ts |
|---|---|
| ✔ Use sterilized scissors for clean cuts | ✖ Use dull or dirty tools that can spread pathogens |
| ✔ Place in bright, indirect light | ✖ Put in direct sun, which can overheat water and scorch stems |
| ✔ Change water weekly | ✖ Let water become cloudy or green with algae |
| ✔ Include at least one node per cutting | ✖ Assume any leafy stem will root without a node |
| ✔ Be patient—roots take time | ✖ Disturb the cutting daily to check progress |
Tips for Long-Term Success in Water Culture
Many people assume water-propagated pothos must eventually be transferred to soil, but that’s not always necessary. With proper care, pothos can thrive indefinitely in water. However, they require ongoing maintenance to remain healthy.
To support sustained growth, replace 20–30% of the water weekly instead of full changes once a month. Introduce a diluted liquid houseplant fertilizer every 4–6 weeks to replenish nutrients absent in plain water. Over time, roots may darken or thicken—this is normal, especially in established plants. But if roots turn mushy or black, trim them promptly and refresh the water.
Real Example: Sarah’s First Propagation Attempt
Sarah, a first-time plant owner in Portland, decided to propagate her golden pothos after noticing it had grown sparse at the base. She took several cuttings, making sure each had a visible node. Initially, she placed them in a reused mason jar filled with tap water straight from the faucet. After five days, two cuttings developed cloudy water and soft stems.
After researching, Sarah learned about chlorine sensitivity and began using filtered water left overnight. She cleaned the jars, re-cut the remaining healthy stems, and placed them in fresh water under a north-facing window. Within ten days, white roots emerged. By week four, she had robust root systems and chose to keep one plant in water while transferring another to soil. Her original pothos responded well to pruning, producing new growth near the base within three weeks.
Sarah’s experience highlights how small adjustments—like water quality and light placement—can dramatically improve outcomes.
When and How to Transfer to Soil
While pothos can live in water permanently, some gardeners prefer moving rooted cuttings to soil for a more traditional growing setup. The best time to transplant is when roots are 1–2 inches long and multiple secondary roots have formed.
Prepare a pot with well-draining potting mix—regular houseplant soil works fine. Gently place the cutting into a hole, covering the roots but not burying leaves. Water thoroughly and keep the soil consistently moist (not soggy) for the first two weeks. This helps the plant transition from absorbing nutrients via water to relying on soil-based uptake.
Expect some leaf drooping during the first few days—it’s a sign of adjustment, not failure. Avoid fertilizing for at least three weeks post-transplant to prevent root burn.
Frequently Asked Questions
Can I propagate variegated pothos in water?
Yes, all varieties—including marble queen, neon, and jade—can be propagated in water. However, maintain bright light to preserve variegation. Low light may cause reversion to solid green.
How many cuttings can I put in one jar?
You can group multiple cuttings in a single container as long as each has space and access to light. Overcrowding reduces oxygen flow and increases disease risk. Use wide-mouth jars for better circulation.
Why isn’t my pothos rooting?
Lack of rooting usually stems from missing nodes, poor water quality, insufficient light, or old/damaged stems. Double-check that the node is submerged and conditions are stable. Some cuttings take up to three weeks to initiate roots, so patience is key.
Final Checklist for Success
- Choose a healthy parent plant with strong foliage
- Use sterilized, sharp tools for clean cuts
- Ensure each cutting includes at least one node
- Remove leaves that would sit below the waterline
- Use dechlorinated, room-temperature water
- Place in bright, indirect light (no direct sun)
- Change water weekly or top off with fresh water
- Monitor for root development starting around day 7
- Allow roots to reach 1–2 inches before transplanting
- Maintain consistency—avoid moving or disturbing frequently
Conclusion: Start Growing Today
Propagating pothos in water is one of the most accessible and rewarding projects for new plant lovers. With minimal investment and attention to detail, you can multiply your collection, gift living plants to friends, or revitalize aging vines. The process teaches patience, observation, and the quiet joy of watching life emerge from a simple stem.


 浙公网安备
33010002000092号
浙公网安备
33010002000092号 浙B2-20120091-4
Comments
No comments yet. Why don't you start the discussion?