
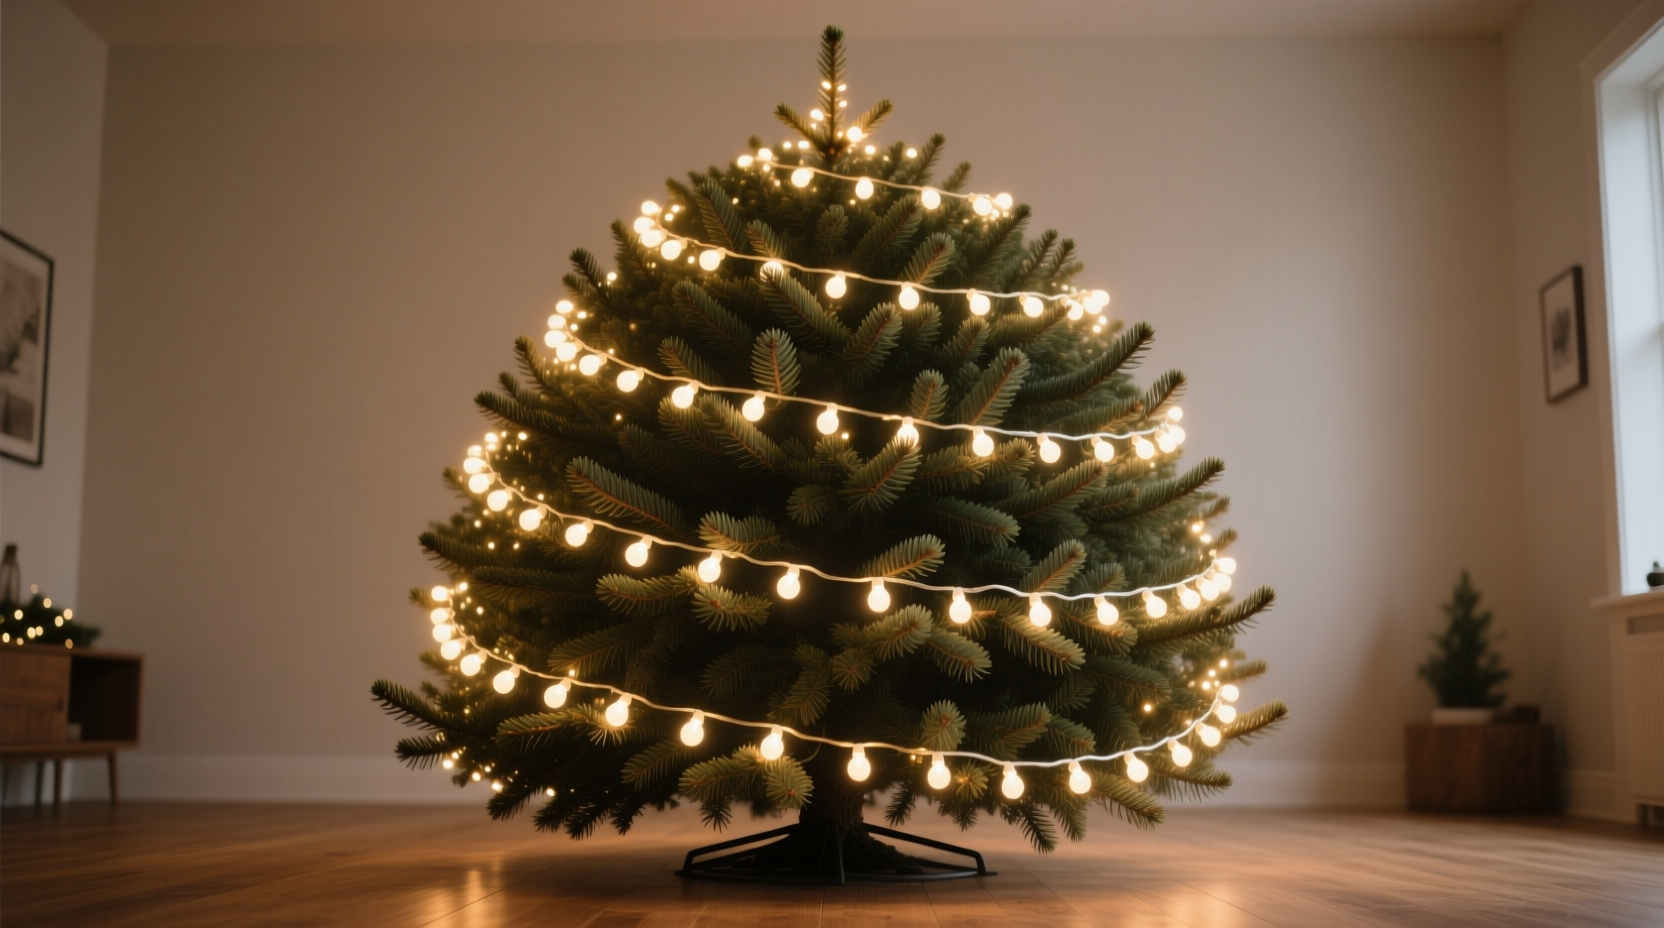
Decorating a Christmas tree is one of the most cherished holiday traditions. But no matter how festive your ornaments or how lush your evergreen, uneven lighting can instantly undermine the effort. Rounded trees—whether real fir, spruce, or artificial—are especially prone to shadowy patches and glaring hotspots if lights aren’t placed with intention. Achieving even coverage requires more than just draping strings haphazardly. It demands strategy, rhythm, and an understanding of light behavior across curved surfaces.
The goal isn’t simply to cover every inch, but to create depth, dimension, and a warm, inviting glow that feels cohesive from any angle. Whether you're working with a compact tabletop tree or a towering floor model, mastering light placement transforms your tree from ordinary to extraordinary. This guide dives into the science and artistry behind optimal light distribution on rounded silhouettes, offering practical techniques backed by decorators and lighting professionals.
Understanding Light Distribution on Curved Surfaces
A rounded tree presents unique challenges compared to flat or angular displays. Its three-dimensional form means light must wrap around contours, penetrate inner branches, and maintain consistency despite depth variations. When lights are applied without structure, certain areas—especially the back and lower interior—can appear dim, while front-facing sections may look over-lit or clustered.
Light behaves differently on curves: it reflects, scatters, and diminishes as it travels inward. The outer canopy catches direct illumination, but deeper layers rely on ambient bounce. Without deliberate layering, the result is a halo effect—bright on the surface, dark within.
To counteract this, professionals use a \"layered approach,\" treating the tree like an onion with multiple concentric rings of light. Each ring builds upon the last, ensuring photons reach not just the tips of branches but their base. This method prevents the common mistake of “skinning” the tree—only lighting the outermost layer.
“A well-lit tree doesn’t shout; it glows. Evenness is more important than quantity. Ten strands thoughtfully placed beat twenty tossed on.” — Marcus Bellweather, Lighting Designer & Holiday Display Consultant
Step-by-Step Guide: Wiring Your Rounded Tree for Balanced Illumination
Follow this structured sequence to ensure full, uniform coverage. The process assumes a standard conical or oval-shaped tree with moderate density. Adjust slightly for fuller or sparser models.
- Start at the trunk, work outward. Begin each strand at the central pole or trunk, feeding the plug down through the stand so it’s hidden. This ensures the first bulb is deeply embedded, providing internal illumination.
- Use the spiral technique with vertical offset. Instead of a flat horizontal wrap (which creates glowing bands), angle your path diagonally. Move up and out in a continuous spiral, like winding a globe. For every full rotation, rise 6–8 inches vertically. This breaks up symmetry and avoids visible patterns.
- Layer from bottom to top. Start at the lowest tier and complete one full spiral before moving to the next section. Dense lower branches require more attention—add extra bulbs here to prevent a dark base.
- Incorporate inward-pointing bulbs. As you place each bulb, gently bend the wire so the light faces slightly toward the center. This directs glow inward, reducing shadows and enhancing depth.
- Fill gaps with secondary strands. After completing primary spirals, inspect the tree from all angles. Use shorter “filler” strands to address thin spots, particularly near the trunk or upper apex where spirals may leave voids.
- Test frequently. Plug in after every 1–2 strands to check brightness, color consistency, and dead bulbs. Fix issues immediately before they’re buried under layers.
Optimal Strand Density and Spacing Guidelines
How many lights are enough? The answer depends on tree size and desired effect, but spacing—not total count—is the true determinant of evenness. A common rule of thumb is 100 lights per foot of tree height, but this doesn’t account for shape or bulb size.
For rounded trees, focus on consistent spacing between bulbs rather than total numbers. Aim for 3–4 inches between adjacent bulbs along the strand, and ensure vertical separation between spiral rows does not exceed 8 inches. Closer spacing increases warmth but also heat output—important when using incandescent bulbs.
| Tree Height | Recommended Bulbs | Spiral Rows Needed | Avg. Vertical Spacing |
|---|---|---|---|
| 4 ft | 400–500 | 5–6 | 7–8 in |
| 6 ft | 600–700 | 7–8 | 7 in |
| 8 ft | 800–1000 | 9–10 | 6–7 in |
| 10 ft | 1000–1200 | 11–12 | 6 in |
Note: LED strands often allow tighter spacing due to lower heat and higher bulb counts per string. If using LEDs, you can reduce vertical separation by 1–2 inches for a denser effect without risk.
Do’s and Don’ts of Tree Lighting Placement
Mistakes in placement are often subtle but impactful. The following table outlines common errors and their solutions:
| Do | Don’t |
|---|---|
| Begin wiring at the trunk and move outward | Start at the edge and work inward—this leaves the core dark |
| Angle bulbs slightly toward the center | Let all bulbs face outward—creates flat, two-dimensional look |
| Use multiple short strands instead of few long ones | Daisy-chain too many strings—increases failure risk and voltage drop |
| Test each strand before and after installation | Assume all lights work—undetected outages ruin evenness |
| Step back every few minutes to assess balance | Work from only one angle—leads to blind spots |
Real Example: Transforming a Problematic 7-Foot Artificial Tree
Sarah M., a homeowner in Portland, struggled for years with her pre-lit 7-foot artificial tree. Despite having 750 built-in bulbs, the lighting looked patchy—bright in front, nearly dark from the sides. She described it as “a spotlight on a stage, not a glowing centerpiece.”
After consulting a local decorator, she removed the factory wiring and rewired the tree manually using four separate 200-light LED strands. Applying the spiral technique with 6-inch vertical rise per rotation, she began at the trunk and angled each bulb inward. She added a fifth strand dedicated to the crown and interior trunk zone.
The difference was immediate. From every angle, the tree emitted a soft, omnidirectional glow. Ornaments caught reflections uniformly, and the room felt warmer. Sarah reported that guests assumed she had purchased a new tree—proof that lighting quality can redefine perception.
Checklist: Achieving Even Coverage on a Rounded Tree
- ✅ Measure tree height and calculate required bulb count
- ✅ Choose LED or low-heat bulbs for safety and efficiency
- ✅ Start each strand at the trunk, routing plugs downward
- ✅ Apply diagonal spiral pattern with 6–8 inch vertical rise
- ✅ Angle bulbs slightly inward to illuminate core
- ✅ Step back and rotate tree every 2–3 feet of wiring
- ✅ Test each strand before advancing
- ✅ Add filler strands to dark zones (crown, base, back)
- ✅ Balance color temperature—avoid mixing warm and cool whites
- ✅ Finish with ornaments and topper, then do final glow check
“The secret isn’t more lights—it’s smarter placement. One intentional spiral beats three rushed wraps.” — Lena Cho, Interior Stylist & Seasonal Decor Specialist
Frequently Asked Questions
Can I use pre-lit trees effectively, or should I rewire them?
Many pre-lit trees have poor internal distribution, with lights concentrated on outer tips. While convenient, they often lack depth. Rewiring—even partially—can dramatically improve appearance. At minimum, supplement with one or two hand-wired strands focused on the trunk and rear.
How do I avoid seeing the wires?
Wires are inevitable, but they can be minimized. Use green or brown-coated cords that blend with branches. Tuck wires along natural branch lines and secure discreetly. From six feet away, properly concealed wiring becomes invisible under the glow.
Should I use warm white or cool white lights?
Warm white (2700K–3000K) is generally preferred for Christmas trees. It mimics candlelight, enhances gold and red tones, and creates a cozier atmosphere. Cool white (5000K+) can feel clinical and wash out traditional decor. Stick to one temperature across all strands to maintain consistency.
Final Tips for a Professional Finish
Even coverage isn’t just about technique—it’s about patience. Rushing leads to missed spots and visual fatigue. Work in good light, take breaks, and enlist a second pair of eyes if possible. What looks balanced up close may reveal gaps from across the room.
Consider the tree’s environment. A tree against a dark wall benefits from rear lighting; one in a corner may need emphasis on the open side. Reflective surfaces nearby can amplify glow, while matte furnishings may require slightly higher density.
Finally, remember that lights set the tone for all other decorations. Ornaments, tinsel, and garlands interact with illumination. Place reflective ornaments deeper in the tree to catch inner light, and avoid overcrowding near bulbs, which can create glare.


 浙公网安备
33010002000092号
浙公网安备
33010002000092号 浙B2-20120091-4
Comments
No comments yet. Why don't you start the discussion?