
Folding a fitted sheet has long been considered one of the most frustrating household tasks. The elastic edges curl unpredictably, corners twist into knots, and even experienced homemakers often end up with a crumpled mess instead of a neat stack. But it doesn’t have to be this way. There is a proven, reliable method—backed by professional organizers and textile experts—that transforms this chaotic chore into a simple, repeatable process. Once mastered, you’ll fold fitted sheets in under a minute, consistently achieving crisp, compact results that fit neatly into linen closets and drawers.
The key lies not in brute force or improvisation, but in understanding the geometry of the fitted sheet and working with its structure, not against it. This guide breaks down the science-backed folding technique used by hotel housekeepers and storage specialists, complete with clear steps, expert insights, and practical tips to eliminate guesswork for good.
Why Fitted Sheets Are So Hard to Fold
Unlike flat sheets, fitted sheets have deep pockets, elasticized edges, and corner gussets designed to grip mattresses. These functional features make them excellent for bedding—but terrible for folding. When removed from the bed, the tension in the elastic causes corners to snap back and edges to curl inward, creating an unruly shape that resists symmetry.
Most people attempt to fold fitted sheets while they're still \"alive\"—that is, fully stretched and bouncing with stored energy. This leads to inconsistent folds, bulkiness, and eventual abandonment. The solution? Deactivate the elastic tension first by aligning the corners correctly before any folding begins.
“Folding a fitted sheet starts with containment, not compression. You must neutralize the elastic forces before attempting to create order.” — Miriam Lopez, Professional Home Organizer & Author of *The Neat Method*
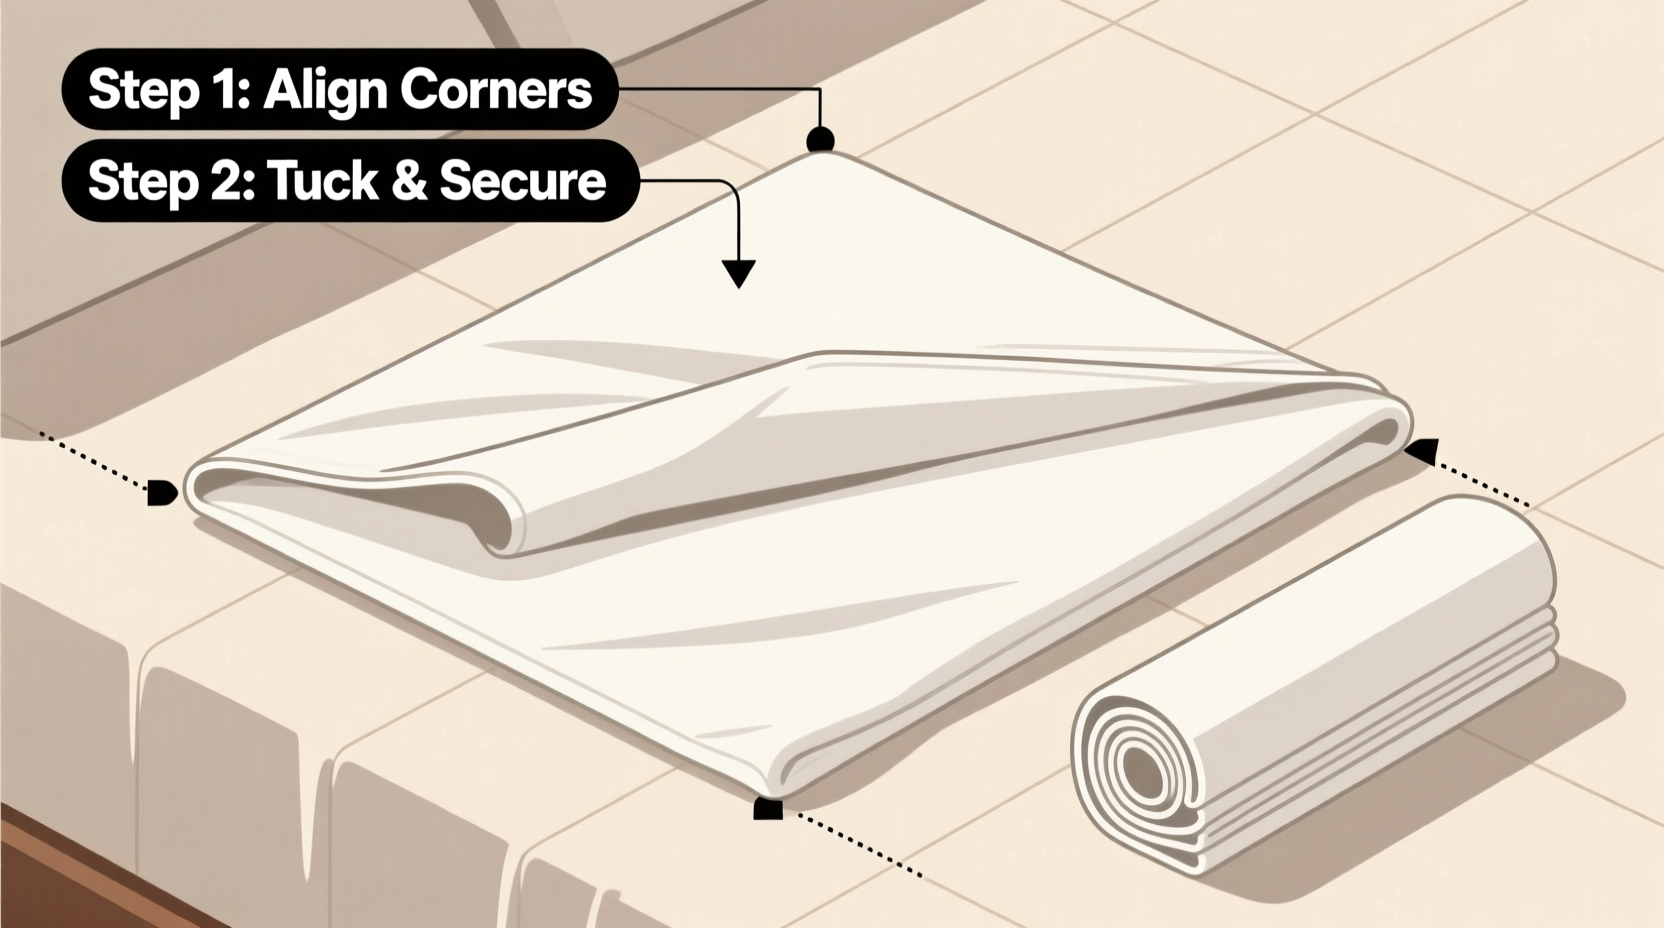
Step-by-Step: The Proven Folding Technique
This method, widely taught in hospitality training programs and popularized by organization experts like Marie Kondo, uses a systematic approach to tame the chaos. Follow these steps precisely for consistent success.
- Hold the sheet lengthwise: Stand with the fitted sheet held in front of you, short edges facing left and right. Identify two adjacent corners on one short side (usually the top of the bed). Grasp one corner in each hand, making sure the right sides of the fabric are touching.
- Connect the first two corners: Bring your hands together so the two corners meet. Tuck one corner inside the other, effectively nesting them. This removes the outward pull of the elastic on that end.
- Locate the opposite corners: Without flipping the sheet, reach behind your back or rotate the sheet to access the remaining two corners on the opposite short edge. Again, bring them together and tuck one inside the other, just as you did in step two.
- Lay the sheet flat: Place the now-connected sheet on a clean, flat surface such as a bed or table. With all four corners paired and tucked, the sheet should resemble a loose rectangle with no exposed elastic.
- Smooth out wrinkles: Gently press down from the center outward to remove air pockets and creases. Ensure the edges are aligned as much as possible.
- Fold in thirds lengthwise: Take one long side and fold it toward the center, about one-third of the way across. Repeat with the opposite side, overlapping slightly if needed. You now have a long rectangle.
- Fold crosswise into a square: Starting from one short end, fold the strip into thirds or quarters, depending on the size of the sheet. Each fold should be crisp and deliberate, matching the edges as closely as possible.
- Store immediately: Slide the folded sheet into a labeled linen bin, drawer, or set it atop its matching flat sheet and pillowcases for coordinated storage.
Common Mistakes That Sabotage Success
Even when following instructions, small missteps can derail the entire process. Avoid these frequent errors:
- Folding while standing over a laundry basket: Limited space and unstable surfaces make alignment difficult. Always use a flat, open area like a bed or dining table.
- Not connecting corners properly: If corners aren’t nested securely, the elastic will spring apart during folding. Double-check that each pair is fully tucked.
- Rushing through smoothing: Skipping the flattening step leaves trapped air and uneven layers, resulting in bulky, lopsided folds.
- Trying to fold immediately after drying: Hot, staticky sheets resist handling. Let them cool for 5–10 minutes before folding.
- Using the wrong technique for oversized sheets: King and California king sheets require extra attention. Fold lengthwise once before connecting corners if the span is too wide to manage comfortably.
Do’s and Don’ts at a Glance
| Do | Don’t |
|---|---|
| Use a flat, stable surface like a bed or table | Fold over a cramped countertop or laundry basket |
| Tuck corners completely inside one another | Just pinch corners together without securing them |
| Smooth the fabric before folding | Skip flattening and start folding over wrinkles |
| Fold matching sets together (fitted + flat + cases) | Store components separately and lose coordination |
| Label storage bins by bed size | Stack unlabeled sheets and waste time searching later |
Real-Life Example: How One Family Transformed Their Linen Closet
The Rivera family of six had long treated their linen closet like a dumping ground. With three bathrooms, multiple guest beds, and seasonal bedding changes, clean sheets piled up in haphazard bundles. “We’d spend ten minutes every Sunday trying to find a matching set,” says Elena Rivera, a school administrator from Portland. “Half the time, we’d give up and just buy new ones.”
After watching a short tutorial based on this exact folding method, Elena spent one Saturday re-folding every fitted sheet in the house. She then grouped each set—fitted sheet, flat sheet, and pillowcases—in matching cloth bags labeled by room and size. Within weeks, her children learned the folding technique and began putting away laundry independently.
“It sounds small, but it changed how we interact with our home,” she says. “Now everything fits in half the space, and there’s no more morning panic when guests arrive.”
Expert Tips for Long-Term Success
Mastery isn’t just about folding—it’s about maintaining order. Incorporate these habits to ensure lasting results:
- Wash and fold in batches: Process all sheets from one bed together. This ensures consistency and prevents mismatched sets.
- Use shelf dividers or bins: Keep folded stacks upright and separated by room or season to avoid toppling and tangling.
- Rotate stock regularly: Place newer sets behind older ones to prevent forgotten linens from sitting unused for years.
- Teach the method early: Children as young as 10 can learn this technique. Turn it into a quick game: “Can you fold a perfect rectangle in under 90 seconds?”
“The ability to fold a fitted sheet is a life skill that pays compound dividends. It saves time, reduces stress, and creates visible order in one of the most frequently used areas of the home.” — David Tran, Organizational Psychologist and Founder of HabitSpace Labs
Checklist: Master the Method in One Session
Follow this checklist the next time you do laundry to lock in the technique:
- ☐ Clear a flat surface (bed, table, or floor cleared of clutter)
- ☐ Pull one fitted sheet from the dryer and let it cool briefly
- ☐ Hold the sheet by two adjacent corners on the same short edge
- ☐ Nest the corners by tucking one inside the other
- ☐ Reach for the opposite two corners and nest them the same way
- ☐ Lay the sheet down and smooth out all wrinkles
- ☐ Fold lengthwise into a narrow strip
- ☐ Fold crosswise into a compact square or rectangle
- ☐ Pair with matching flat sheet and pillowcases
- ☐ Store in labeled container or designated shelf area
Frequently Asked Questions
Can this method work for deep-pocket or extra-thick sheets?
Absolutely. The technique remains the same regardless of pocket depth or fabric weight. For very thick materials like flannel or quilted cotton, take extra care to smooth layers thoroughly before folding to prevent excessive bulk.
What if I keep ending up with a lumpy fold?
Lumps usually mean corners came undone or wrinkles weren’t smoothed. Go back to step four—lay the sheet flat and recheck that all corners are securely tucked. Press firmly from center to edges with your palms to flatten air pockets.
Is it worth learning if I only change sheets once a month?
Yes. Even infrequent handlers benefit from knowing this skill. A single well-folded sheet takes less than 60 seconds and saves far more time in the long run when searching, storing, or rotating linens. It’s a high-leverage household competency.
Conclusion: Turn Frustration Into Confidence
Folding a fitted sheet doesn’t have to be a mystery or a source of domestic dread. With the right method, anyone can achieve neat, uniform folds that look store-bought and last through countless wash cycles. The process is logical, repeatable, and deeply satisfying once mastered. More than just a laundry task, it’s a small act of control in an often-chaotic routine—a tangible win that ripples into greater confidence in home management.


 浙公网安备
33010002000092号
浙公网安备
33010002000092号 浙B2-20120091-4
Comments
No comments yet. Why don't you start the discussion?