
A cluttered workspace doesn’t just look unprofessional—it can hinder productivity, create distractions, and even pose safety risks. One of the most common sources of mess is the tangle of cables beneath your desk. Power cords, USB cables, monitor leads, headphones, and chargers often twist into an inescapable knot that frustrates every time you need to access or replace something. While many solutions involve purchasing cable ties, clips, or management boxes, not everyone wants—or needs—to spend money on new tools. The good news is that with a little creativity and some household items, you can achieve a clean, functional setup using what you already have.
Why Cable Clutter Matters More Than You Think
Cable disarray isn’t just an eyesore. Studies show that physical clutter increases cognitive load, making it harder to focus and process information efficiently. A messy desk environment can subconsciously signal chaos, reducing mental clarity and work performance. Beyond psychological impact, tangled cords increase the risk of accidental unplugging, damage from pets or foot traffic, and overheating due to poor airflow around power strips.
Additionally, when cables are buried under layers of dust and debris, they become harder to troubleshoot during outages or device failures. A single loose connection might take minutes to locate in a well-organized system but could turn into a 30-minute scavenger hunt in a chaotic bundle.
“Organization isn’t about perfection—it’s about creating systems that reduce friction in daily tasks.” — David Allen, productivity expert and author of *Getting Things Done*
Step-by-Step Guide: Organizing Cables Without New Tools
You don’t need zip ties, Velcro straps, or adhesive mounts to make a dramatic improvement. Follow this sequence using only common household objects and existing desk features.
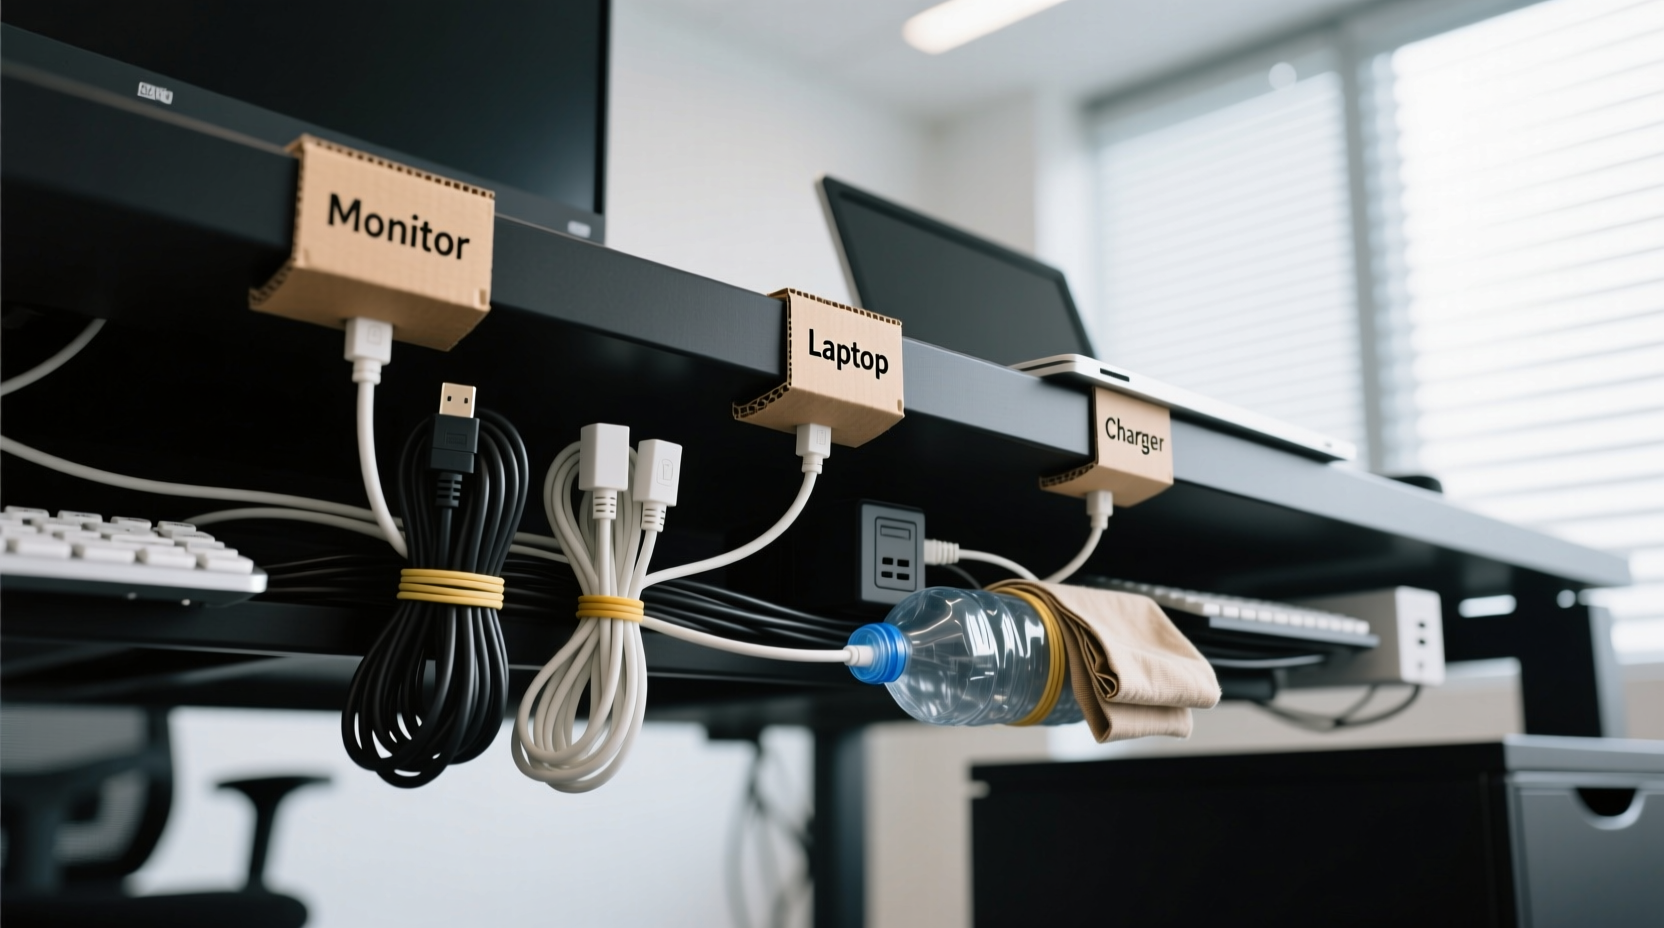
- Unplug and Remove Everything
Start by turning off all devices and safely disconnecting every cable from your computer, monitors, power strip, and peripherals. Lay them out on the floor or a nearby table so you can see each one clearly. - Identify Each Cable’s Purpose
Label each cord temporarily with sticky notes or tape indicating its function (e.g., “Monitor HDMI,” “Laptop Charger”). This prevents confusion when reconnecting and helps identify redundant or unused cables. - Eliminate Unnecessary Wires
Check for old chargers, broken adapters, or duplicate cords. If a cable hasn’t been used in over six months, consider recycling it responsibly. Fewer cables mean less complexity from the start. - Group by Device or Function
Bundle wires that belong to the same device. For example, group your monitor’s power, HDMI, and USB hub cables together. Use rubber bands—yes, the kind from produce or office supplies—to loosely hold these bundles. Avoid tight binding that could damage insulation. - Use Binder Clips as Cable Guides
Repurpose medium or large binder clips by clipping them to the edge of your desk. Thread each grouped bundle through the metal arms to route them neatly downward. This keeps cables separated and prevents them from dangling freely or snagging on chairs. - Create Loops with Paper Clips
For excess length, form gentle loops in longer cords and secure them with unfolded paper clips bent into S-shapes. These act like makeshift cable wraps, preventing slack from pooling on the floor while allowing quick release when needed. - Anchor Cables Along Edges Using Masking Tape
If your desk has flat sides or rear panels, use small pieces of masking tape to lightly secure cable runs along edges. Place tape every 6–8 inches to maintain alignment without damaging surfaces or leaving residue. Never use duct tape—it can peel finishes and leave sticky residue. - Route Through Existing Openings
If your desk has grommet holes (those round openings typically near the back), feed major bundles through them. This hides the bulk of wiring and directs them toward wall outlets or surge protectors underneath. - Stabilize the Power Strip
Prevent your power strip from sliding around by placing it inside an empty shoebox or cardboard tray. Cut slots in the sides for cables to pass through. The box acts as both anchor and partial cover, reducing tripping hazards. - Final Check and Test Connections
Reconnect all devices, ensuring each plug fits securely. Gently tug on cables to confirm they’re held in place and won’t pull loose easily. Turn everything back on and verify functionality before closing up the area.
Household Items That Double as Cable Management Tools
The key to organizing without spending money lies in repurposing everyday objects. Below is a comparison of common household items and how they can serve as effective cable organizers.
| Household Item | How to Use It | Best For | Limitations |
|---|---|---|---|
| Rubber Bands | Bundle same-device cables together | Short-term grouping; soft holding | Degrade over time; avoid latex if allergic |
| Binder Clips | Clip to desk edge to guide cables down | Vertical routing; separation | Limited grip on thick desks |
| Paper Clips | Secure cable loops; temporary fasteners | Managing slack; light-duty use | Can scratch surfaces if bent sharply |
| Cardboard Boxes | Enclose power strips or hide wire clusters | Concealment and anchoring | Not fire-resistant; keep away from heat |
| Masking Tape | Temporarily secure cables to desk legs or walls | Guiding paths; non-damaging adhesion | Loses stickiness over time; not for heavy loads |
| Old Shoelaces | Tie into adjustable loops for bundling | Reusable, strong ties | May fray; inspect regularly |
Real Example: Transforming a Home Office Setup
Consider Sarah, a freelance graphic designer working from her dining table converted into a workstation. Her setup included a laptop, external monitor, drawing tablet, printer, phone charger, and Wi-Fi router—all plugged into a single overloaded power strip beneath the table. Wires snaked across the floor, tripping her dog and making it impossible to slide chairs in and out smoothly.
Over one weekend, she applied the no-cost method outlined here. She removed all cables, labeled them with painter’s tape, and eliminated two old chargers she no longer used. Using binder clips from her home office drawer, she routed monitor and laptop cords down opposite sides of the table. Excess lengths were coiled and secured with paper clips. A spare tissue box was placed under the table to house the power strip, with slits cut for cables to exit cleanly.
The result? A visibly cleaner space, easier access during tech issues, and zero tripping incidents since. More importantly, Sarah reported feeling more focused and in control of her workspace—proof that simple changes yield real psychological benefits.
Common Mistakes to Avoid
- Over-tightening bundles: Crushing cables with tight bindings can damage internal wires and reduce lifespan.
- Ignoring ventilation: Covering power strips with fabric or enclosing them in sealed containers can lead to overheating.
- Using permanent adhesives: Duct tape or super glue may seem like quick fixes but can ruin furniture and be nearly impossible to remove.
- Routing high-traffic areas: Avoid running cables across walkways or under rolling chair paths unless properly protected.
- Forgetting future access: Make sure critical connections (like router reboots) remain easy to reach without dismantling the entire system.
Frequently Asked Questions
Can I use hair ties for cable organization?
Yes, fabric-covered hair ties (especially the scrunchie type) are excellent for bundling cables. They’re stretchy, gentle on insulation, and come in various colors for visual coding. Avoid thin elastic bands—they degrade faster and can snap unexpectedly.
What if my desk has no grommet holes or edges to clip onto?
No problem. Use folded pieces of cardboard as anchors. Tape the cardboard to the underside of the desk, then wrap cables around it to prevent slipping. Alternatively, drape grouped wires over a stable leg or frame support and secure them with masking tape at contact points.
How often should I reorganize my cables?
Review your setup every 3–6 months. Devices change, new gadgets arrive, and wear occurs. Regular checkups ensure your system evolves with your needs and remains safe and functional.
Essential Checklist: No-Cost Cable Organization
Follow this concise checklist to ensure you’ve covered all bases:
- ✅ Unplugged all devices safely
- ✅ Identified and labeled each cable
- ✅ Removed outdated or unused cords
- ✅ Grouped cables by device or function
- ✅ Used rubber bands or shoelaces for bundling
- ✅ Installed binder clips for vertical routing
- ✅ Secured slack with paper clips or loops
- ✅ Anchored power strip with a cardboard base
- ✅ Verified all connections work post-setup
- ✅ Took a reference photo for future maintenance
“The simplest solutions are often the most sustainable. Organizing with what you have builds resourcefulness and reduces waste.” — Dr. Lena Patel, Sustainable Living Researcher, Urban Efficiency Lab
Conclusion: Take Control of Your Workspace Today
Organizing cables under your desk doesn’t require a trip to the store or a significant investment. With thoughtful planning and creative use of everyday items, you can transform a chaotic mess into a streamlined, efficient system. The benefits go beyond aesthetics—they enhance safety, improve device longevity, and support a calmer, more productive mindset.
Start today. Clear your desk, gather your tools from around the house, and apply the steps outlined here. In less than an hour, you’ll have a cleaner, smarter workspace that reflects intentionality and care. And once you experience the peace of a tidy setup, you may find yourself inspired to tackle other areas of your digital and physical environment.


 浙公网安备
33010002000092号
浙公网安备
33010002000092号 浙B2-20120091-4
Comments
No comments yet. Why don't you start the discussion?