
Installing Christmas lights is one of the most anticipated holiday traditions—but it can quickly turn into a frustrating ordeal when half the strands don’t work after hours of hanging. The secret to a seamless, stress-free setup? Testing every single strand before installation. Skipping this step risks wasted effort, damaged wires, and last-minute scrambling for replacements. By investing a small amount of time upfront, you ensure that every string lights up as intended once it’s in place.
This process isn’t just about plugging in a strand and hoping for the best. It involves systematic checks, troubleshooting faulty bulbs or fuses, and organizing your inventory efficiently. Whether you're decorating a modest home or managing an elaborate outdoor display, a disciplined pre-installation testing routine saves time, money, and energy.
Why Pre-Testing Matters More Than You Think
Many homeowners assume that if a box of lights was functional last year, it will work again this season. Unfortunately, environmental exposure, storage conditions, and minor manufacturing defects can compromise even recently used strings. A strand might appear intact but have internal wire breaks, corroded contacts, or blown fuses hidden within the plug.
Consider this: hanging 20 strands over gutters and trees takes several hours. If three fail after installation, you’ll need to take them all down, troubleshoot, and reinstall—doubling your labor. Worse, some modern light sets are non-shunt designs, meaning one dead bulb can darken the entire strand. Without testing, you won’t know until they’re already mounted.
“Over 60% of Christmas light failures I see during service calls could have been caught with a five-minute pre-test,” says Derek Langston, a professional holiday lighting installer with over 15 years of experience. “It’s not just convenience—it’s electrical safety.”
Additionally, many LED light sets come with built-in rectifiers and low-voltage circuitry. These components can degrade due to moisture or power surges. Testing allows early detection of flickering, dimming, or partial illumination that may indicate deeper issues.
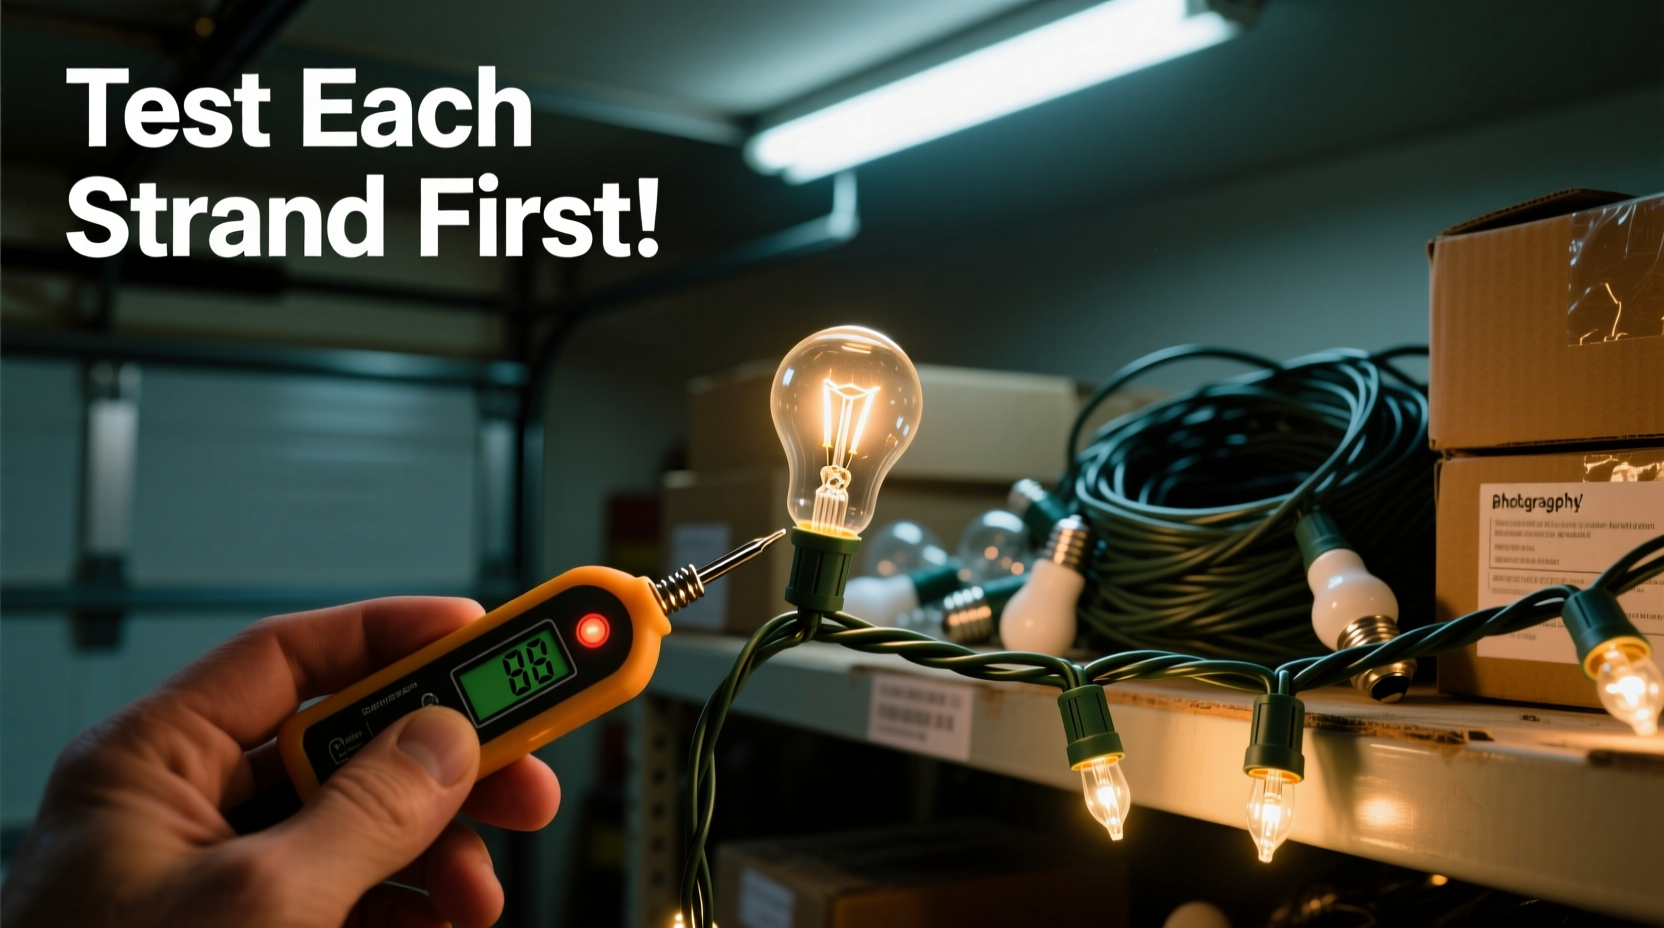
Step-by-Step Guide to Testing Each Strand
To ensure reliability and consistency across your display, follow this detailed testing procedure before any installation begins.
- Gather Supplies: Collect extension cords, a multi-outlet power strip, spare fuses (if applicable), a bulb tester or multimeter, needle-nose plugs, and a notebook for tracking results.
- Unbox One Strand at a Time: Keep packaging intact until confirmed working. Lay the strand flat on a table or floor, untangling completely.
- Inspect Visually: Check for cracked sockets, exposed wires, frayed insulation, or bent prongs. Discard any visibly damaged set.
- Plug In and Power On: Connect the strand to a known-working outlet. Let it run for at least 3–5 minutes to catch intermittent faults like flickering or overheating.
- Check for Full Illumination: Walk along the length and confirm every bulb is lit. Pay attention to dark sections—especially near connectors or ends.
- Test End-to-End Connectivity: If using connectable strands, attach a second known-good strand to verify the male/female connectors function properly.
- Replace Fuses (if needed): Some incandescent sets have replaceable fuses in the plug. Use a fuse tester or swap with a new pair from a repair kit.
- Use a Bulb Tester: For individual dark bulbs, remove and test with a spring-loaded bulb checker. Replace with exact-match spares.
- Label Results Immediately: Tag each strand with colored tape: green = fully functional, yellow = repaired, red = discard.
- Store Tested Strands Separately: Place working sets in labeled bins by color, length, and type to streamline installation later.
This methodical approach prevents confusion and ensures accountability. Never skip the labeling step—memory fades quickly when dealing with dozens of nearly identical strands.
Common Problems and How to Fix Them
Even high-quality light strings develop issues over time. Knowing how to diagnose and resolve common problems makes pre-testing far more effective.
- Flickering Lights: Often caused by loose bulbs or poor socket contact. Rotate each bulb gently while powered to identify unstable connections.
- Half a Strand Out: Indicates a broken wire or failed shunt in incandescent sets. Use a voltage detector to trace the break point, or replace the section if modular.
- One Bulb Dark: In older series-wired sets, this may not affect others. However, in newer shunted designs, it often does. Replace immediately.
- Entire Strand Dead: First check the fuse. Then inspect both plugs for damage. Finally, use a multimeter to test continuity across the line.
- Overheating Plug: A serious warning sign. Unplug immediately. This usually means internal shorting or overload—discard the strand.
| Issue | Most Likely Cause | Solution |
|---|---|---|
| No lights at all | Blown fuse, broken wire, or bad plug | Replace fuse; inspect wiring; test with multimeter |
| Last few bulbs dim | Voltage drop in long runs | Shorten chain or use higher-voltage-rated strands |
| Frequent burnouts | Moisture ingress or power surge | Store in sealed containers; use surge protectors |
| Blinking randomly | Faulty controller or timer | Remove from circuit; test without timer |
| Only works when wiggled | Loose connection inside plug or socket | Retire the strand—intermittent faults worsen over time |
Real-World Example: A Homeowner’s Close Call
Mark Teller, a homeowner in Portland, Oregon, learned the hard way why pre-testing matters. Last November, he spent two full weekends installing over 80 strands of incandescent lights around his two-story house. Excited to unveil the display, he flipped the switch—only to find that 17 strands were completely dead, and another 9 had multiple dark sections.
He spent the next week taking everything down, testing each one individually, and making repairs. During the process, he discovered water had seeped into several plugs during storage in his damp garage. Corrosion had eaten through internal contacts. Two strands showed signs of melting near the base plug—a potential fire risk had they remained energized longer.
After replacing damaged sets and investing in waterproof storage bins, Mark now tests every strand in early October. He labels each one and keeps a spreadsheet logging purchase date, location used, and repair history. “I used to think I was saving time by skipping checks,” he said. “Now I realize I was just delaying the inevitable—and risking my home’s safety.”
Essential Checklist for Stress-Free Light Testing
Before you begin, print or copy this checklist to guide your workflow:
- ☐ Designate a clean, dry workspace indoors
- ☐ Gather tools: power strip, spare fuses, bulb tester, labels, notebook
- ☐ Sort strands by type (LED/incandescent), color, and length
- ☐ Inspect each strand for visible damage
- ☐ Plug in and test for full operation (minimum 5 minutes)
- ☐ Identify and replace dead bulbs
- ☐ Test connector compatibility with adjacent strands
- ☐ Replace blown fuses where applicable
- ☐ Label each strand based on functionality
- ☐ Store working sets in protective reels or boxes by zone
- ☐ Set aside non-repairable strands for recycling
- ☐ Order replacements early if inventory falls short
Completing this list systematically eliminates guesswork and ensures no strand slips through undetected. Treat testing like quality control—because that’s exactly what it is.
Frequently Asked Questions
Can I test all my strands at once by plugging them together?
No. While daisy-chaining seems efficient, it masks individual failures. If one strand has a short, it can trip a breaker or prevent others from powering correctly. Always test one strand—or at most two connected units—at a time using a reliable power source.
Do LED strands need testing too? They’re supposed to last forever.
Yes, absolutely. While LEDs have longer lifespans, their drivers, connectors, and circuit boards are vulnerable to moisture, voltage spikes, and physical stress. Many LED failures occur at the plug or first bulb rather than along the wire. Pre-testing catches these issues before installation.
What should I do with strands that keep failing after repair?
Retire them. Repeated failures suggest underlying design flaws or cumulative wear. Continuing to repair old strands costs more in time and materials than buying new, energy-efficient models. Modern LED sets consume up to 90% less power and come with better warranties.
Final Thoughts: Build a Tradition That Lasts
The joy of a glowing holiday home shouldn’t be overshadowed by avoidable technical setbacks. Taking the time to test each strand before installation transforms a chaotic chore into a smooth, predictable process. It protects your investment, reduces waste, and most importantly, keeps your family safe from electrical hazards.
Think of pre-testing as part of your seasonal ritual—like baking cookies or watching classic films. With the right system, it becomes quick, almost meditative. Over time, you’ll build a curated collection of reliable, well-documented light sets that perform year after year.


 浙公网安备
33010002000092号
浙公网安备
33010002000092号 浙B2-20120091-4
Comments
No comments yet. Why don't you start the discussion?