
A sleek, minimalist entertainment center is one of the most satisfying upgrades to any living room. But no matter how carefully you arrange your soundbar, streaming devices, or gaming consoles, exposed cords can instantly ruin the aesthetic. Tangled power cables, HDMI wires, and audio connectors not only look messy but can also pose tripping hazards and collect dust. The good news? Hiding these cords doesn’t require expensive renovations or advanced technical skills. With the right tools and techniques, you can achieve a clean, professional-looking setup that enhances both safety and style.
The key to effective cord management lies in planning, choosing the right materials, and executing a system that’s both functional and discreet. Whether your TV is mounted on the wall or sitting on a stand, there are multiple reliable strategies to conceal cords without sacrificing accessibility or performance. This guide walks through the most effective approaches, backed by real-world examples, expert insights, and practical checklists to help you transform your entertainment area into a clutter-free zone.
Plan Your Setup Before You Start
Before cutting any zip ties or drilling holes, take time to map out your entire TV and media configuration. Identify every device—TV, cable box, sound system, game console, streaming stick—and note where each power and data cable originates and terminates. This inventory helps determine how many cords need hiding and which routing method will work best.
Consider the location of your nearest power outlet and internet connection. If they’re far from your TV, you may need an extension solution or consider relocating equipment. Wall-mounted TVs often benefit from in-wall cabling, while furniture-based setups may lean toward raceways or cord covers. Planning prevents mid-project surprises like running out of HDMI length or discovering that your favorite cord concealer blocks ventilation.
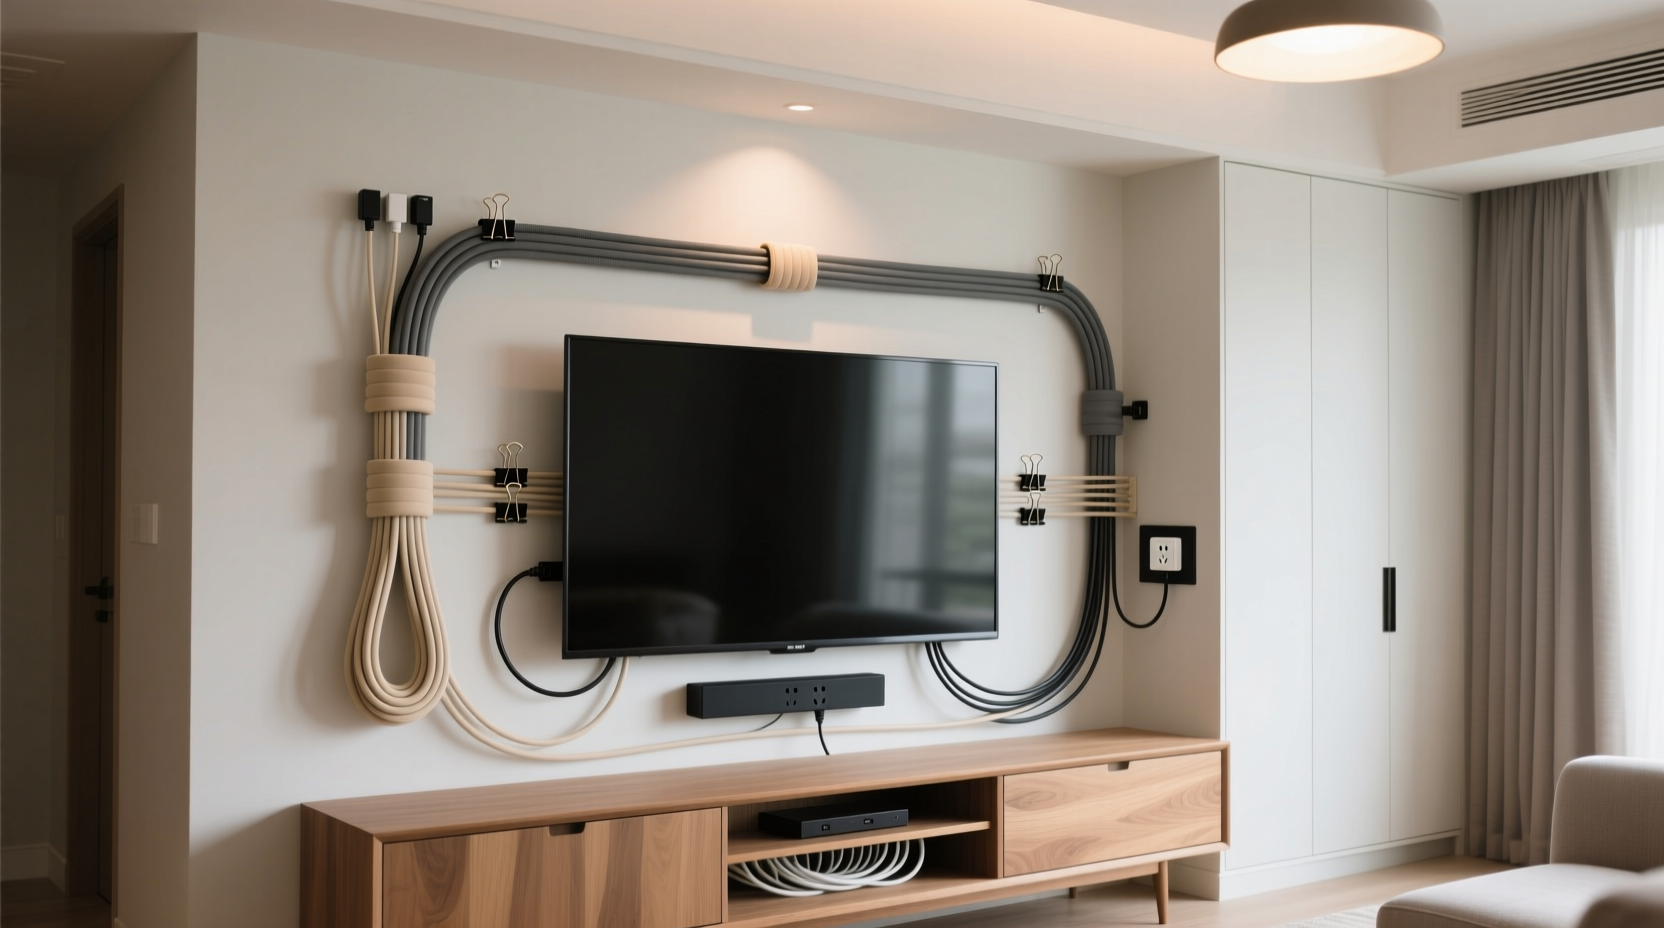
Use Cord Management Raceways for Surface Mounting
Raceways—also known as cord cover tracks—are one of the most popular and user-friendly solutions for hiding cords along walls or baseboards. These hollow plastic channels mount directly onto surfaces with adhesive or screws and allow you to bundle all cables inside, creating a seamless appearance.
Available in various lengths and finishes (including white, beige, and paintable options), raceways blend easily into most interiors. Some models even feature removable lids for future access, making it simple to add or replace devices without tearing down the entire system.
To install a raceway:
- Measure the distance from your TV to the nearest power source and data outlet.
- Cut the raceway to size if necessary (most come in standard 3–6 foot sections).
- Route your cords through the channel before mounting.
- Secure the raceway to the wall using included adhesive strips or screws.
- Close the lid and enjoy a tidy finish.
Raceways work especially well when your TV is positioned above a console or media cabinet. Run the track vertically from the outlet up to the TV height, then extend it horizontally if needed to reach other components. For corners, use flexible bendable raceways or corner connectors designed for smooth transitions.
In-Wall Cable Concealment for Mounted TVs
If your TV is wall-mounted, in-wall cabling offers the cleanest possible result—literally disappearing cords behind drywall. However, this method requires more effort and caution than surface-level solutions.
Proper in-wall installation involves cutting two small openings: one near the floor where your outlets and router are located, and another behind the TV at mounting height. A fish tape or flexible drill bit helps guide the cables through the stud cavity. Once pulled through, plug them into your devices and patch the upper hole with spackle or a decorative outlet cover.
Important: Never run standard electrical cords inside walls unless protected by a UL-listed in-wall rated conduit. Instead, use low-voltage cables (like HDMI) specifically designed for in-wall use, marked “CL2” or “CL3.” For power, consider installing a recessed power kit—a metal box mounted behind the TV that connects to your main outlet via a slim, flexible armored cord routed externally along the baseboard or under carpet edges.
“With proper materials and technique, in-wall cord management can give your living room the polished look of a high-end home theater.” — Marcus Lin, AV Installation Specialist
Mini Case Study: The Modern Family Living Room Makeover
The Thompson family had a 75-inch OLED TV mounted above their fireplace, but the dangling cords created a chaotic look. Their son’s PlayStation, Apple TV, and soundbar all required separate connections, resulting in a spaghetti-like mess behind the screen.
They opted for an in-wall solution using CL3-rated HDMI cables and a recessed power kit. An electrician installed a new outlet behind the wall cavity and ran the power line safely through a side channel. All other signal cables were fed through the wall using a fish rod. The final result was nearly invisible—only a tiny access point near the baseboard remained visible, neatly covered by a sofa. The family reported feeling like they’d upgraded their entire home just by cleaning up the back of the TV.
Cord Clips, Sleeves, and Bundling Techniques
For simpler setups or renters who can’t modify walls, bundling cords together with clips or sleeves is an affordable and reversible option. These tools keep wires organized and reduce visual clutter without permanent installation.
- Velcro straps – Reusable and gentle on cables, ideal for grouping cords behind a media console.
- Braided cable sleeves – Expandable mesh tubes that encase multiple wires into a single neat bundle.
- Adhesive cord clips – Small plastic mounts that hold wires flush against furniture legs or wall surfaces.
Start by aligning all cables side-by-side and securing them every 6–8 inches with Velcro or clips. Use a sleeve for a more polished look—simply thread all cords through one end and pull tight. Avoid over-tightening, which can compress insulation and impair signal quality.
| Method | Best For | Installation Difficulty | Reversibility |
|---|---|---|---|
| Raceways | Wall-mounted or console setups | Easy to Moderate | High (removable) |
| In-Wall Cabling | Permanent wall-mounted TVs | Moderate to High | Low (requires patching) |
| Cord Clips & Sleeves | Renters or temporary setups | Very Easy | Very High |
| Furniture Integration | Consoles with built-in channels | None (pre-designed) | N/A |
| Power Bridge Kits | Minimizing visible power cords | Moderate | Moderate |
Choose Furniture That Supports Cord Management
Not all entertainment centers are created equal. When selecting a TV stand or media console, prioritize models with built-in cord management features such as pre-drilled holes, internal channels, or rear cutouts. These design elements make it easy to route cables neatly from devices to outlets without external accessories.
Look for wide back panels with grommets or rubber-lined ports to prevent wire chafing. Some high-end cabinets even include pull-out trays for AV receivers and hidden compartments for power strips. Pairing smart furniture with minimal external cabling can drastically reduce the need for additional concealment tools.
If your current stand lacks these features, consider retrofitting it. Drill small holes in the back panel (measuring carefully to avoid structural supports) and feed cords through to the rear. Place a fabric cord bag or felt-lined organizer on the backside to store excess length and maintain a clean profile.
Step-by-Step Guide: Hide Your TV Cords in 6 Steps
Follow this clear sequence to organize and conceal your cords efficiently:
- Unplug and label all devices. Use masking tape and a marker to identify each cord by its function (e.g., “Soundbar Power,” “HDMI to PS5”).
- Group cables by type. Separate power cords from HDMI, optical audio, Ethernet, and USB cables.
- Select your concealment method. Choose based on your setup: raceway for walls, sleeve for consoles, or in-wall for mounted TVs.
- Route cords accordingly. Feed them through chosen channels, ensuring no sharp bends or tension points.
- Secure bundles. Use Velcro straps or clips every few inches to prevent sagging or tangling.
- Test everything before finalizing. Plug in all devices, turn them on, and verify signals are strong. Only then close raceway lids or patch walls.
This process typically takes 30–90 minutes depending on complexity and ensures a durable, functional outcome.
Common Mistakes to Avoid
- Ignoring ventilation – Packing too many devices in enclosed spaces can cause overheating. Leave space around amplifiers and streaming boxes.
- Using non-in-wall-rated cables – Standard HDMI cables aren’t fire-safe for in-wall use. Always check for CL2/CL3 certification.
- Over-tightening zip ties – Can damage cable insulation and degrade signal quality over time. Opt for reusable Velcro instead.
- Blocking access to ports – Ensure your concealment method allows easy unplugging for maintenance or upgrades.
FAQ
Can I hide cords without drilling holes?
Yes. Use adhesive-backed raceways, cord sleeves, or clip-on organizers that attach to furniture or baseboards without damaging walls. These are ideal for rentals or temporary setups.
How do I hide cords when my outlet is far from the TV?
Use a slim-line power bridge kit that runs along the baseboard, or install a floor box outlet. Alternatively, place a matching power strip inside your media console and extend cords discreetly through the back.
Are wireless solutions a viable alternative?
While wireless charging and streaming reduce some cables, most TVs still require power and occasional wired connections for optimal performance. Wireless shouldn’t be relied on exclusively for full cord elimination.
Final Checklist: Did You Cover All Bases?
- ✅ Measured distances between devices and outlets
- Ensures cables are long enough and routes are efficient.
- ✅ Selected UL-rated or CL3-certified cables for in-wall use
- Safety first—never compromise on fire ratings.
- ✅ Grouped and labeled all cords
- Saves time during installation and future troubleshooting.
- ✅ Allowed space for heat dissipation
- Prevents device damage and extends lifespan.
- ✅ Tested all connections post-installation
- Confirms audio, video, and power are working properly.
- ✅ Chose a method compatible with your living situation
- Renters should avoid permanent modifications; homeowners can explore in-wall options.
Conclusion: Transform Clutter Into Clean Design
A clean TV setup isn’t just about aesthetics—it reflects thoughtful organization and attention to detail. By applying the right combination of planning, tools, and techniques, you can eliminate unsightly cords and create a living space that feels intentional and calm. Whether you opt for simple cord sleeves or invest in professional-grade in-wall installation, the result is the same: a modern, distraction-free environment where your content takes center stage—not the cables powering it.


 浙公网安备
33010002000092号
浙公网安备
33010002000092号 浙B2-20120091-4
Comments
No comments yet. Why don't you start the discussion?