
A cluttered desk doesn’t just look unprofessional—it can disrupt focus, reduce productivity, and make even simple tasks feel overwhelming. Among the biggest culprits? Exposed cords. Whether you’re working from home, studying, or managing a small office, tangled power strips, charging cables, and monitor wires create visual chaos. The good news is that hiding these cords doesn’t require a renovation or a designer budget. With smart organization, a few inexpensive tools, and some creativity, you can achieve a clean, minimalist desk setup that feels intentional and calming.
This guide explores practical, affordable, and effective methods to conceal cords without sacrificing accessibility or safety. From DIY hacks to clever store-bought solutions, you’ll find options that fit any workspace, aesthetic, and budget.
Why Cord Management Matters
It’s easy to overlook the impact of visible cords until you experience a well-organized desk. A clean surface does more than look better—it supports mental clarity. Studies in environmental psychology suggest that organized spaces reduce cognitive load, helping people focus and process information more efficiently. Tangled wires, on the other hand, contribute to subconscious stress and distraction.
Beyond aesthetics, poor cord management poses real risks: tripping hazards, accidental unplugging, and even overheating when cables are compressed under furniture or trapped in tight spaces. Properly managed cords also extend the lifespan of your devices by preventing fraying and strain on connectors.
“Good cable management isn't about perfection—it's about creating a workspace that supports flow and function.” — Jordan Lee, Workspace Ergonomics Consultant
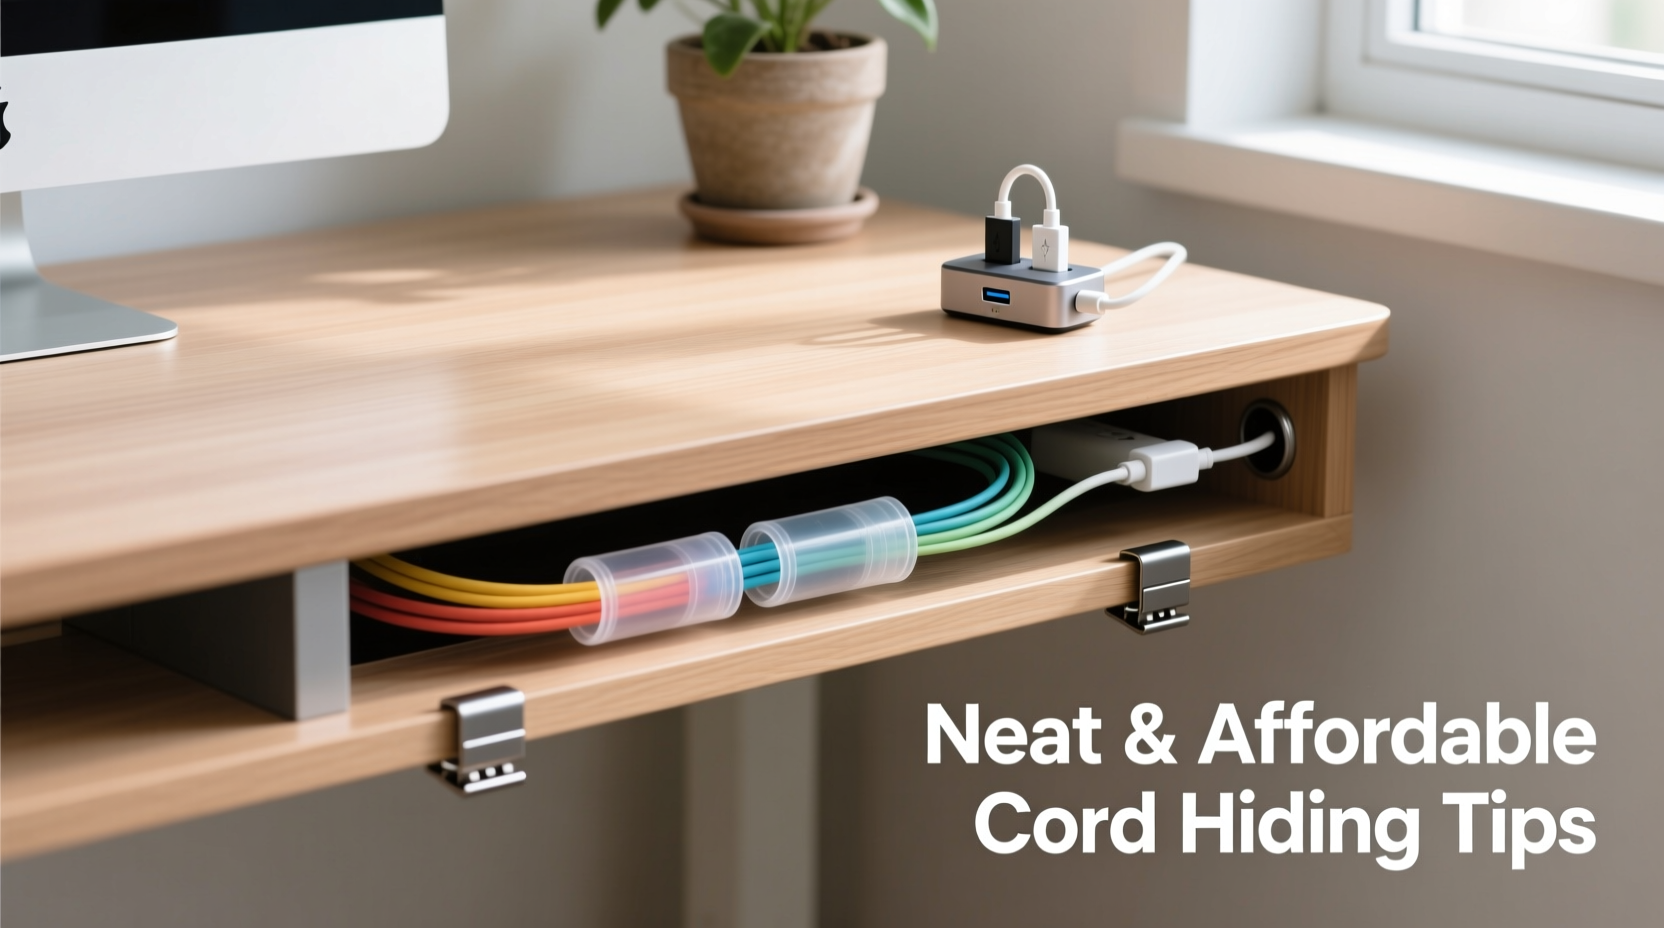
1. Use Adhesive Cable Clips for Instant Order
One of the simplest and most cost-effective ways to tame loose cords is with adhesive cable clips. These small plastic or rubber channels stick directly to your desk surface, wall, or underside of the desk, guiding cords along a clean path.
Available in various sizes and colors, they’re ideal for securing charging cables, USB lines, or HDMI cords. Place them vertically down the side of your desk or horizontally along the back edge to route multiple cables toward a single power strip or outlet.
For a nearly invisible look, opt for white or clear clips that blend with your desk. Reusable silicone versions allow repositioning without residue, making them perfect for renters or those who frequently rearrange their workspace.
2. Bundle Cords with Velcro Ties or Reusable Straps
Loose strands become messy fast. Instead of twisting cords around each other (which causes tangles), use Velcro cable ties or fabric-wrapped straps to group them neatly. Unlike zip ties, Velcro is reusable and gentle on insulation.
Cut long Velcro rolls into 6–8 inch sections, or buy pre-cut ones in bulk. Wrap them every 6–12 inches along a bundle, starting near the device and moving toward the power source. For color-coding, assign different colored ties to specific devices—blue for laptop, red for monitor, green for lamp, etc.
- Velcro ties cost as little as $5 for a pack of 20.
- Fabric straps with snap closures offer a premium look and feel.
- Avoid elastic bands—they degrade over time and can damage cords.
3. Route Cables Under the Desk with Raceways
A cable raceway is a flat, rectangular channel that mounts under the back edge of your desk, creating a hidden highway for all your cords. It’s one of the most professional-looking solutions and is surprisingly affordable.
Raceways come in paintable white or gray plastic, or sleek aluminum finishes. Most include mounting tape or screws. Simply drill small entry holes at intervals, feed cords into the channel, and close the lid. The entire bundle stays out of sight but remains accessible—you can pop open the cover anytime to add or remove cables.
| Solution | Cost Range | Installation Time | Best For |
|---|---|---|---|
| Adhesive Clips | $3–$10 | 5 minutes | Quick fixes, temporary setups |
| Velcro Ties | $5–$15 | 10 minutes | Grouping loose cables |
| Cable Raceway | $15–$30 | 20–30 minutes | Permanent, clean under-desk routing |
| Cord Covers + Paint | $20–$40 | 1 hour | Wall-mounted desk setups |
| DIY Box Enclosure | $10–$25 | 45 minutes | Hiding power strips and adapters |
4. Build a DIY Cord Concealment Box
If you have a power strip buried under a jungle of adapters, a concealment box is an elegant solution. You don’t need woodworking skills—just a sturdy cardboard box, wooden crate, or even an old shoebox.
Here’s how to build one in four steps:
- Select a container: Choose something slightly larger than your power strip and plug-in adapters. A ventilated wooden box is ideal, but a thick cardboard box works if kept away from heat sources.
- Cut entry and exit holes: Use a utility knife or drill to make slots in the back and bottom for cords to pass through. Make them just large enough to prevent unnecessary gaps.
- Paint or decorate: Match the box to your desk color. Use spray paint, contact paper, or washi tape for a custom look.
- Position and secure: Place the box behind or beside your desk. Use double-sided tape or adhesive pads to keep it from shifting.
This method keeps bulky transformers and power bricks contained while giving your setup a polished appearance. It’s also fully reversible—perfect for shared workspaces or rental units.
5. Leverage Furniture and Wall Space
Many people forget that their desk doesn’t have to bear the full burden of cord management. Smart use of surrounding space can dramatically reduce clutter.
If your desk is against a wall, consider installing a slim shelf above or below it to hold power strips. Alternatively, mount a small cabinet or floating box underneath the desk to house all your electronics. Even a basic pegboard with hooks can organize excess cable length and keep adapters off the floor.
For wall-mounted desks or floating shelves, run cords through cord covers that adhere directly to the wall. These plastic tracks can be painted to match your wall color, rendering them nearly invisible. Feed monitor, lamp, and router cables through them straight to the outlet.
“Most people spend too much time managing cords at the desk level. The real solution is vertical planning.” — Maria Tran, Interior Design Specialist
Mini Case Study: Transforming a Home Office Corner
Consider Sarah, a freelance graphic designer working from a small bedroom nook. Her desk was crammed with a laptop, dual monitors, drawing tablet, phone charger, lamp, and Wi-Fi router—all plugged into two overloaded power strips on the floor. Every morning, she tripped over cords or accidentally unplugged her monitor.
She implemented three low-cost changes:
- Mounted a $12 cable raceway under her desk to route all cords from devices to the back.
- Built a painted cardboard box enclosure for her power strip, placing it behind the desk leg where it was hidden but accessible.
- Used black Velcro ties to group monitor and laptop cords together, labeling each with a tiny tag.
Total cost: under $25. Time invested: one Saturday morning. Result? A clean, professional-looking workspace that reduced daily frustration and made video calls less embarrassing. “I didn’t realize how much mental clutter those cords were causing,” she said. “Now my whole workflow feels smoother.”
Step-by-Step Guide to a Cord-Free Desk
Follow this timeline to transform your desk in under two hours:
- Unplug everything (10 minutes): Take inventory of all devices and cords. Label each plug with masking tape and a marker (e.g., “Monitor,” “Lamp”).
- Declutter (15 minutes): Discard frayed cables, old chargers, and unused adapters. Recycle responsibly.
- Plan your layout (10 minutes): Decide where your power strip will go—ideally near an outlet and hidden from view. Map cord paths from devices to that point.
- Install routing tools (30 minutes): Attach cable clips, raceway, or cord covers. Feed cords through as you go, grouping similar ones together.
- Secure and conceal (20 minutes): Use Velcro ties every few inches. Place power strip in a DIY box or under-desk tray. Tuck excess cord length into loops secured with ties.
- Test and adjust (15 minutes): Plug everything back in. Check for tension, overheating, or awkward bends. Make final tweaks.
By the end, you’ll have a streamlined desk where every cord has a purpose and a place.
Checklist: Your Cord Management Action Plan
- ☐ Unplug and label all cords
- ☐ Remove damaged or unused cables
- ☐ Choose a central power hub location
- ☐ Install adhesive clips or raceway
- ☐ Group cords with Velcro or fabric ties
- ☐ Build or buy a power strip enclosure
- ☐ Route excess length neatly (avoid tight coils)
- ☐ Test all connections and adjust positioning
- ☐ Clean the area beneath and around the desk
- ☐ Schedule a monthly cord check-up
Frequently Asked Questions
Can I use tape to secure cords?
Regular tape is not recommended—it can leave residue, lose adhesion over time, or damage cord insulation. Instead, use double-sided mounting tape designed for cables, or opt for adhesive clips with strong backing. Painter’s tape is acceptable for temporary setups but should be replaced within a few weeks.
How do I prevent cords from tangling again?
Consistency is key. Always unplug and rewind cords the same way. Use labeled Velcro ties at consistent intervals. Store extra length in loose figure-eight loops rather than tight circles, which cause internal wire stress. Consider magnetic cable holders for frequently used cords like phone chargers.
Are wireless solutions worth it?
Wireless charging pads and Bluetooth peripherals reduce cord count, but they don’t eliminate the need for power. Most still require a USB connection to a wall outlet. However, combining wireless devices with smart cord management can significantly cut visible clutter. Just remember: fewer cords are helpful, but proper management of the ones you keep matters more.
Final Thoughts: A Clean Desk Is Within Reach
You don’t need a custom-built office or high-end accessories to conquer cord chaos. The best solutions are often the simplest: thoughtful grouping, strategic routing, and a little DIY ingenuity. What matters most isn’t perfection—it’s progress. A few well-placed clips, a homemade box, and a couple of reusable ties can transform your workspace from chaotic to calm.
Start small. Pick one method from this guide and implement it today. Then build from there. Over time, you’ll develop a system that works for your habits and environment. A tidy desk isn’t just about looks—it’s about creating a space where you can think clearly, work efficiently, and feel in control.


 浙公网安备
33010002000092号
浙公网安备
33010002000092号 浙B2-20120091-4
Comments
No comments yet. Why don't you start the discussion?