
Transforming your holiday display from static strings of lights to a dynamic, eye-catching spectacle is easier than ever with the right tools. One of the most effective ways to achieve this is by using Christmas light chase controllers—compact devices designed to sequence power across multiple light strands in precise patterns. When configured properly, these controllers can generate mesmerizing wave effects that ripple through your display like liquid light. Whether you're decorating a rooftop, wrapping trees, or outlining windows, understanding how to use chase controllers elevates your setup from ordinary to extraordinary.
What Is a Chase Controller and How Does It Work?
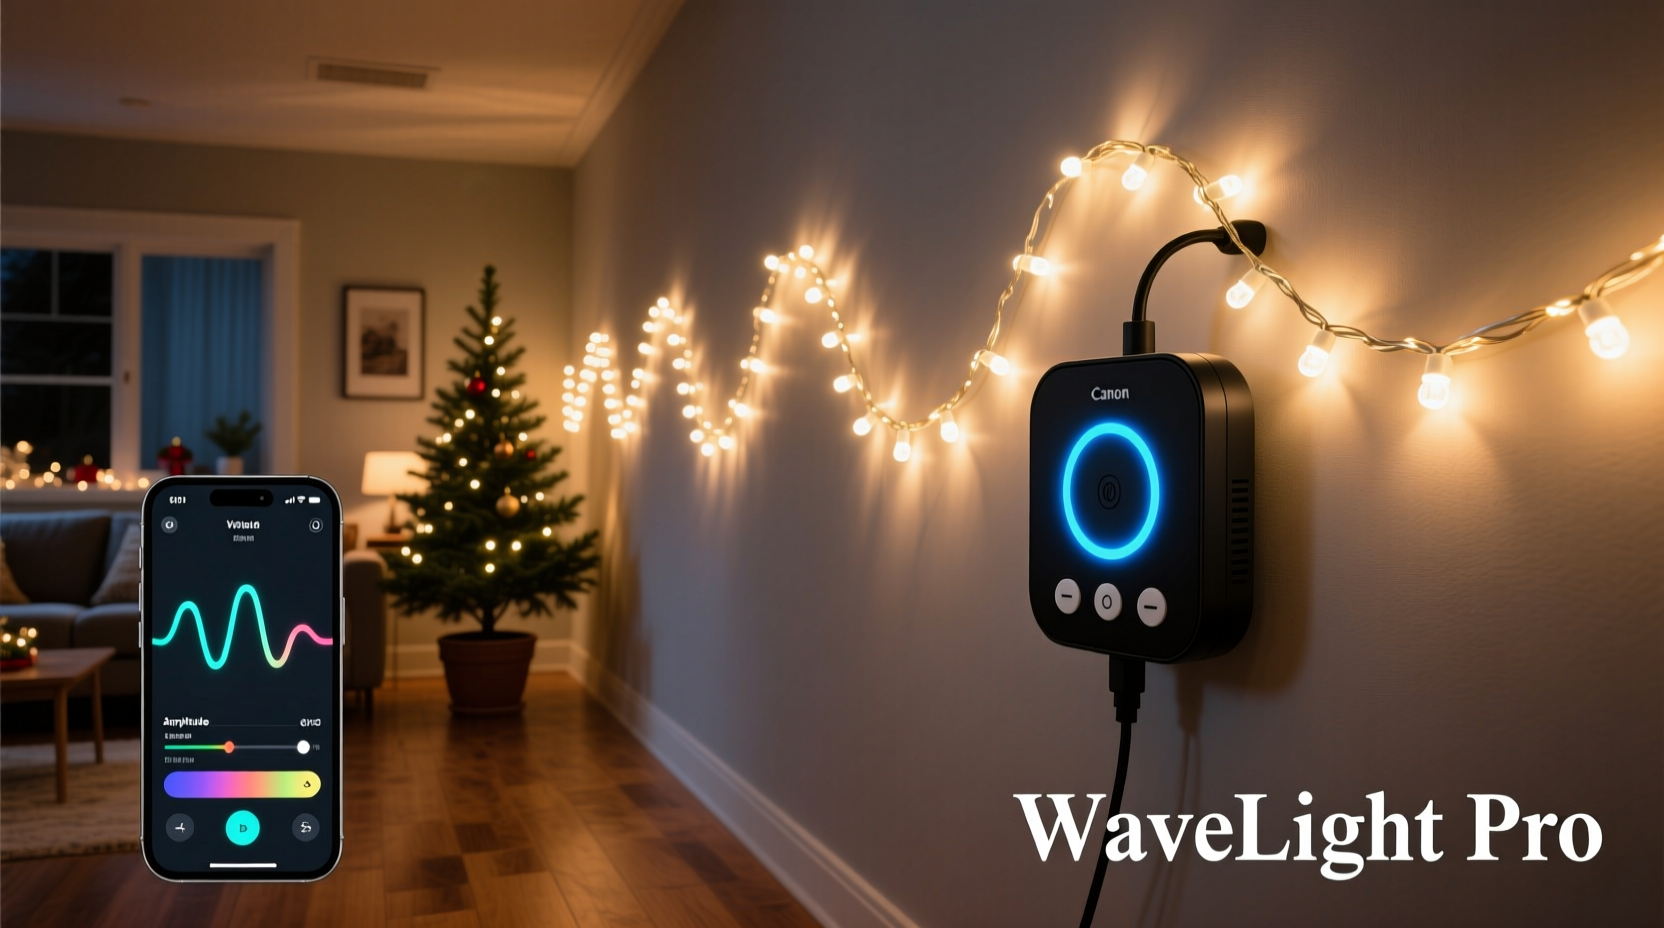
A Christmas light chase controller is an electronic device that cycles electrical output through several channels in a programmed sequence. Each channel connects to a separate strand of lights, and as power shifts from one to the next, it creates the illusion of movement—commonly known as a \"chasing\" or \"wave\" effect. This mimics the visual rhythm seen in classic neon signs or vintage marquees, where bulbs appear to travel in a continuous loop.
Modern chase controllers come in various forms: basic mechanical relays, digital solid-state units, and even Wi-Fi-enabled smart models compatible with apps. At their core, they operate on timing circuits that activate each outlet in succession, pause briefly, then deactivate before moving to the next. The speed, direction (forward, reverse, alternating), and pattern (sequential, random, cascading) are often adjustable depending on the model.
For wave effects specifically, the goal is to produce a smooth progression of illumination that appears fluid rather than jumpy. This requires careful synchronization between light placement, wiring, and controller settings. High-quality LED mini-lights work best due to their fast response time and low power draw, allowing for crisp transitions without flicker or delay.
Choosing the Right Chase Controller for Wave Effects
Not all chase controllers are built equally when it comes to creating seamless wave patterns. Some prioritize randomness or strobing over smooth sequencing, which defeats the purpose of a flowing wave. Consider these key features when selecting a unit:
- Number of Channels: Most residential setups benefit from 4 to 8 channels. More channels allow longer, more complex waves.
- Adjustable Speed Control: Essential for fine-tuning the pace of the wave to match the physical layout of your lights.
- Directional Options: Look for forward, reverse, and bidirectional modes to vary the flow of the wave.
- Pattern Memory: Units that save preferred sequences eliminate the need to reprogram each season.
- Voltage Compatibility: Ensure the controller supports standard household voltage (120V in North America) and matches your light type (incandescent vs. LED).
For beginners, plug-in modules like the Gemstone LED 8-Channel Digital Sequencer offer intuitive dials and preset programs ideal for wave creation. Advanced users may prefer programmable DMX-compatible systems used in commercial displays, which allow pixel-level control over thousands of LEDs.
“Smooth wave effects depend less on hardware cost and more on precision in timing and spacing. A $30 controller with well-placed lights outperforms a high-end unit with poor setup.” — Daniel Reeves, Holiday Lighting Designer & Instructor at LightShowAcademy.org
Step-by-Step Guide to Setting Up a Wave Effect
Creating a convincing wave isn’t just about plugging in lights—it’s about choreography. Follow this timeline-based approach to build a professional-quality display:
- Plan Your Layout (Day 1)
Sketch your house outline or yard area. Decide where the wave will begin and end. Vertical runs (e.g., down gutters) suit single-direction waves; horizontal lines (rooflines, fences) work well for back-and-forth motion. - Measure and Install Lights (Day 2–3)
Install individual light strands so each segment aligns precisely with the next. Avoid gaps greater than 6 inches between ends—this breaks the continuity of the wave. Use clips or hooks to secure wires evenly. - Select and Test the Controller (Day 4)
Connect one light per channel and test the sequence indoors first. Adjust speed until the transition looks natural—not too fast (blurry) or slow (jerky). - Wire and Sync Outdoors (Day 5)
Run extension cords safely along eaves or buried under mulch if needed. Label each channel’s cord for easy troubleshooting. Plug in and verify all lights respond correctly. - Final Tuning (Day 6)
At dusk, observe the full effect. Fine-tune speed and direction. Add dimming or color filters if desired to enhance depth.
This phased method prevents last-minute issues and ensures reliability throughout the season. Always check local electrical codes regarding outdoor wiring and use GFCI-protected outlets.
Do’s and Don’ts: Optimizing Performance
| Action | Recommendation | Reason |
|---|---|---|
| Do space strands closely | Keep ends within 6 inches | Maintains visual continuity of the wave |
| Do use timers | Set automatic on/off hours | Extends bulb life and reduces energy waste |
| Don’t overload circuits | Stay below 80% of rated load | Prevents tripped breakers and fire hazards |
| Don’t mix warm and cool white | Use consistent color temps | Color contrast distracts from motion effect |
| Do protect connections | Use weatherproof enclosures | Moisture causes shorts and erratic behavior |
Real Example: A Suburban Home Transformed
In suburban Denver, homeowner Maria Lin installed a six-channel chase system along her two-story gable roofline. She divided the vertical drop into six equal sections, each lit with a 50-light string of pure white LEDs spaced exactly 18 inches apart. Using a Luminara Pro 6-Channel Digital Controller, she programmed a downward wave that reset every 12 seconds.
The result was immediate neighborhood attention. “It looked like snow falling slowly down the side of the house,” she said. “Kids would point and say ‘Mommy, look at the magic waterfall!’” By adjusting the speed slightly slower than factory default, she achieved a graceful cascade instead of a rapid blink. She later added a second controller for upward-moving waves on the porch columns, creating a mesmerizing push-pull rhythm.
Maria’s success stemmed not from expensive gear but from disciplined spacing and thoughtful sequencing—proving that even modest equipment can deliver premium results with proper planning.
Expanding Beyond Basic Waves
Once comfortable with simple chases, experiment with layered effects. For example:
- Dual-Wave Patterns: Run opposing waves (up and down) on adjacent columns to simulate convergence.
- Pulsed Waves: Combine chasing with gradual dimming to mimic ocean swells.
- Color-Changing Variants: Pair RGB LED strips with addressable controllers to shift colors as the wave progresses.
Some advanced users integrate sound sensors or app-based triggers to sync waves with music, turning their homes into immersive light shows during holiday gatherings. While more complex, these builds start with the same foundational principles of timing, alignment, and clean power delivery.
Frequently Asked Questions
Can I use regular Christmas lights with a chase controller?
Yes, but only if they’re wired for independent circuit operation (typically labeled “rhythm” or “chase-ready”). Standard parallel-wired sets won’t work because all bulbs receive power simultaneously. Check packaging or manufacturer specs before purchase.
Why does my wave look choppy instead of smooth?
This usually stems from either uneven spacing between light strands or incorrect timing. Increase the pause duration between channel activations to give the eye time to follow the motion. Also ensure all bulbs turn on instantly—older incandescents have slight lag compared to LEDs.
Are chase controllers safe for outdoor use?
Only if specifically rated for outdoor conditions (look for UL certification and IP44 or higher). Always place the controller itself in a covered, dry location—even if connected lights are weatherproof. Never expose internal electronics to rain or snow.
Checklist: Preparing Your Chase Controller Setup
- ☐ Measure total linear footage for wave path
- ☐ Purchase matched LED light strands (same brand, color, length)
- ☐ Choose a controller with enough channels and speed adjustment
- ☐ Plan wire routing and outlet access
- ☐ Test all components indoors before installation
- ☐ Secure outdoor connections with waterproof junction boxes
- ☐ Program and fine-tune wave speed at night
- ☐ Install timer or smart plug for automated scheduling
Conclusion: Bring Motion to Your Holidays
Christmas light chase controllers unlock a new dimension in seasonal decoration—one defined not by stillness, but by rhythm and flow. With thoughtful design and attention to detail, homeowners can craft wave effects that captivate neighbors and delight families. These aren’t gimmicks; they’re expressions of creativity made possible through accessible technology.
The beauty of modern lighting systems lies in their scalability. You don’t need a mansion or a warehouse of gear to make an impact. Start small—on a single window frame or garden post—and grow your vision year after year. Master the basics of sequencing, embrace the physics of perception, and let your lights dance.


 浙公网安备
33010002000092号
浙公网安备
33010002000092号 浙B2-20120091-4
Comments
No comments yet. Why don't you start the discussion?