
As the holiday season approaches, one of the most time-consuming tasks for homeowners is decorating their homes with festive lighting. For decades, traditional string lights have been the go-to option—winding them around trees, draping them along eaves, and securing them with clips or nails. But in recent years, Christmas projection lights have emerged as a compelling alternative, promising faster setup and fewer hassles. The key question many decorators now face is not just about brightness or aesthetics, but efficiency: which option truly saves more setup time?
This article compares Christmas projection lights and physical string lights from the perspective of installation speed, labor intensity, adaptability, and long-term usability. Whether you're a minimalist decorator or someone who transforms your home into a winter wonderland every December, understanding the real-time cost of each lighting method can help you make a smarter, faster decision.
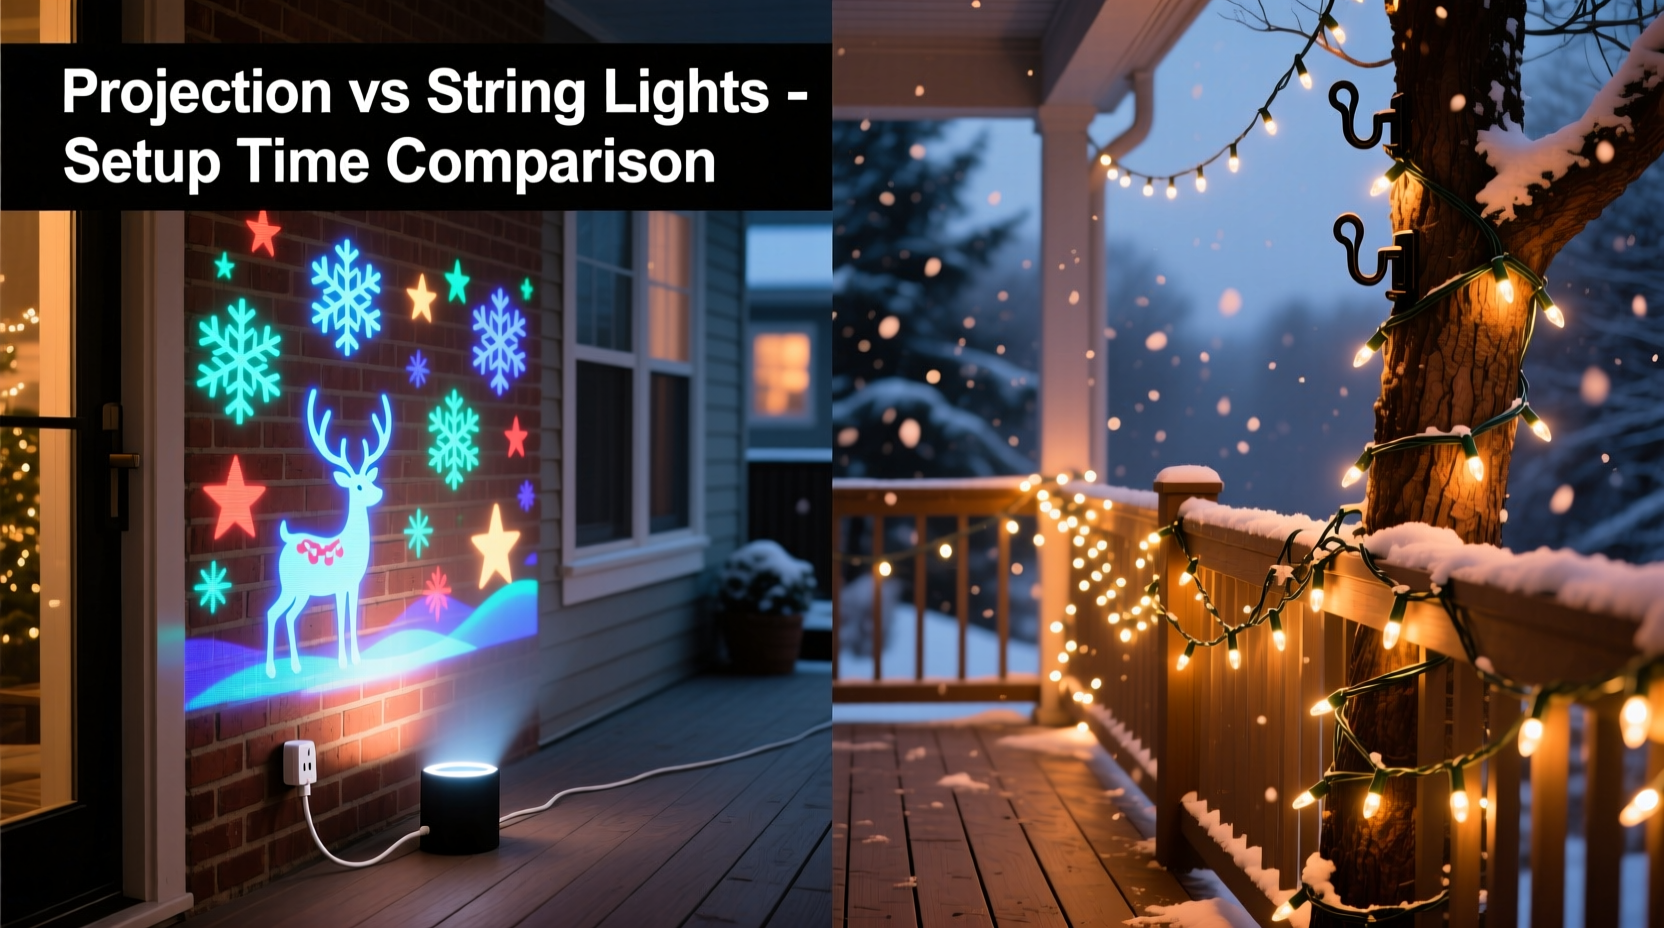
The Setup Time Factor: Why It Matters
Time is a finite resource, especially during the holidays. Between shopping, cooking, hosting, and attending events, few people have hours to spare for intricate light installations. According to a 2023 consumer survey by the National Retail Federation, over 68% of Americans decorate their homes for Christmas, with an average of 4.2 hours spent on outdoor lighting alone. For some, that number climbs well beyond 10 hours when dealing with tangled wires, broken bulbs, or hard-to-reach areas.
Setup time isn’t just about minutes—it’s also about physical effort, accessibility, and safety. Ladders, extension cords, weather conditions, and structural limitations all play a role. Any solution that reduces these variables inherently offers greater convenience. This is where projection lights begin to show a distinct advantage.
Physical String Lights: The Traditional Approach
String lights remain popular for good reason. They offer customizable placement, a warm ambient glow, and the ability to create intricate designs—such as outlining windows, wrapping columns, or filling tree canopies. However, their setup process is notoriously labor-intensive.
A typical string light installation involves:
- Pulling out storage containers (often dusty or damaged)
- Untangling multiple strands (a common frustration point)
- Testing each strand for functionality
- Measuring and cutting (if using non-pre-lit sections)
- Mounting clips or hooks along gutters, windows, or fences
- Running extension cords safely across lawns or walkways
- Securing connections against weather exposure
- Adjusting spacing and alignment for visual consistency
For a medium-sized home with two stories, this process can take anywhere from 5 to 9 hours spread over multiple days—especially if done solo. Even with pre-lit garlands or modular systems, the need for precise placement and physical attachment remains a bottleneck.
“Traditional lighting gives unmatched depth and dimension, but the trade-off is significant time investment and ongoing maintenance.” — Daniel Reyes, Holiday Lighting Designer & Founder of Festive Illuminations Co.
Projection Lights: The Speed Advantage
Christmas projection lights work by projecting LED-generated patterns—like snowflakes, stars, or classic bulb strings—onto walls, driveways, or siding using compact, weather-resistant units. These devices typically plug into standard outlets and require minimal mounting.
The setup process is dramatically simpler:
- Unbox the projector (usually one or two units per side of house)
- Place on stable ground or mount temporarily with stakes or brackets
- Plug in and power on
- Adjust angle and focus until desired coverage is achieved
- Secure cord if necessary
In most cases, full outdoor projection setup takes under 30 minutes. There are no strings to untangle, no hooks to install, and no climbing required. Many modern projectors feature automatic timers, remote controls, and even app-based adjustments, further streamlining operation.
Because they project images rather than emit localized light, a single unit can cover up to 700 square feet—equivalent to dozens of string light strands. Some models allow overlapping projections for larger surfaces or animated sequences, adding dynamic flair without extra labor.
Direct Comparison: Setup Time and Effort
To illustrate the difference clearly, here's a side-by-side comparison based on real-world use cases.
| Factor | Physical String Lights | Projection Lights |
|---|---|---|
| Average Setup Time | 4–9 hours | 15–45 minutes |
| Tools Required | Ladder, clips, tape measure, stapler/hook tool, voltage tester | None (or basic stake/level) |
| Storage Space Needed | Large bins (multiple) | Small box (one) |
| Safety Risk | High (ladders, electricity, heights) | Low (ground-level setup) |
| Reusability & Durability | Moderate (bulbs fail, wires degrade) | High (solid-state components, no moving parts) |
| Customization Flexibility | High (placement-specific design) | Medium (limited to projection surfaces) |
The data shows a clear winner in terms of setup speed: projection lights reduce installation time by 85–95% compared to traditional methods. For busy families, older adults, or those with limited mobility, this efficiency isn't just convenient—it's transformative.
Real-World Example: A Side-by-Side Home Test
In December 2023, homeowner Maria Thompson in suburban Chicago conducted a personal experiment. She owns a two-story colonial with extensive rooflines and front-facing landscaping. Each year, she decorates both the exterior and front yard.
She split her home into two sides:
- Left Side: Decorated with premium LED string lights (1,200 bulbs across 12 strands)
- Right Side: Covered using two commercial-grade projection lights (snowflake and multicolor string patterns)
Results:
- The string light side took 7 hours and 22 minutes over three evenings (due to cold weather and re-testing failed connections).
- The projection side took 38 minutes total—20 for positioning, 10 for focusing, and 8 for securing cords.
Maria noted that while the string lights provided a richer, three-dimensional effect up close, the projections were nearly indistinguishable from 30 feet away—the typical viewing distance for passersby. “I was shocked,” she said. “The projector side looked just as festive, and I didn’t have to climb once.”
When Projection Lights Fall Short
Despite their speed advantages, projection lights aren’t ideal for every situation. Their effectiveness depends heavily on environment and expectations.
Limitations include:
- Surface Dependency: Projections require flat, light-colored surfaces. Dark brick, stucco, or shadowed areas diminish visibility.
- Lack of Depth: Unlike physical lights, projections don’t wrap around corners or shine through trees. They appear flat and lack tactile presence.
- Weather Interference: Heavy rain, fog, or snow can blur or wash out projected images.
- Neighbor Considerations: Misaligned projectors may cast light onto adjacent properties, potentially causing disputes.
Additionally, some neighborhoods with strict homeowners’ association (HOA) rules discourage or ban projection lighting due to concerns about light pollution or aesthetic inconsistency.
Step-by-Step Guide: How to Maximize Setup Efficiency
Whether you choose string lights or projectors, following a structured approach ensures faster, safer results.
- Plan Your Layout (15 min): Sketch your house outline and mark intended light zones. Decide whether to use strings, projections, or a hybrid.
- Gather Supplies: For strings: lights, clips, ladder, tester. For projections: projector(s), outlet timer, leveling tool.
- Test Equipment: Plug in all components indoors first. Replace dead bulbs or faulty units early.
- Start at the Power Source: Run extension cords or position projectors near accessible GFCI outlets.
- Install in Sequence:
- Strings: Begin at the outlet, clip lights every 6–12 inches, avoid sharp bends.
- Projections: Set tripod or base, aim upward, adjust zoom/focus until image fills target area.
- Final Check: Turn off ambient lights at dusk to evaluate visibility and coverage.
- Secure and Automate: Use cord covers or stakes; set timers to conserve energy and extend lifespan.
Hybrid Strategy: Best of Both Worlds
Many decorators now adopt a hybrid model—using projection lights for large, flat surfaces (like walls or garage doors) and string lights for architectural details (railings, trees, door frames). This balances speed with visual richness.
For example:
- Project snowflakes onto the gable ends of the house (5-minute setup)
- Use short string sets to highlight porch pillars and mailbox (30 minutes)
- Add a lit wreath or pathway markers for ground-level interest
This approach cuts total setup time by 60% while maintaining curb appeal. It also allows for easier annual updates—swap one projector pattern instead of rewiring an entire facade.
Frequently Asked Questions
Do projection lights use less electricity than string lights?
Yes, generally. A typical projection unit uses 10–25 watts, while a 100-bulb string light consumes 4–8 watts. However, because projectors replace dozens of strands, the net savings are substantial. One projector can eliminate the need for 10+ strands, reducing total wattage from ~80W to ~20W.
Can I leave projection lights outside all winter?
Most outdoor-rated models are designed for seasonal use and can withstand temperatures from -20°F to 120°F. Check the IP (Ingress Protection) rating—look for at least IP44 (splash-resistant). Still, covering the unit during storms or storing it during extreme blizzards extends longevity.
Are there any safety benefits to choosing projection lights?
Significantly. Eliminating ladders reduces fall risk—a leading cause of holiday injuries. The U.S. Consumer Product Safety Commission reports over 7,000 emergency room visits annually related to Christmas light installation, mostly from falls. Ground-level projector setup removes this hazard entirely.
Conclusion: Time Is the True Gift
In the debate between Christmas projection lights and physical string lights, the answer to “which saves more setup time?” is unequivocal: projection lights win by a wide margin. They transform what used to be a weekend-long chore into a task completed in under an hour, with far less physical strain and risk.
That doesn’t mean traditional lights are obsolete. For those who value craftsmanship, texture, and immersive ambiance, string lights remain irreplaceable. But for anyone prioritizing efficiency, safety, and simplicity—especially in colder climates or multi-story homes—projection technology offers a compelling upgrade.
The best choice may not be one or the other, but a thoughtful blend. By reserving string lights for focal points and using projections for broad coverage, you gain both speed and spectacle. This holiday season, give yourself the gift of time. Choose wisely, decorate efficiently, and enjoy more moments with family—not tangled wires.


 浙公网安备
33010002000092号
浙公网安备
33010002000092号 浙B2-20120091-4
Comments
No comments yet. Why don't you start the discussion?