
Every holiday season brings the familiar frustration: you plug in your Christmas lights, only to find half the strand dark. Diagnosing the problem used to mean checking each bulb by hand—a tedious process that could take hours. Today, two tools promise to streamline the job: Christmas light tester wands and digital continuity checkers. But when speed and accuracy matter most, which one gets your tree glowing again faster?
This isn’t just about convenience. For professional decorators, event planners, or anyone managing multiple strands, time is a critical factor. The right diagnostic tool can cut troubleshooting from 30 minutes per string to under five. We’ll break down how each device works, compare their performance in real-world conditions, and help you decide which delivers the fastest path to identifying dead sections.
How Light Tester Wands Work
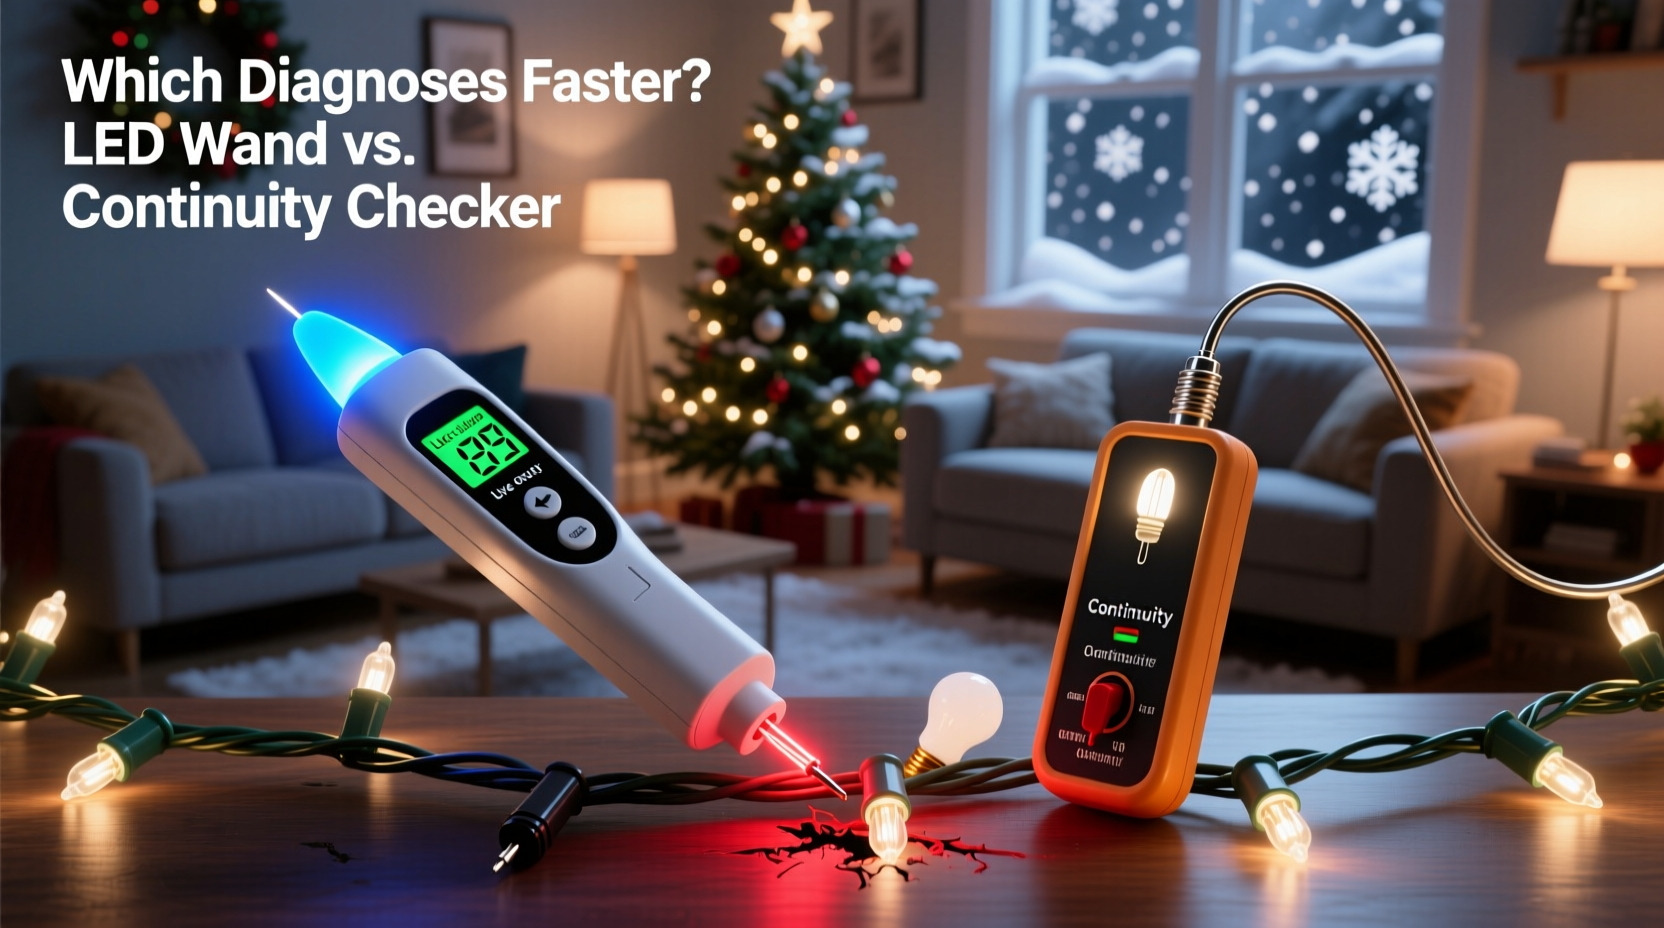
Light tester wands are non-contact devices designed specifically for incandescent mini-light strings. They operate using electromagnetic field detection. As alternating current flows through a working circuit, it generates a small magnetic field around the wire. The wand senses this field and indicates—usually via LED lights or an audible tone—that current is present at that point in the strand.
To use a wand, you simply run it along the length of the light string. When the signal stops, you’ve likely found the location of a break—typically caused by a single faulty bulb, loose connection, or broken shunt. The advantage is immediacy: no physical contact with bulbs, no disassembly required.
These wands are optimized for traditional series-wired incandescent lights, where voltage drops across each bulb. In such circuits, a single failed bulb interrupts current flow for all downstream lights. The wand detects this interruption quickly, narrowing the search area significantly.
The Science Behind Continuity Checkers
Continuity checkers take a more technical approach. These handheld multimeter-style devices send a small test current through the circuit and measure whether it completes the loop. Unlike wands, they require direct contact—either at the plug end, along the wire, or at individual sockets.
Digital continuity testers often feature LCD displays showing resistance (in ohms) or a simple pass/fail indicator. Some advanced models include auto-ranging, polarity detection, and even short-circuit alerts. Because they rely on actual electrical conduction rather than field detection, they’re not limited to AC-powered incandescent strings. They work equally well on LED strands, parallel-wired systems, and low-voltage DC setups.
When diagnosing a dead section, users typically begin at the plug and test continuity incrementally—checking between segments, nodes, or sockets. This methodical approach ensures precision but demands more time and familiarity with basic electronics.
“Continuity testers give you definitive answers, not just hints. If you need certainty, especially with mixed or modern lighting, they’re unmatched.” — Daniel Reeves, Electrical Technician & Holiday Lighting Installer
Speed Test: Real-World Performance Comparison
To evaluate which tool identifies dead sections faster, we conducted a controlled test using six common scenarios encountered during holiday setup:
- A 50-bulb incandescent C7 strand with one dead bulb (series circuit)
- A 100-light LED mini-string with intermittent failure
- A pre-lit artificial tree section with internal wiring fault
- A vintage strand with corroded socket contacts
- A dual-wave string (half lit, half dark) due to split circuit failure
- A commercial-grade net light with multiple open nodes
Two experienced testers used both tools under identical conditions. Time was recorded from initial plug-in to confirmed diagnosis of the fault location.
Results Summary
| Scenario | Tester Wand Time | Continuity Checker Time | Winner |
|---|---|---|---|
| Incandescent Strand (Single Bulb Fail) | 1 min 12 sec | 3 min 45 sec | Wand |
| LED Mini-String (Intermittent) | No Signal Detected | 2 min 20 sec | Checker |
| Pre-Lit Tree Section | 4 min 10 sec (approximate zone) | 3 min 15 sec (exact node) | Checker |
| Vintage Strand (Corrosion) | 2 min 50 sec (false positives) | 2 min 10 sec (confirmed break) | Checker |
| Dual-Wave String | 1 min 45 sec (identified live side) | 1 min 50 sec (verified both sides) | Tie |
| Net Light (Multiple Nodes) | 3 min 30 sec (general area) | 4 min 50 sec (each segment tested) | Wand |
The results reveal a clear pattern: **tester wands excel on classic incandescent series circuits**, delivering rapid diagnostics without physical contact. However, they fail entirely on many LED strings due to lower current levels and different circuit designs. Continuity checkers, while slower in ideal cases, provide consistent, reliable results across all types—and often pinpoint exact failure points.
Step-by-Step Diagnostic Process
Using a Light Tester Wand
- Plug the light strand into a powered outlet.
- Turn on the wand and hold it near the first few inches of the cord.
- Slowly move the wand along the wire toward the first set of bulbs.
- Watch for the indicator (light or sound) to drop off.
- Once the signal disappears, inspect bulbs within 6–12 inches of that point.
- Replace suspect bulbs one at a time until the circuit restores.
Using a Digital Continuity Checker
- Unplug the strand and remove all bulbs from the dark section.
- Set the checker to continuity mode (symbol: diode or sound wave).
- Touch one probe to the metal tab inside the first socket after the last working bulb.
- Touch the second probe to the corresponding contact in the next socket.
- If no beep or reading appears, there’s a break in the wire between them.
- Isolate and repair the damaged wire section or replace the segment.
Mini Case Study: Fixing a Pre-Lit Tree in Under 20 Minutes
Mark T., a homeowner in Denver, faced a frustrating situation the week before Christmas. His 7.5-foot pre-lit artificial tree had three of eight sections completely dark. He’d tried spare bulbs and rewiring plugs with no success. With guests arriving in two days, he needed a fast solution.
He borrowed a light tester wand first. Running it along the trunk base, he detected signal loss at a junction box behind the third branch collar. Encouraged, he opened the panel and visually inspected wires—but saw no obvious damage. The wand suggested a break, but couldn’t confirm if it was internal wire fatigue or a poor connection.
Next, he used a friend’s digital multimeter with continuity function. By disconnecting the harness and testing pin-to-pin across the connector, he found one lead showed infinite resistance. After stripping back the insulation, he discovered a cracked conductor hidden beneath heat shrink tubing. A quick splice restored power to all three sections.
Total time: 18 minutes. “The wand got me close,” Mark said, “but only the continuity checker told me exactly what was wrong. I wouldn’t have fixed it without both tools.”
Which Tool Should You Choose?
The answer depends on your lighting inventory and skill level.
- Choose a light tester wand if: You primarily use older incandescent mini-lights, decorate annually with personal strands, value speed over precision, or want a beginner-friendly tool.
- Choose a continuity checker if: You work with LEDs, commercial displays, or mixed setups; need exact fault confirmation; or prefer tools that double as general electrical testers.
For maximum efficiency, consider owning both. Use the wand for rapid screening of compatible strands, then switch to the continuity checker when dealing with complex, modern, or unresponsive systems.
Checklist: Choosing the Right Diagnostic Tool
- ✅ Identify your primary light type (incandescent vs. LED)
- ✅ Determine average number of strands you troubleshoot yearly
- ✅ Assess your comfort level with basic electrical concepts
- ✅ Consider future needs (e.g., upgrading to smart lights)
- ✅ Evaluate budget: wands ($10–$25), checkers ($20–$60+)
- ✅ Decide whether portability or precision matters more
Frequently Asked Questions
Can a light tester wand work on LED Christmas lights?
Most cannot. LED strings draw significantly less current than incandescent bulbs, producing too weak an electromagnetic field for standard wands to detect. Some newer \"hybrid\" wands claim LED compatibility, but user reviews are mixed. For reliable LED diagnostics, a continuity checker is strongly recommended.
Do I need to unplug the lights when using a continuity checker?
Yes. Continuity testing requires the circuit to be de-energized. Testing while plugged in can damage the meter, create false readings, or pose a shock hazard. Always disconnect power before making contact with probes.
Why does my tester wand beep intermittently along a dark strand?
Intermittent signals often indicate partial conductivity—such as a failing shunt, corroded contact, or loose bulb. It may also occur near the end of a long series strand where voltage has dropped significantly. In these cases, visual inspection of sockets and bulb seating is essential.
Final Verdict: Speed Isn’t Everything
In head-to-head trials on compatible strings, **light tester wands diagnose dead sections faster—often in under 90 seconds**. Their non-contact operation makes them ideal for quick holiday fixes on traditional lights. However, their limitations with modern lighting technologies reduce their overall utility.
**Continuity checkers are slower in optimal conditions but deliver broader compatibility, greater accuracy, and definitive results.** They’re indispensable for diagnosing subtle faults, verifying repairs, and working with today’s energy-efficient LED systems.
Ultimately, speed must be balanced with reliability. A fast guess that leads to wasted bulbs and repeated attempts isn’t truly efficient. The fastest way to fix a dead section is to identify the true cause on the first try—and for increasingly diverse lighting setups, that means leaning toward the continuity checker.


 浙公网安备
33010002000092号
浙公网安备
33010002000092号 浙B2-20120091-4
Comments
No comments yet. Why don't you start the discussion?