
Earwax buildup in AirPods is a common issue—especially for daily users. Over time, the tiny speaker grilles accumulate oils, skin particles, and wax, which can degrade sound quality and even cause permanent damage if not addressed properly. While it's tempting to poke at the gunk with sharp tools or cotton swabs, doing so often pushes debris deeper into the speaker housing, making the problem worse. The goal isn’t just cleaning—it’s cleaning safely, effectively, and without compromising your device’s integrity.
This guide provides practical, tested strategies to remove earwax from AirPods using gentle, non-invasive techniques. Whether you own AirPods (1st to 3rd gen), AirPods Pro, or AirPods Max, these methods apply across models while respecting Apple’s design limitations and warranty concerns.
Why You Should Avoid Pushing Debris Inward
The internal structure of AirPods includes micro-perforated speaker meshes designed to let sound pass through while blocking larger particles. When earwax enters, it adheres to these fine surfaces. Using pointed tools like paperclips, toothpicks, or the tip of a pin may seem effective but risks:
- Denting or tearing the delicate mesh
- Dislodging internal components
- Packing wax further into the sound channel where moisture and heat accelerate clogging
- Voiding any remaining warranty due to visible tampering
“Once wax is compacted inside the speaker chamber, it becomes nearly impossible to extract without disassembly—which consumers should never attempt.” — Dr. Lena Patel, Audio Device Repair Specialist
AirPods lack user-serviceable parts. Unlike headphones with removable ear cushions or grill covers, Apple seals most components internally. This makes external cleaning the only viable option for everyday users.
Safe Tools and Materials You’ll Need
Effective cleaning doesn’t require expensive kits. Most solutions use household items that are gentle yet capable of lifting wax without pressure. Below is a list of recommended tools:
| Tool | Purpose | Why It’s Safe |
|---|---|---|
| Soft-bristled brush (e.g., clean toothbrush or makeup brush) | Loosens surface wax and debris | Bristles flex on contact, reducing risk of scratching |
| Microfiber cloth | Wipes down exteriors and removes oils | Lint-free and non-abrasive; won't leave residue |
| Tape (low-adhesion, e.g., masking tape) | Lifts wax from grilles via adhesion | Minimal pressure needed; no insertion required |
| Flashlight or phone light | Inspects buildup depth and cleaning progress | Non-contact visual aid |
| Rubber earbud tip cleaner (optional) | Gently compresses against mesh to lift debris | Designed specifically for in-ear devices |
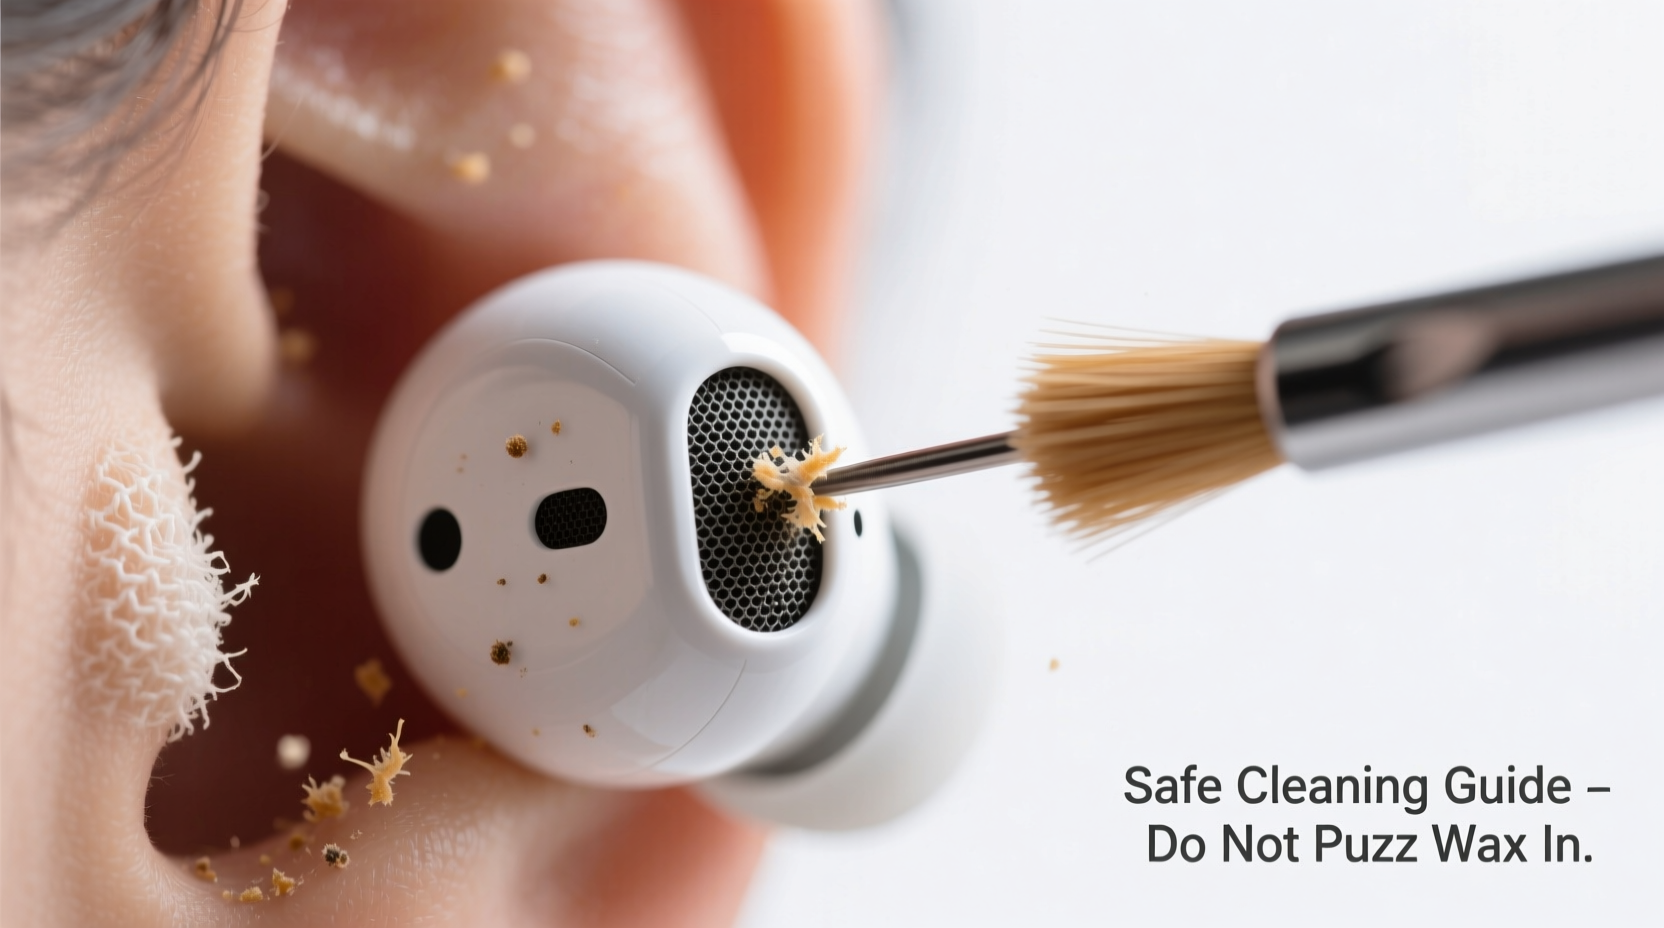
Step-by-Step: How to Remove Earwax Without Pushing It In
Cleaning your AirPods properly involves patience and precision. Follow this timeline-based method to ensure thorough, safe results.
- Power Off and Remove from Case
Turn off Bluetooth or disconnect your AirPods from devices. Take them out of the charging case to prevent accidental input during cleaning. - Inspect Under Light
Use a flashlight to examine both the speaker mesh (bottom of each bud) and microphone ports (stem or front). Look for yellowish or brownish discoloration indicating wax accumulation. - Dry Brush Gently
Using a soft-bristled brush, lightly sweep across the mesh in one direction. Do not press hard. The motion should mimic dusting—not scrubbing. Rotate the AirPod slightly to cover all angles. - Use Tape for Adhesive Lift
Roll a small piece of masking tape into a ball with the sticky side out. Press it gently onto the speaker grille and lift straight off. Repeat 2–3 times. Wax particles will cling to the tape rather than being forced inward. - Clean the Exterior
Wipe the outer shell with a dry microfiber cloth. If there’s oily residue near the stem or touch sensors, lightly dampen one corner of the cloth with isopropyl alcohol (70%) and wipe—then immediately dry. - Check Fit and Function
Reinsert the AirPods and play audio at moderate volume. Listen for clarity, especially in high frequencies. Muffled sound may indicate residual blockage requiring another round. - Repeat Weekly as Needed
For heavy users, perform steps 1–6 once per week. Light users can do it every 2–3 weeks.
This process takes less than five minutes and eliminates the need for invasive tools. The key is consistency: regular maintenance prevents deep buildup that’s harder to reverse.
What Not to Do: Common Mistakes
Avoiding harm is just as important as active cleaning. Below are frequent errors people make when trying to fix muffled sound:
| Don’t | Why It’s Harmful |
|---|---|
| Use cotton swabs (Q-tips) | Fibers break off and trap moisture; swab tips push wax deeper |
| Insert pins, needles, or paperclips | Can puncture mesh or damage drivers permanently |
| Apply water, soap, or liquid cleaners directly | Liquids enter ports and corrode circuitry over time |
| Blow air forcefully with mouth or canned air | Moisture from breath worsens clogs; compressed air can dislodge internal parts |
| Soak AirPods in cleaning solutions | Destroys battery and sensor functionality instantly |
Real Example: Recovering Muffled Sound After Months of Neglect
Mark, a software developer, used his AirPods Pro daily for calls and music—often up to six hours a day. After three months, he noticed the right bud sounded dull and distant. He tried poking it with a pin, which made the issue worse. Eventually, he brought them to an authorized service center.
The technician explained that compacted earwax had sealed the acoustic port completely. They used professional-grade ultrasonic vibration to loosen the mass—a service costing $45. Mark learned that weekly tape-lift cleaning would have prevented the problem entirely.
After the repair, he adopted a Sunday night routine: inspect, brush, and tape-lift both buds. Six months later, his AirPods still deliver crisp audio. His takeaway? “Five minutes a week beats paying for repairs—or buying new ones.”
Alternative Methods: When Standard Cleaning Isn’t Enough
If brushing and taping don’t restore sound, consider these additional approaches—but only after exhausting non-invasive options.
- Rubber Bulb Blower: A small, clean rubber blower (like those used for camera lenses) can dislodge loose debris with a puff of air. Hold the AirPod upside down and squeeze once gently. Do not use canned air.
- Interdental Brushes (Extra-Soft): Some users report success with ultra-fine, flexible interdental brushes (size 0 or 1). Gently twirl the bristles *on* the surface—never insert deeply. Replace the brush monthly.
- Professional Cleaning Kits: Third-party kits like the “Dustie” or “AirPod Whisper” offer specialized silicone tips and brushes designed for Apple earbuds. These are safer than DIY tools because they’re engineered to fit the contours without pressure.
Still no improvement? It may be time to contact Apple Support. Devices under warranty or covered by AppleCare+ may qualify for replacement—even for issues related to debris buildup, provided there’s no physical damage from improper cleaning.
Prevention Checklist: Keep Your AirPods Clear Long-Term
Preventive care reduces the frequency and intensity of cleaning. Follow this checklist to maintain optimal performance:
- ✅ Clean AirPods at least once a week
- ✅ Wash hands before handling to reduce oil transfer
- ✅ Store in a dry, dust-free case when not in use
- ✅ Avoid wearing during workouts unless using sweat-resistant covers
- ✅ Replace foam tips on AirPods Pro every 1–2 months (if applicable)
- ✅ Don’t share AirPods frequently—ear canal shapes vary, increasing wax transfer risk
“The best way to protect your investment is routine maintenance. Think of it like brushing your teeth—small efforts daily prevent major problems later.” — Jordan Lee, Consumer Electronics Technician
FAQ: Common Questions About Cleaning AirPods
Can I use alcohol wipes on my AirPods?
You can use a disinfectant wipe containing 70% isopropyl alcohol on the exterior surfaces, but never on the speaker grilles or microphone ports. Wipe quickly and dry immediately with a microfiber cloth. Apple officially permits this method for sanitizing.
Why does only one AirPod get clogged faster?
Most people have asymmetrical earwax production. One ear typically produces more than the other. Additionally, habits like sleeping on one side or holding your phone to a specific ear can influence airflow and debris accumulation.
Will Apple clean my AirPods for free?
Apple does not offer standalone cleaning services. However, if your AirPods are under warranty and experiencing hardware failure due to manufacturing defects (not debris), they may replace them. If dirt is the cause, they might recommend cleaning first before considering service.
Conclusion: Protect Your Investment with Smart Habits
Your AirPods represent both convenience and cost. Treating them with consistent care ensures they deliver clear sound, reliable connectivity, and long-term value. The safest way to remove earwax is also the simplest: avoid insertion altogether. Use indirect methods like adhesive lifting, soft brushing, and preventive wiping to keep ports clear.
Damage from improper cleaning is irreversible. Once the mesh is torn or the driver compromised, replacement is the only option. But with just a few minutes each week, you can extend the life of your AirPods by years—keeping them sounding fresh and functioning flawlessly.


 浙公网安备
33010002000092号
浙公网安备
33010002000092号 浙B2-20120091-4
Comments
No comments yet. Why don't you start the discussion?