
Mechanical keyboards are precision instruments—each keystroke is a result of carefully engineered switches, stabilizers, and keycaps. Over time, dust, oils from fingers, and debris accumulate beneath and around the keys, dulling both performance and appearance. While cleaning seems straightforward, one wrong move—especially when removing keycaps—can damage the fragile plastic stems or even the underlying switch. The goal isn’t just cleanliness; it’s preservation. Done correctly, keycap removal and cleaning can extend your keyboard’s life and keep it feeling crisp for years. This guide walks through the safest methods, essential tools, and real-world precautions to avoid costly mistakes.
Why Keycap Removal Requires Care
Unlike membrane keyboards, mechanical keycaps sit atop individual switches, each connected via a stem that interfaces with the switch mechanism. These stems—typically made of thin, injection-molded plastic—are surprisingly delicate. Excessive force, improper angle, or using sharp tools can crack or snap them, rendering the keycap unusable. Worse, broken stems can interfere with switch function or leave fragments inside the housing.
Additionally, larger keys (like spacebars, shifts, and enters) use stabilizers—internal mechanisms that prevent wobbling. These are more complex than standard switches and are easily disrupted if removed incorrectly. A single misstep during removal can bend stabilizer wires, dislodge clips, or break the stabilizer housing, leading to inconsistent keypresses or rattling.
“Over 60% of mechanical keyboard repairs I see involve damaged keycap stems or destabilized stabilizers—all preventable with proper removal technique.” — Daniel Ruiz, Keyboard Technician at MechFix Labs
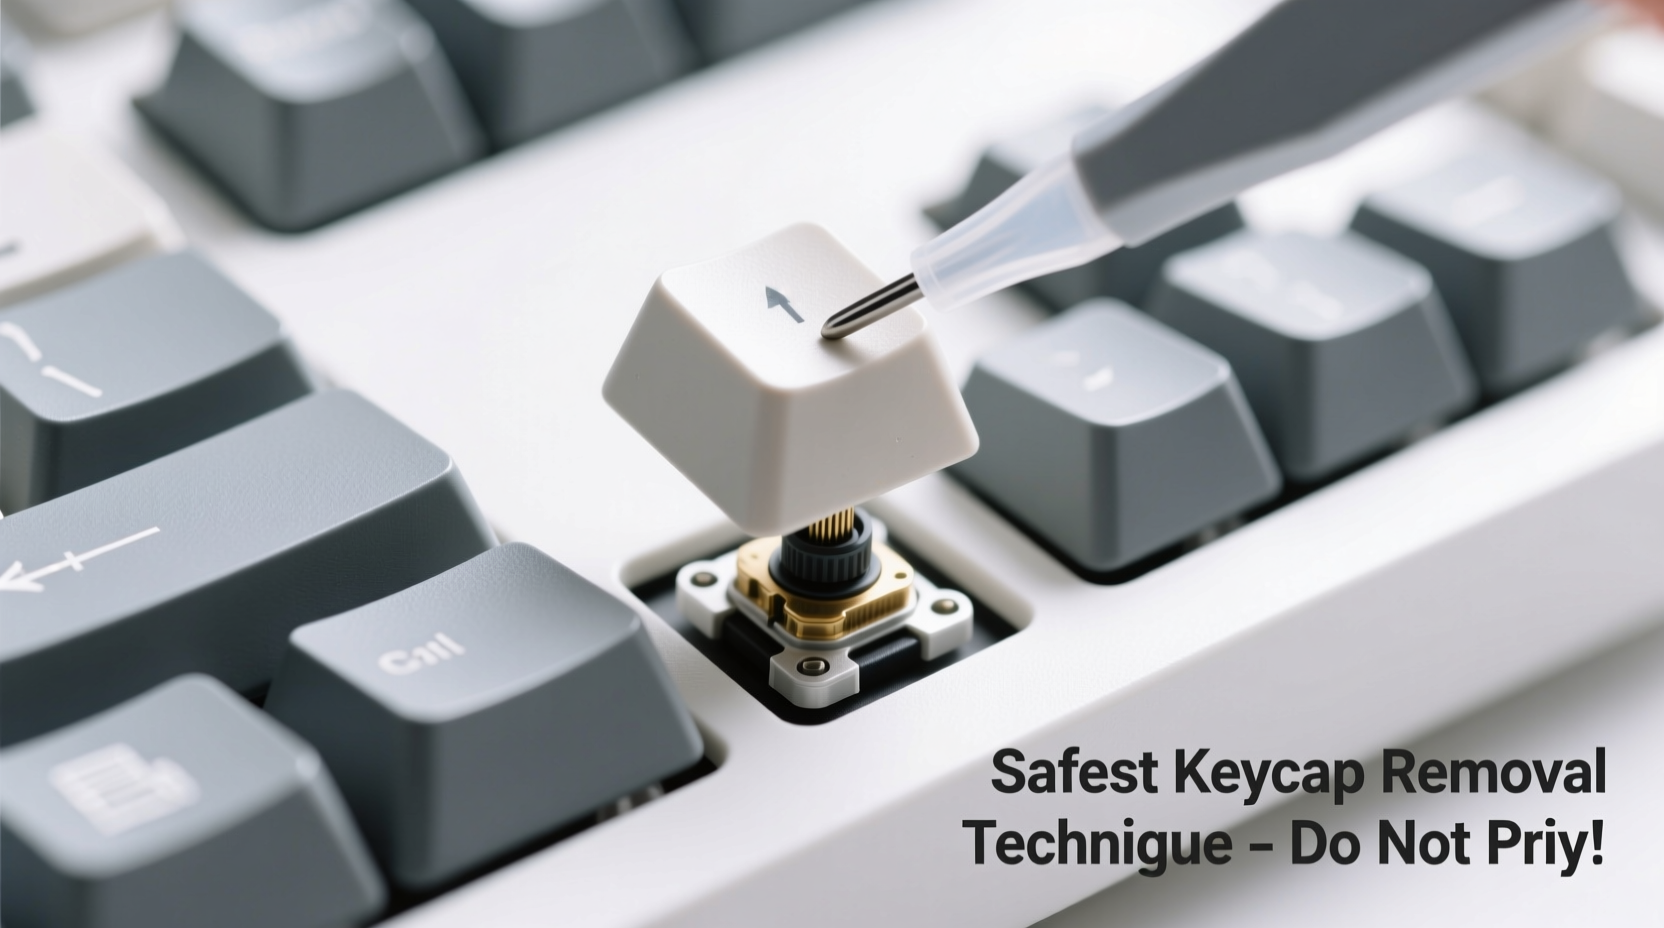
Essential Tools for Safe Keycap Removal
Using the right tools drastically reduces risk. Never attempt removal with fingernails, knives, or flathead screwdrivers. Instead, invest in purpose-built accessories:
- Keycap puller (recommended): A plastic or metal ring designed to grip the sides of a keycap evenly. Plastic versions are gentler on legends (printed letters), while metal offers more leverage.
- Stabilizer puller: A specialized tool for large keys with stabilizers. It hooks under the keycap and lifts uniformly, reducing stress on stabilizer bars.
- Compressed air canister: For blowing out debris before and after removal.
- Soft-bristled brush or makeup brush: Ideal for dislodging dust without scratching.
- Isopropyl alcohol (70% or higher) and microfiber cloth: For cleaning keycaps post-soak.
- Small container or mesh bag: To hold keycaps during soaking and prevent loss.
Step-by-Step Guide to Removing Keycaps Safely
Follow this sequence to minimize risk and ensure thorough cleaning:
- Power down and unplug the keyboard. Even for wired models, disconnect to prevent accidental input or short circuits.
- Use compressed air to blow surface debris. Focus on gaps between keys. This prevents dirt from being pushed deeper during removal.
- Select the appropriate puller. For standard keys (letters, numbers), a standard keycap puller is sufficient. For spacebar, Enter, Shift, etc., consider using a stabilizer puller if available.
- Position the puller under the keycap. Hook it evenly on opposite sides. Avoid gripping only one edge, as this creates uneven tension.
- Lift straight upward with steady pressure. Do not wiggle or twist. A smooth, vertical motion ensures the stem disengages cleanly from the switch.
- Place removed keycaps in a labeled container. Group by size or row to simplify reassembly.
- Repeat for all desired keys. You don’t need to remove every cap—focus on frequently used areas or visibly dirty ones.
For stabilizer-equipped keys, pay close attention to resistance. If the key doesn’t lift smoothly, stop and reposition the puller. Some stabilizers require slight side-to-side rocking once partially lifted, but only after initial vertical separation.
Do’s and Don’ts of Keycap Handling
| Action | Do | Don’t |
|---|---|---|
| Removing keycaps | Use a proper puller and lift straight up | Wiggle aggressively or use sharp tools |
| Cleaning solution | Soak in lukewarm water with mild dish soap | Use boiling water or bleach |
| Drying keycaps | Air dry on a towel for 4–6 hours | Use a hairdryer on high heat |
| Reattaching caps | Align stems and press down evenly | Hammer or force misaligned caps |
| Frequency | Clean every 3–6 months | Remove caps weekly without reason |
Cleaning and Reassembling Keycaps
Once removed, keycaps can be cleaned effectively without damaging legends or texture:
- Fill a bowl with lukewarm water and a few drops of non-abrasive dish soap.
- Submerge keycaps and let soak for 15–20 minutes.
- Gently scrub with a soft toothbrush, focusing on underside and edges.
- Rinse thoroughly under running water.
- Lay flat on a lint-free towel and allow to air dry completely—do not reinstall damp keycaps.
For stubborn grime or yellowing, a paste of baking soda and water can be used sparingly. Avoid abrasive sponges or scouring pads, which can scratch surfaces and fade printed labels.
When reattaching, align the keycap stem directly over the switch. Press down firmly but gently until you hear a soft click. For stabilizer keys, ensure both ends seat evenly—uneven seating causes wobble or binding. Test the key by pressing it several times; it should feel smooth and centered.
Real Example: Recovering from a Broken Stem
Jamal, a freelance writer in Portland, attempted to clean his custom mechanical keyboard using a flathead screwdriver. He pried up the 'E' key from one corner, snapping the stem cleanly in half. The keycap became loose and wobbly, failing to actuate consistently. After consulting a technician, he learned the stem could not be repaired—but replacement was possible. He ordered a new keycap set online ($25) and used a proper puller for the rest. Since then, he keeps a dedicated cleaning kit on hand and only removes keycaps every four months.
This scenario is common. While a single broken stem isn’t catastrophic, repeated mishandling leads to cumulative damage. Prevention is far cheaper and less disruptive than replacement.
Expert Tips for Long-Term Maintenance
Professional keyboard technicians emphasize consistency over intensity. Frequent aggressive cleaning increases wear; infrequent deep cleans often require riskier handling due to built-up grime. Balance is key.
“The best maintenance routine includes weekly surface wiping with a microfiber cloth and a full keycap cleaning every 4–5 months. That’s enough to prevent buildup without stressing components.” — Lena Tran, Mechanical Keyboard Consultant
Additional recommendations:
- Keep food and drinks away from the workspace to minimize crumb and liquid intrusion.
- Use a keyboard cover when not in use, especially in dusty environments.
- Rotate keycap sets if you own multiple—this distributes wear and gives each set rest periods.
- Inspect stabilizers annually for lubrication needs or wire deformation.
Frequently Asked Questions
Can I clean my keyboard without removing the keycaps?
Yes, but with limitations. Use compressed air, a soft brush, and a slightly damp microfiber cloth to wipe tops and sides. This removes surface dust but won’t reach deep debris under the caps. For thorough hygiene, removal is necessary.
Are all keycaps safe to soak?
Most ABS and PBT plastic keycaps can be safely soaked in soapy water. However, keycaps with glued-in inserts (e.g., translucent layers for RGB) may delaminate. Hand wash these instead. Double-shot or dye-sublimated legends are generally safe, but avoid prolonged soaking for printed keycaps.
What if a key feels sticky after reassembly?
This usually means the keycap wasn’t fully seated or there’s residual moisture. Remove and inspect the stem and switch. Ensure the cap is aligned properly and dry. If the issue persists, check for debris in the switch housing using compressed air.
Checklist: Safe Keycap Cleaning Routine
- ✅ Unplug the keyboard
- ✅ Use compressed air to clear loose debris
- ✅ Select the correct puller (keycap or stabilizer)
- ✅ Remove caps using even, vertical pressure
- ✅ Soak in warm, soapy water for 15–20 minutes
- ✅ Scrub gently with a soft brush
- ✅ Rinse and air dry completely (4+ hours)
- ✅ Reattach caps with firm, even pressure
- ✅ Test each key for smooth operation
- ✅ Store cleaning tools in a designated case
Conclusion: Maintain Your Keyboard Like a Pro
Your mechanical keyboard is an investment in comfort, performance, and typing satisfaction. Treating it with care during routine maintenance ensures it returns the favor with reliability and longevity. Removing keycaps isn’t inherently risky—but doing it without the right knowledge or tools is. By following the safest techniques outlined here, using proper equipment, and respecting the fragility of plastic stems and stabilizers, you preserve both function and form.


 浙公网安备
33010002000092号
浙公网安备
33010002000092号 浙B2-20120091-4
Comments
No comments yet. Why don't you start the discussion?