
Spotify is a powerful music streaming app, but if you're switching platforms, troubleshooting performance issues, or simply reclaiming disk space, removing it completely from your MacBook Air is essential. Simply dragging the app to the Trash doesn’t erase all associated files—preferences, caches, logs, and support folders often remain hidden in your system. These leftovers can clutter your drive and potentially interfere with future software installations. This guide walks you through every step to thoroughly uninstall Spotify and ensure no trace remains.
Why a Full Uninstall Matters
When you delete an application by dragging its icon from the Applications folder to the Trash, macOS only removes the main app bundle. Supporting files stored in user-specific directories like ~/Library are left behind. Over time, these orphaned files accumulate and contribute to unnecessary storage use. In some cases, corrupted preference files can cause conflicts if you reinstall Spotify later. A complete removal ensures a clean slate and optimal system performance.
“Residual files from uninstalled apps are one of the most overlooked sources of storage bloat on macOS.” — Jordan Lee, Mac Systems Analyst at TechInsight Labs
Step-by-Step Guide to Fully Remove Spotify
Follow this sequence carefully to eliminate Spotify and all related components from your MacBook Air.
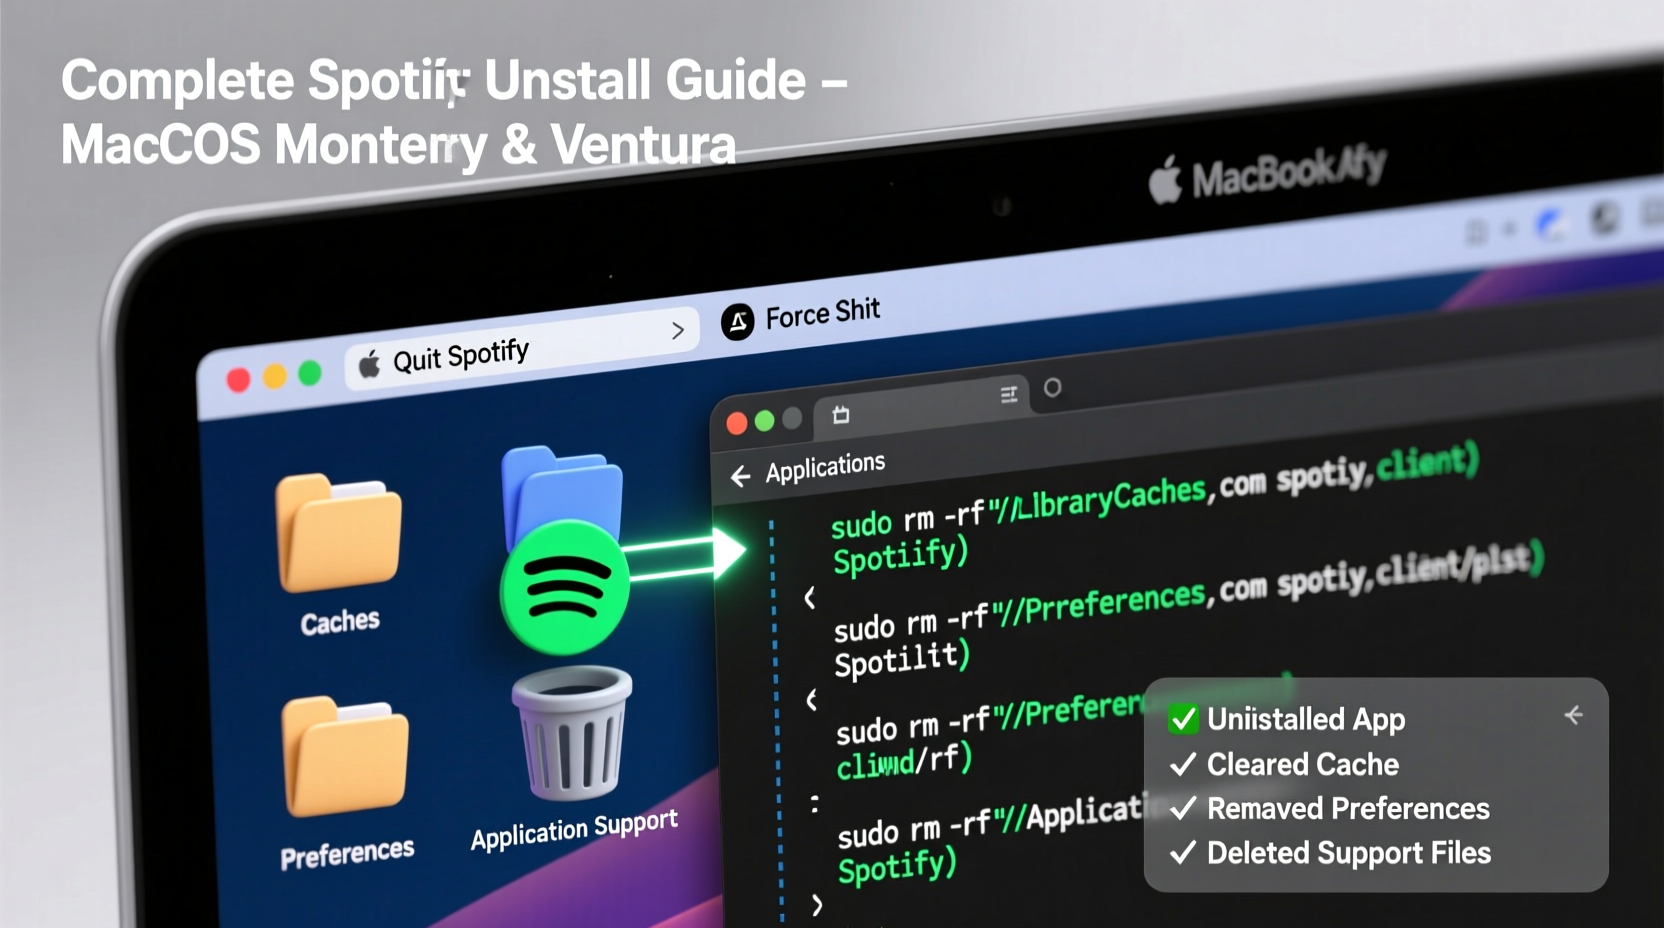
- Quit Spotify Completely
Ensure Spotify is not running. Right-click the Spotify icon in the Dock and select “Quit,” or press Cmd + Q while the app is active. - Delete the Spotify Application
Go to yourApplicationsfolder, locate Spotify, drag it to the Trash, then empty the Trash immediately. - Remove User-Specific Support Files
Open Finder, press Cmd + Shift + G, and enter the following paths one by one. Delete any Spotify-related folders found:~/Library/Application Support/Spotify~/Library/Caches/com.spotify.client~/Library/Preferences/com.spotify.client.plist~/Library/Saved Application State/com.spotify.client.savedState~/Library/Cookies/com.spotify.client.binarycookies
- Clear System-Wide Caches (Optional)
If you want a deeper cleanup, check system-level cache locations (requires admin access):/Library/Caches/com.spotify.client/Library/Preferences/com.spotify.client.plist
Note: These are less commonly used on personal accounts unless Spotify was installed system-wide.
- Remove Login Items and Agents
Spotify sometimes adds itself to login items to launch at startup. To remove:- Open System Settings → General → Login Items.
- Find Spotify in the list and click the minus (-) button to remove it.
- Check for Remaining Spotify Processes
Open Activity Monitor (found inApplications > Utilities), search for “Spotify,” and force quit any lingering processes before proceeding.
Common Mistakes to Avoid During Uninstallation
Many users think they’ve removed Spotify when they haven’t. Here’s what not to do:
| Mistake | Why It's Problematic | Correct Approach |
|---|---|---|
| Only dragging Spotify to Trash | Leaves behind caches and preferences | Delete files in Library folders manually |
| Ignoring login items | Spotify may still auto-launch | Remove from System Settings > Login Items |
| Not clearing caches | Takes up unnecessary space over time | Purge both user and system cache directories |
| Using third-party cleaners without review | Risk of deleting important system files | Use trusted tools or manual deletion only |
Alternative: Using App-Cleaning Tools
If you prefer automation, several reputable apps can help identify and remove leftover files after uninstalling Spotify. These tools scan for dependencies and orphaned data linked to deleted applications.
Popular options include:
- AppCleaner (Free) – Lightweight, intuitive, and effective for single app removals.
- CleanMyMac X (Paid) – Comprehensive system cleaner with app uninstallation module.
- OnyX (Free) – Advanced utility for power users; requires caution.
To use AppCleaner:
- Download AppCleaner from the official website.
- Launch it and drag the Spotify app into the window.
- It will detect related files. Review the list and click “Delete.”
Real Example: Clearing Spotify After Subscription Cancellation
Sophie, a freelance designer using a MacBook Air M1, decided to cancel her Spotify Premium subscription and switch to Apple Music. She dragged Spotify to the Trash but noticed her Mac still showed high memory usage. Upon checking her Library folder, she discovered 1.2 GB of cached audio files and outdated preference data. After manually deleting Application Support/Spotify and clearing caches, she reclaimed valuable space and improved overall responsiveness. Her experience highlights how invisible files can impact performance long after app removal.
Checklist: Confirming a Complete Spotify Removal
Use this checklist to verify that Spotify has been fully uninstalled:
- ✅ Spotify app is no longer in Applications folder
- ✅
~/Library/Application Support/Spotifyfolder deleted - ✅
com.spotify.client.plistremoved from Preferences - ✅ Cache folders under
CachesandSaved Application Statecleared - ✅ Spotify removed from Login Items in System Settings
- ✅ No Spotify processes appear in Activity Monitor
- ✅ Optional: Verified with AppCleaner or similar tool for completeness
Frequently Asked Questions
Will uninstalling Spotify delete my playlists and account?
No. Your Spotify account, playlists, listening history, and settings are stored in the cloud. Uninstalling the app only removes the local application and cached data. You can log back in anytime and restore your content.
Can leftover Spotify files slow down my MacBook Air?
Individually, these files have minimal impact. However, accumulated remnants from multiple uninstalled apps can consume gigabytes of storage and slightly affect system responsiveness, especially on models with limited SSD capacity (e.g., 256GB or less).
Is it safe to delete files in the Library folder?
Yes, as long as you’re certain about which files belong to Spotify. Never delete files from /System/Library or unknown third-party apps unless verified. Stick to user-specific paths (~/Library) and double-check filenames.
Final Steps and Verification
After completing the removal process, restart your MacBook Air. This ensures any background processes are terminated and confirms Spotify does not relaunch automatically. Once rebooted, open Finder and use Cmd + Shift + G to revisit key paths like ~/Library/Preferences and confirm no Spotify entries remain.
You can also search globally in Spotlight (press Cmd + Space) by typing “Spotify” and filtering results by “This Mac.” If only web links or unrelated documents appear, your system is clean.
Conclusion
Completely uninstalling Spotify from your MacBook Air is more than just freeing up space—it’s about maintaining a streamlined, efficient system. By addressing not just the app but also caches, preferences, and login behaviors, you ensure no digital residue lingers. Whether you choose manual deletion or trusted tools, the goal is the same: a thorough, lasting cleanup. Take control of your Mac’s environment today and enjoy a faster, more organized experience.


 浙公网安备
33010002000092号
浙公网安备
33010002000092号 浙B2-20120091-4
Comments
No comments yet. Why don't you start the discussion?