
Repainting a Kabuda figure model is more than a cosmetic upgrade—it’s an opportunity to breathe new life into a collectible, personalize its design, or restore it after years of display. Whether you're correcting factory flaws, refreshing worn paint, or creating a custom look, achieving a flawless finish demands precision, patience, and the right approach. Done correctly, a repaint can elevate your model from store-bought to museum-quality. This guide walks you through every phase, from disassembly to final sealant, ensuring professional results even if you’re working at home.
Understanding Your Kabuda Model
Kabuda figures are typically made from polyvinyl chloride (PVC) or ABS plastic, materials that respond well to proper surface preparation and compatible paints. These models often feature intricate details, layered parts, and pre-applied paint that may include metallics, glosses, or weathering effects. Before picking up a brush, inspect your figure closely. Note areas with chipped paint, glue residue from assembly, or mold lines that need cleaning. Understanding the original construction helps avoid damaging delicate components during stripping or repainting.
Some Kabuda releases come with translucent parts (like energy effects or visors), which require special handling. These elements are sensitive to strong solvents and should be removed before any chemical treatment. Always check manufacturer documentation or community forums to confirm material types if uncertain.
“Repainting isn’t just about color—it’s about respecting the sculpt. A great repaint enhances detail, not obscures it.” — Daniel Reyes, Custom Figure Artist & Exhibitor at Anime Expo Art Show
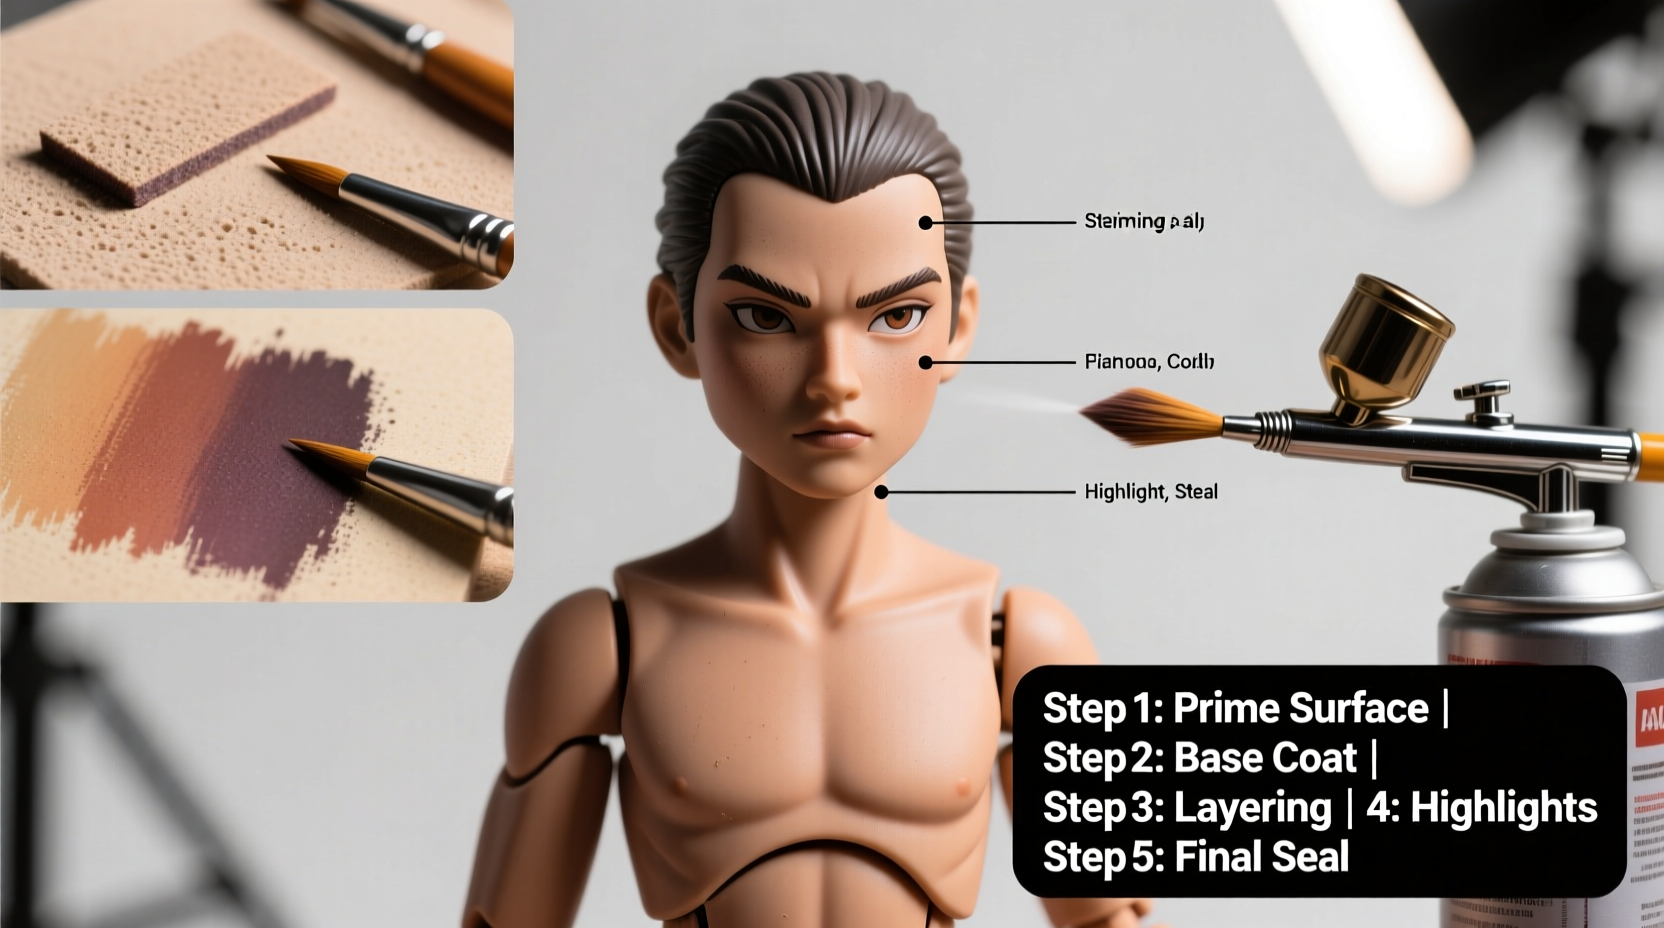
Step-by-Step Repainting Process
Follow this structured timeline to ensure each stage supports the next. Rushing or skipping steps leads to peeling, bubbling, or uneven coverage.
- Disassemble the figure: Remove all detachable parts—arms, head, weapons, accessories. Label them in small bags if needed. This allows full access to joints and recessed areas.
- Strip existing paint (if necessary): Use a dip-style plastic-safe paint remover only on non-translucent parts. Soak for no longer than 15 minutes, then gently scrub with a soft toothbrush. Rinse thoroughly.
- Clean and degrease: Wash all parts in lukewarm water with mild dish soap. Dry completely. Wipe down with isopropyl alcohol (70%) to remove oils and residues.
- Sand imperfections: Lightly sand rough spots or seams with 400–600 grit wet/dry sandpaper. Keep the surface damp to minimize dust.
- Prime the surface: Apply 1–2 thin coats of plastic-compatible primer (e.g., Mr. Surfacer 1000). Let dry 2–4 hours between coats.
- Paint application: Use acrylic hobby paints or airbrush-grade enamels in thin layers. Allow 30–60 minutes between coats.
- Detail work: Switch to fine brushes (0/00 size) for facial features, insignias, or panel lines. Consider using a magnifying lamp for precision.
- Seal with topcoat: Apply a matte, satin, or gloss varnish depending on desired finish. UV-resistant sealants prevent yellowing over time.
- Reassemble carefully: Reattach parts only after 24 hours of full curing. Avoid forcing pieces to prevent cracking.
Essential Tools and Materials Checklist
Having the right supplies on hand prevents mid-project delays and ensures consistent quality. Here’s what you’ll need:
- Microfiber cloths and cotton swabs
- Isopropyl alcohol (70% or higher)
- Soft-bristled toothbrush (dedicated to modeling use)
- Plastic-safe paint stripper (optional)
- 400–1000 grit wet/dry sandpaper
- Plastic primer (e.g., Tamiya Surface Primer)
- Hobby-grade acrylics (Vallejo, Citadel, or AK Interactive)
- Fine-tipped synthetic brushes (sizes 0, 00)
- Airbrush setup (optional but recommended for smooth gradients)
- Topcoat spray (Testors Dullcote or Mr. Super Clear)
- Tweezers and part holders (helpful for painting small pieces)
- Ventilated workspace with good lighting
Do’s and Don’ts: Painting Best Practices
| Do’s | Don’ts |
|---|---|
| Use thin, even coats of paint to prevent pooling | Apply thick layers that obscure sculpted detail |
| Let each layer dry fully before adding the next | Rush drying with heat sources like hairdryers |
| Label and organize disassembled parts | Leave parts loose on an unmarked tray |
| Test colors on a spare piece or inconspicuous area | Assume paint color matches exactly as shown online |
| Wear a mask when sanding or spraying | Breathe in primer or solvent fumes directly |
Real Example: Restoring a Vintage Kabuda Sentinel
Jessica M., a collector from Portland, inherited a 1990s Kabuda Sentinel model from her brother’s childhood collection. The figure had faded red armor, yellowed translucent wings, and visible glue stains at the shoulder joints. She wanted to honor the original design while improving durability.
She began by removing the wings and hands, then cleaned each section with soapy water. After lightly sanding scuff marks, she applied two coats of gray primer. Instead of matching the original bright red, she opted for a deeper crimson with subtle weathering—using a dry-brush technique to highlight raised edges. She sealed the armor with a satin varnish and used a gloss coat only on the eyes and power core to create contrast. The wings were cleaned with distilled water and a soft cloth, then sealed separately with UV-clear coat to prevent future yellowing.
The result? A refreshed model that looked authentic yet professionally restored. At her local anime convention, it won second place in the custom figure category.
Frequently Asked Questions
Can I use regular craft paint on my Kabuda figure?
No. Standard craft acrylics lack adhesion strength on plastic and may crack or peel over time. Use hobby-specific acrylics formulated for miniatures or scale models, such as those from Vallejo or Reaper Master Series.
How long should I wait before reassembling the figure?
Wait at least 24 hours after the final topcoat to ensure full curing. Some sealants, especially enamel-based ones, can remain tacky for several days in humid conditions.
What if I make a mistake during painting?
Minor errors can be corrected with a fine brush and touch-up paint. For larger mistakes, allow the paint to dry completely, then lightly sand the area with 600+ grit paper, re-prime, and repaint. Never sand wet paint.
Final Touches and Long-Term Care
A flawless finish isn’t complete until protection is ensured. Exposure to sunlight, humidity, and fingerprints degrades even the best paint jobs over time. Display your repainted Kabuda in a glass case away from direct light. Clean the surface monthly with a dry microfiber cloth. Avoid commercial dust sprays, which can leave residues or react with sealants.
If you plan to sell or exhibit your model, document the process with notes on materials used. Collectors and judges appreciate transparency in custom work.
Conclusion: Bring Your Vision to Life
Repainting a Kabuda figure is a rewarding blend of artistry and technical skill. With careful preparation, the right tools, and attention to detail, you can transform a mass-produced model into a unique masterpiece. Every brushstroke adds character, and every sealed edge ensures longevity. Whether you’re restoring nostalgia or crafting something entirely new, the process itself becomes part of the figure’s story.


 浙公网安备
33010002000092号
浙公网安备
33010002000092号 浙B2-20120091-4
Comments
No comments yet. Why don't you start the discussion?