
Controller stick drift is a frustrating issue that affects millions of gamers across platforms like PlayStation, Xbox, Nintendo Switch, and PC. It occurs when an analog stick registers movement even when untouched—causing characters to walk, run, or turn on their own. While manufacturers often recommend replacement, many cases can be resolved with simple, effective techniques. Understanding what causes stick drift and knowing how to fix it properly can save money, reduce electronic waste, and extend the life of your favorite controller.
What Causes Stick Drift?
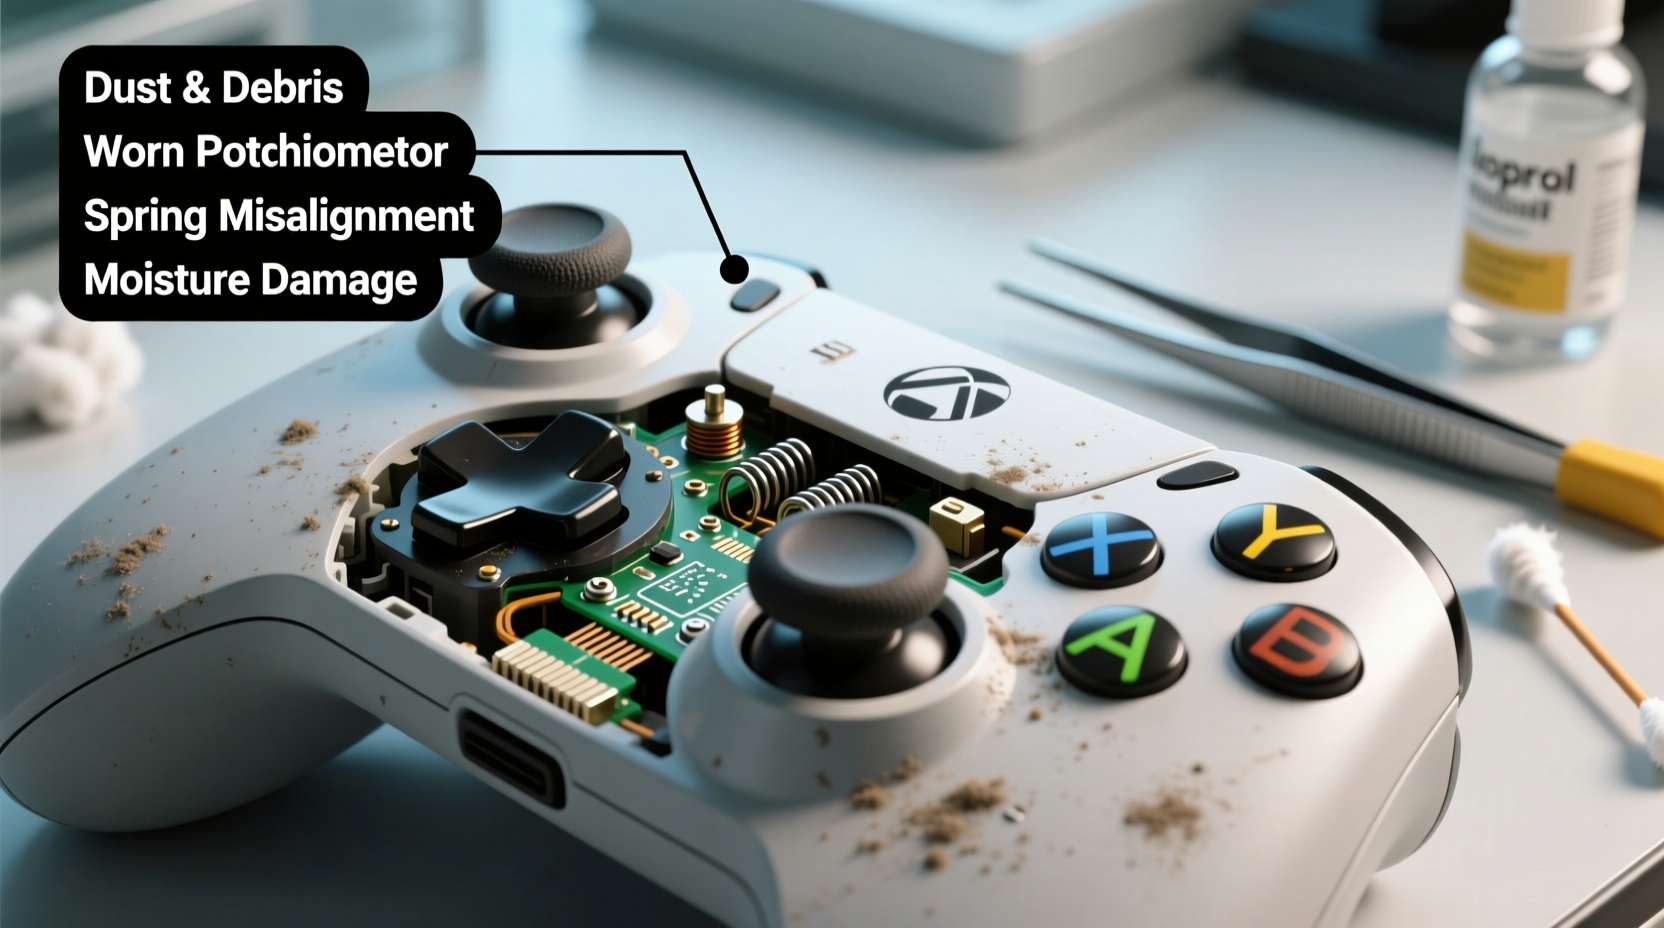
Analog stick drift doesn’t always mean your controller is broken beyond repair. Several mechanical and environmental factors contribute to this malfunction:
- Dust and debris accumulation: Tiny particles from the environment or skin oils enter the analog stick housing, interfering with internal sensors.
- Wear and tear of potentiometers: Most analog sticks use potentiometers (variable resistors) to detect position. Over time, these components degrade due to repeated use, leading to inaccurate readings.
- Carbon contact degradation: The carbon pads on the sensor board wear down after extensive use, reducing conductivity and creating false inputs.
- Moisture or liquid exposure: Spills or high humidity can corrode internal circuits or create conductive bridges between contacts.
- Physical damage: Dropping or pressing too hard on the stick may misalign internal parts or damage solder joints.
“Stick drift is often a symptom of contamination or minor mechanical fatigue—not necessarily hardware failure.” — James Reed, Electronics Repair Technician with 12 years in consumer device diagnostics.
Step-by-Step Guide to Fix Stick Drift at Home
Before considering a costly replacement, try these practical solutions. Many users report full restoration of functionality using non-invasive or minimally invasive methods.
- Power cycle and recalibrate: Start by turning off your console or PC and disconnecting the controller. Wait two minutes, then reconnect. Some systems offer built-in calibration tools—access them through settings under 'Controllers' or 'Devices'.
- Clean around the analog stick: Use a soft cloth dampened with isopropyl alcohol (70% or higher). Gently wipe around the base of the stick. Avoid soaking; moisture should never seep inside.
- Use compressed air: Tilt the controller so the stick faces downward. Spray short bursts of compressed air around the stick’s base to dislodge dust and lint. Rotate the controller to cover all sides.
- Perform the “rubber band trick” (temporary fix): Wrap small rubber bands around the base of the affected stick to apply light upward tension. This can realign the stick and reduce false input in mildly drifted units.
- Recenter the dead zone via software: On PC, tools like Steam Input allow you to adjust joystick dead zones. Increasing the dead zone masks minor drift without hardware changes.
When Cleaning Isn’t Enough: Deep Cleaning the Analog Module
If surface cleaning fails, a deeper intervention may help. This requires opening the controller but avoids component replacement.
- Power off and disconnect the controller.
- Use a precision screwdriver (usually Phillips #00 or Tri-Wing for Nintendo) to remove the casing.
- Locate the analog stick assembly. Detach it carefully—some models have ribbon cables or clips.
- Inspect the potentiometer or Hall effect sensor area. Look for grime, corrosion, or visible wear.
- Dampen a cotton swab with isopropyl alcohol and gently clean the moving parts and contact points. Do not scrub aggressively.
- Let the unit dry completely (15–20 minutes) before reassembling.
- Test the stick after reassembly. Repeat calibration if necessary.
Do’s and Don’ts When Handling Stick Drift
| Do | Don't |
|---|---|
| Use isopropyl alcohol for safe, residue-free cleaning | Use water or household cleaners near electronics |
| Apply gentle pressure when cleaning around the stick | Poke sharp objects into the stick housing |
| Calibrate your controller after cleaning | Ignore persistent drift after multiple fixes |
| Store controllers in a dry, dust-free case | Leave controllers exposed on floors or near food/drink |
| Adjust dead zones on PC as a temporary workaround | Disassemble lithium-ion battery-powered devices without proper training |
Real Example: Fixing a Drifting Nintendo Switch Pro Controller
Austin, a college student and avid Splatoon 3 player, noticed his Switch Pro Controller’s left stick began drifting during ranked matches. His character would slowly move forward while idle, costing him games. He tried recalibration through the console settings—no improvement. After researching, he used compressed air around both sticks and wiped the rims with an alcohol-dampened cloth. No change.
Determined not to spend $70 on a new controller, Austin opened the device using a YouTube tutorial. Inside, he found a fine layer of gray dust coating the left stick’s sensor module. Using a cotton swab and 90% isopropyl alcohol, he cleaned the contacts and let it dry overnight. Upon reassembly, the drift was gone. Six months later, the controller still performs flawlessly with weekly wipe-downs.
This case illustrates that even advanced-seeming issues often stem from preventable buildup—and that careful DIY maintenance can yield long-term results.
Alternative Fixes and Preventative Measures
For users uncomfortable with disassembly or facing recurring issues, several alternative strategies exist:
- Dead zone adjustment (PC only): In Steam, go to Settings > Controller > General Controller Settings. Select your controller, click “Edit,” and increase the inner dead zone until drift stops registering.
- Third-party firmware (advanced users): Tools like XInput Plus or DS4Windows allow deep customization of DualShock or Xbox controllers, including drift masking and sensitivity tuning.
- Replaceable stick caps: Some brands sell snap-on replacement tops (e.g., Kontrol Freek). These improve grip and reduce finger oil transfer to internal components.
- Use protective skins: Silicone covers or adhesive skins shield joysticks from dirt and sweat without affecting performance.
When to Consider Replacement Parts
If cleaning and calibration fail repeatedly, the potentiometer may be worn out. In such cases, replacing the analog stick module is more economical than buying a whole new controller. Replacement parts cost $5–$15 online and require basic soldering skills. For those unwilling to solder, modular replacement kits with plug-and-play connectors are available for certain models like PS4 DualShock 4.
“The average lifespan of an analog stick is 2–3 years with daily use. But with maintenance, that can stretch to 5 years or more.” — Lena Torres, Senior Technician at GameFix Labs.
Checklist: How to Fix and Prevent Stick Drift
- ✅ Recalibrate the controller via system settings
- ✅ Clean around the stick with isopropyl alcohol and a soft cloth
- ✅ Use compressed air to blow out debris
- ✅ Try increasing the dead zone (on PC)
- ✅ Disassemble and deep-clean if needed
- ✅ Reassemble and test thoroughly
- ✅ Apply preventive measures: skins, storage cases, regular wipe-downs
- ✅ Replace the analog module if cleaning fails
Frequently Asked Questions
Can stick drift be fixed permanently without replacing parts?
In early-stage drift caused by debris or minor misalignment, thorough cleaning and recalibration can resolve the issue permanently. However, if the internal potentiometer or carbon contacts are physically worn, the fix may be temporary. Long-term success depends on usage patterns and maintenance frequency.
Is stick drift covered under warranty?
Most major manufacturers—including Sony, Microsoft, and Nintendo—officially classify stick drift as a wear-and-tear issue, not a defect. However, class-action lawsuits (notably against Nintendo in 2021) have led some companies to offer free repairs even outside warranty periods. Contact customer support with your serial number and a video demonstrating the issue.
Are some controllers less prone to stick drift?
Yes. Controllers using Hall effect joysticks (which rely on magnetic sensors instead of physical contacts) are far more resistant to drift. The Steam Controller, 8BitDo Pro 2, and newer Xbox Elite Series 2 models use this technology. Though typically more expensive, they offer superior longevity for heavy users.
Conclusion: Extend Your Controller’s Life with Smart Care
Stick drift is a common but often misunderstood issue. Rather than accepting it as inevitable, gamers can take control through informed maintenance. From simple cleaning routines to strategic software adjustments, most cases can be mitigated or fully resolved without spending on a new controller. The key lies in early detection, consistent care, and understanding the root cause behind the malfunction.
By adopting preventative habits and mastering basic troubleshooting, players protect not just their equipment, but their gaming experience. A well-maintained controller responds accurately, lasts longer, and keeps you focused where it matters—in the game.


 浙公网安备
33010002000092号
浙公网安备
33010002000092号 浙B2-20120091-4
Comments
No comments yet. Why don't you start the discussion?