
Creating your own leather keychain isn’t just a satisfying craft—it’s a way to carry something meaningful. Whether you’re making one for yourself or as a thoughtful handmade gift, a custom leather keychain combines durability with personal flair. With minimal tools and basic techniques, even complete beginners can produce a polished, professional-looking pendant in under an hour. This guide walks you through every stage: from selecting the right leather to adding engraved details and finishing with a protective coat.
Why Make Your Own Leather Keychain?
Mass-produced accessories rarely reflect individuality. A handmade leather keychain allows you to choose the shape, color, texture, and even add initials, symbols, or dates. Beyond aesthetics, working with real leather teaches fundamental skills—cutting, stamping, edge finishing—that form the foundation of more advanced leathercraft. Plus, genuine vegetable-tanned leather ages beautifully, developing a rich patina over time.
“Handmade items carry intention. When someone uses a keychain you made, they’re carrying a piece of your effort and care.” — Jordan Hale, Artisan Leatherworker
Essential Tools and Materials
Starting small keeps costs low and learning manageable. You don’t need a full workshop—just a few core supplies available at craft stores or online.
Basic Toolkit Checklist
- Vegetable-tanned leather (2–3 oz thickness, 4” x 6” piece)
- Keyring (1 inch, brass or nickel)
- Utility knife or rotary cutter
- Steel ruler and cutting mat
- Hole punch or awl
- Leather stamping set (optional, for designs)
- Mallet (if using stamps)
- Sandpaper (fine grit: 220–400)
- Leather edge slicker or burnisher
- Leather dye or finish (optional)
- Conditioner (like beeswax or neatsfoot oil)
- Soft cloth for polishing
Step-by-Step Guide to Crafting Your Keychain
Follow this sequence to create a clean, durable keychain that reflects your personal style.
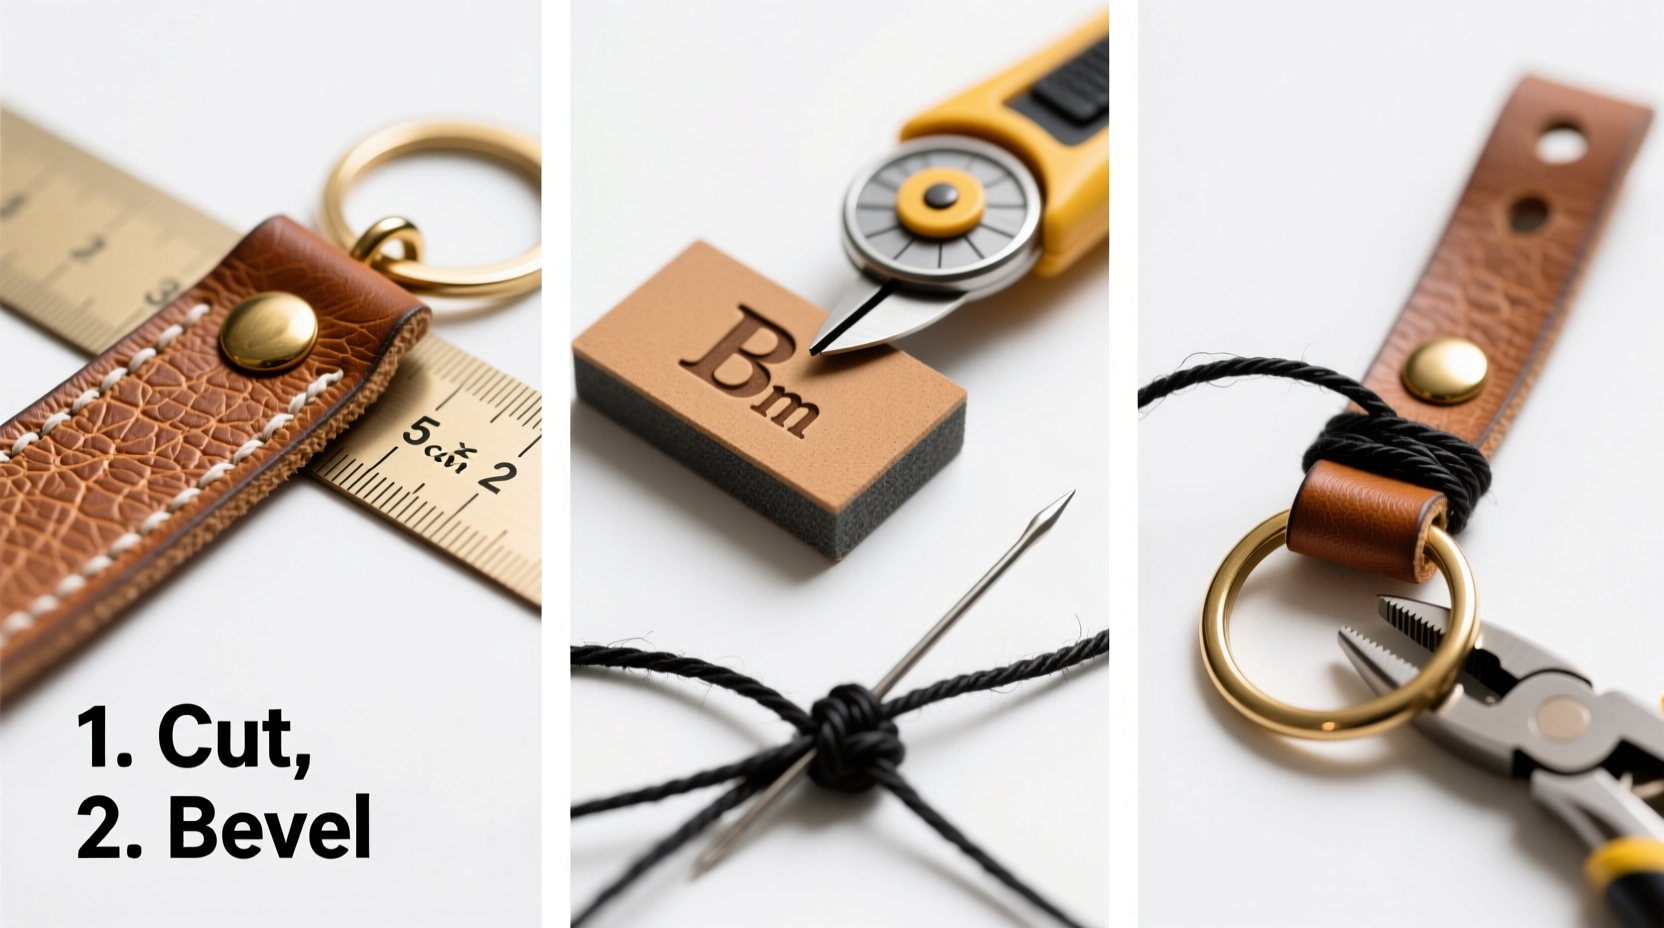
- Design Your Shape
Select a simple shape: rectangle, circle, teardrop, or custom silhouette. Sketch it lightly on paper first, then trace onto the flesh side (back) of the leather using a pencil or chalk marker. - Cut the Leather
Place the leather on a cutting mat. Use a steel ruler as a guide and make several light passes with a utility knife rather than trying to cut through in one stroke. This prevents jagged edges and gives better control. - Sand the Edges
Once cut, use fine-grit sandpaper to smooth any roughness along the perimeter. Round the corners slightly to avoid sharp points that could snag fabric. - Add Personalization
If desired, stamp initials, a date, or a small symbol. Align your stamp, place the leather on a soft surface (like a scrap of rubber), and strike firmly with a mallet. Practice on scrap leather first to gauge pressure. - Punch the Keyring Hole
Decide where the hole should go—typically near the top center. Use a hole punch sized slightly smaller than your keyring to ensure a snug fit. Alternatively, use an awl and twist gently through the leather. - Finish the Surface
Wipe the surface with a damp cloth to remove dust. Apply leather dye if coloring, using a sponge applicator. Let dry completely. Follow with a clear finish like acrylic resin or wax to protect the surface and enhance shine. - Burnish the Edges
Rub the edges with a leather slicker or wooden burnishing tool. Add a drop of water or edge finish to help compact the fibers. This creates a smooth, polished rim that resists fraying. - Condition and Polish
Apply a thin layer of leather conditioner with a soft cloth. Buff gently to bring out a soft luster. Avoid over-conditioning, which can soften the leather too much. - Attach the Keyring
Open the keyring by twisting (not pulling apart) and slide it through the hole. Close securely.
Do’s and Don’ts of Beginner Leathercraft
| Do’s | Don’ts |
|---|---|
| Work on the flesh side when marking or stamping | Use chrome-tanned leather for stamping (it won’t hold impressions well) |
| Store leather flat and away from direct sunlight | Leave unfinished edges exposed to moisture |
| Condition finished pieces every 3–6 months | Soak leather in water during cleaning |
| Practice stamping on scraps first | Press too hard with stamps—firm, even taps work best |
| Keep tools sharp and clean | Use household glue instead of contact cement for repairs |
A Real Example: Maya’s First Keychain
Maya, a college student with no prior crafting experience, decided to make a keychain for her sister’s birthday. She bought a beginner leather kit online for under $25. Her first attempt had uneven edges and a smudged initial, but she used the mistakes as feedback. On her second try, she slowed down, measured carefully, and conditioned the leather after stamping. The result was a clean, oval-shaped pendant with her sister’s initials and a tiny heart stamped below. Her sister still uses it two years later, noting how the leather has darkened attractively with daily use.
Frequently Asked Questions
Can I make a leather keychain without special tools?
Yes, though results will vary. You can use scissors for cutting (though they may crush edges), a nail and hammer for punching holes, and a spoon to burnish edges. For best quality and longevity, investing in basic tools is recommended.
How long does a handmade leather keychain last?
With proper care, a vegetable-tanned leather keychain can last 5–10 years or more. Regular conditioning and avoiding prolonged exposure to water or extreme heat will extend its life significantly.
Is it safe to get leather wet?
Occasional moisture won’t ruin it, but soaking or frequent wetting weakens fibers and can cause warping or cracking. If your keychain gets wet, blot dry immediately and condition once fully air-dried.
Final Thoughts and Next Steps
There’s quiet pride in using something you’ve made with your own hands. A personalized leather keychain is more than a functional item—it’s a small declaration of creativity and care. Once you’ve mastered the basics, consider experimenting with layered designs, different finishes, or incorporating metal studs and stitching. Each project builds confidence and skill.
The beauty of leathercraft lies in its accessibility. You don’t need years of training to create something lasting and meaningful. Start simple, embrace imperfections as part of the process, and let each piece tell a story.


 浙公网安备
33010002000092号
浙公网安备
33010002000092号 浙B2-20120091-4
Comments
No comments yet. Why don't you start the discussion?