
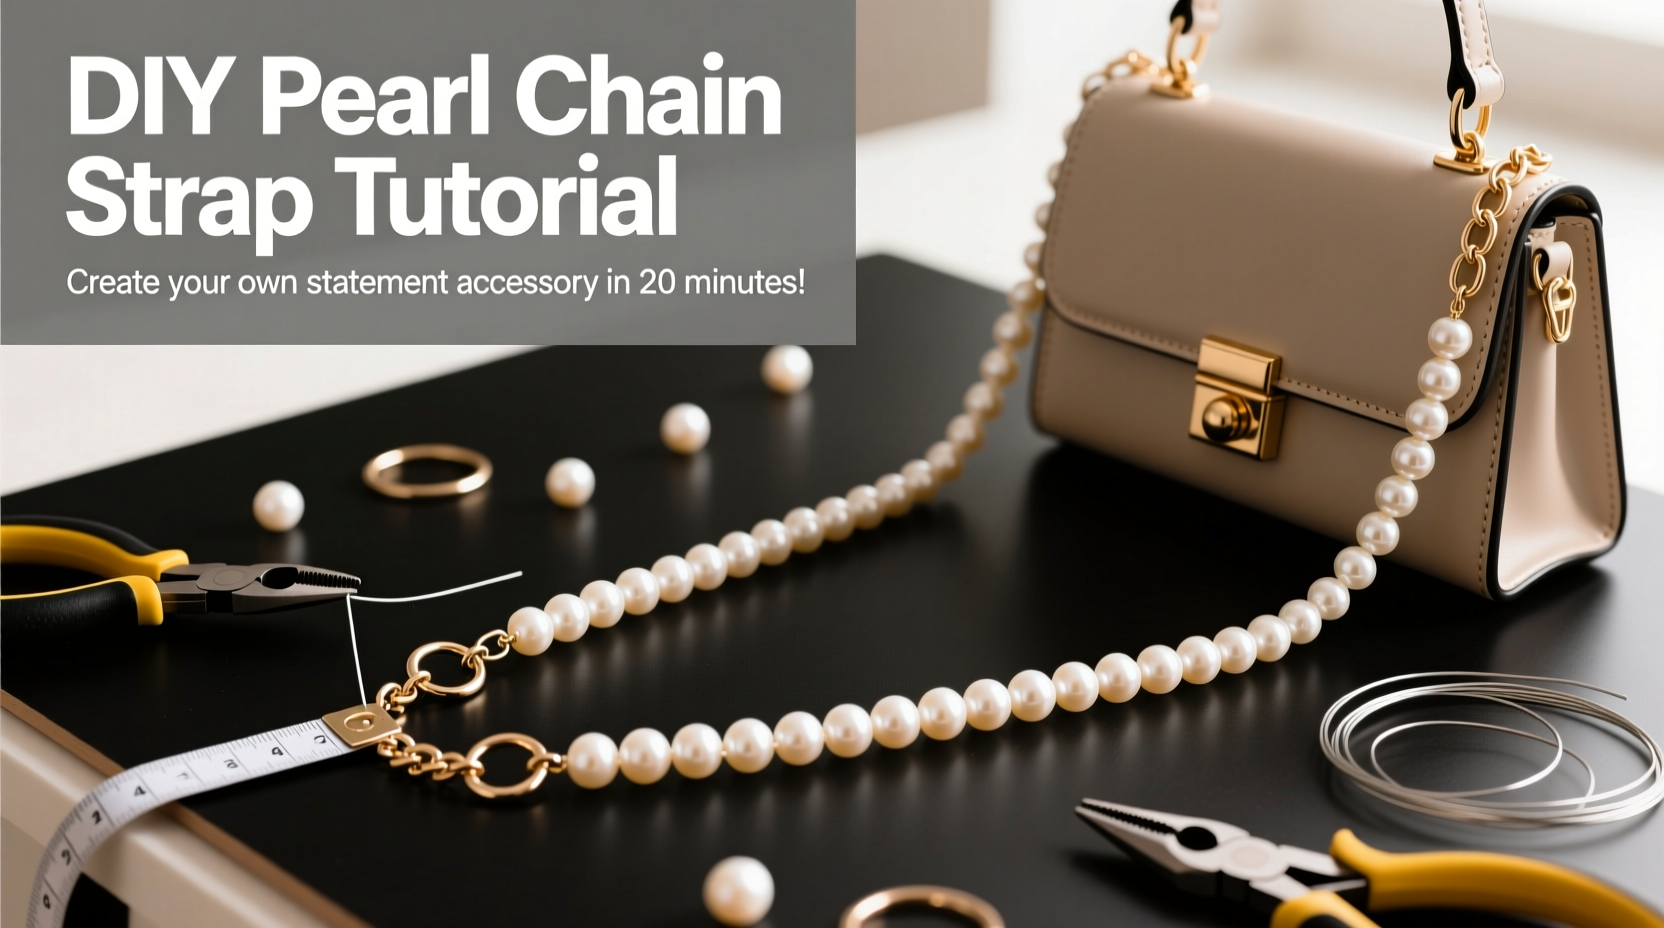
Transforming a simple handbag into a statement piece doesn’t require expensive designer upgrades. One of the most effective yet underused methods is customizing the strap—especially with pearls. A DIY pearl chain bag strap blends elegance with personal flair, offering both durability and style. Whether you’re revamping an old tote or crafting a new clutch, this guide walks through the process of creating a strong, beautiful, and long-lasting pearl strap using accessible materials and techniques.
Why Upgrade Your Bag Strap?
The strap is more than just a functional component—it’s a design opportunity. Most off-the-shelf bags come with generic chains or fabric straps that lack personality. By replacing or enhancing them with a handmade pearl chain, you elevate your accessory from ordinary to couture-inspired. Pearls symbolize timeless sophistication, but when used creatively in a modern context, they become bold and expressive.
Beyond aesthetics, a well-crafted strap improves usability. Custom lengths allow for comfortable crossbody wear or elegant shoulder draping. Plus, using quality findings and secure knots ensures the strap supports daily use without compromising on safety.
Materials You’ll Need
Before beginning, gather all necessary supplies. Using the right components ensures both durability and professional results. Here’s what to prepare:
- Pearl beads (glass, acrylic, or faux ceramic; 6–12mm size)
- Strong beading wire (0.5mm stainless steel or nylon-coated wire)
- Wire guardians or crimp tubes (for stress protection at connection points)
- Silver or gold-toned end caps and jump rings (3–5mm)
- Bag strap connectors (lobster clasps, purse ring ends, or swivel hooks)
- Chain extender (optional, for adjustable length)
- Flat-nose pliers, wire cutters, and crimping tool
- Measuring tape
For durability, avoid flimsy elastic cord or thin thread. These may stretch or break under weight. Instead, opt for professional-grade beading wire designed to withstand tension and friction.
Step-by-Step Guide to Building Your Pearl Chain Strap
Follow this structured approach to assemble a secure and visually balanced strap. This method allows customization in length, density, and finish while ensuring structural integrity.
- Measure and Plan Length: Decide whether you want a short shoulder strap (18–22 inches), crossbody (40–50 inches), or convertible design. Add 2 extra inches for connector hardware.
- Cut the Wire: Use wire cutters to trim your beading wire to the desired length plus 4 inches (for wrapping and securing).
- Attach One Connector: Slide a crimp tube onto the wire, then thread through one end of a jump ring connected to a lobster clasp or purse ring. Loop back through the crimp tube and flatten it with crimping pliers. This creates a secure anchor point.
- String the Pearls: Begin threading pearls onto the wire. For a classic look, space them evenly with 2–3mm between each. For a denser effect, place them side by side. Alternate sizes or add spacer beads (like tiny crystals or metal rounds) for visual interest.
- Reinforce Stress Points: Before finishing, insert a wire guardian at the final few inches near the second end. This reduces wear where the strap bends around connectors.
- Secure the Second End: Thread the wire through another jump ring attached to your second connector. Add a crimp tube, pass the wire back through it, and crimp firmly. Trim excess wire carefully.
- Test Tension and Flexibility: Gently tug along the strand and flex the connectors. Ensure no slippage and smooth movement.
Durability Tips and Design Variations
A beautiful strap must also endure daily use. Consider these enhancements to boost longevity and originality:
- Mix Materials: Combine pearl sections with small metal chains or leather segments for texture contrast.
- Add a Drop Pendant: Center a decorative charm or tassel midway down the strap for focal interest.
- Use Coated Wire: Nylon-coated stainless steel resists kinking and adds flexibility without sacrificing strength.
- Weatherproof Beads: Select lacquered or sealed faux pearls to resist moisture and UV fading, ideal for outdoor use.
For asymmetry lovers, try a single long strand on one side paired with a shorter chain on the other. Or create a detachable strap system using magnetic clasps, allowing quick swaps between styles.
| Design Style | Ideal For | Durability Rating |
|---|---|---|
| Classic Single Strand (Evenly Spaced Pearls) | Elegant clutches, evening bags | ★★★★☆ |
| Dense Pearl Cluster | Fashion-forward totes, statement pieces | ★★★☆☆ |
| Hybrid (Pearl + Metal Chain) | Everyday crossbody bags | ★★★★★ |
| Convertible Double-Length | Travel or multi-use bags | ★★★★☆ |
“Personalization is the future of sustainable fashion. When people invest time into modifying their accessories, they value them longer.” — Lila Nguyen, Sustainable Fashion Designer & Educator
Real-Life Example: Revamping a Vintage Clutch
Sophie, a boutique stylist in Portland, inherited a vintage silk clutch from her grandmother. While the body was pristine, the original chain strap felt outdated and too short. She decided to craft a 24-inch pearl strap using ivory 8mm glass beads and gold-plated connectors.
She alternated every third pearl with a tiny brass spacer bead for subtle shine. To ensure sturdiness, she used double-threaded coated wire and added wire guards at both ends. The result? A showpiece that drew compliments at her friend’s wedding—and held up through hours of dancing and photo sessions.
Her experience highlights how a modest DIY project can breathe new life into sentimental items, making them wearable again without losing authenticity.
Frequently Asked Questions
Can I wash or clean my pearl strap?
Spot-clean with a soft, dry cloth only. Avoid water, perfumes, and lotions, which can degrade adhesives and tarnish metal components. Never submerge the strap.
How do I prevent the pearls from scratching each other?
Choose beads with a high-gloss coating or use micro-spacers (tiny silicone or metal beads) between pearls to minimize contact and friction.
Is it safe to use this strap on heavier bags?
Yes, but reinforce the structure. Use thicker wire, double-stranding, or integrate a hidden support core like braided fishing line or thin cable. Also, distribute weight with wider connectors or padded shoulder rests.
Checklist: DIY Pearl Strap Success
- ☑ Measure desired strap length accurately
- ☑ Use strong, non-stretch beading wire
- ☑ Include crimp tubes and wire guardians at stress points
- ☑ Test connections before finalizing
- ☑ Match connector finish (gold/silver) to bag hardware
- ☑ Allow room for adjustments (e.g., extender chain)
- ☑ Inspect monthly for wear, especially after frequent use
Final Thoughts and Call to Action
A DIY pearl chain bag strap is more than a craft project—it’s an act of self-expression and mindful consumption. In a world of fast fashion, taking the time to personalize an accessory fosters deeper connection and extends its lifespan. With the right materials and attention to detail, your creation won’t just look luxurious; it will perform like a professional product.
Start small: pick a bag you love but rarely use due to a dull strap. Gather your beads and tools, follow the steps, and witness the transformation. Once you complete your first strap, you might find yourself redesigning your entire collection—one elegant link at a time.


 浙公网安备
33010002000092号
浙公网安备
33010002000092号 浙B2-20120091-4
Comments
No comments yet. Why don't you start the discussion?