
For many dogs, especially larger breeds or those with joint issues, eating from a bowl on the floor can lead to discomfort, poor posture, and even digestive problems. An elevated dog feeder raises food and water bowls to chest level, promoting better spinal alignment and reducing strain during meals. While commercial options exist, they often lack customization, durability, or aesthetic appeal. Building your own elevated feeder allows you to tailor height, design, and materials to your dog’s needs and your home’s style—while saving money and gaining satisfaction from a handmade project.
Why Elevation Matters: Health Benefits for Your Dog
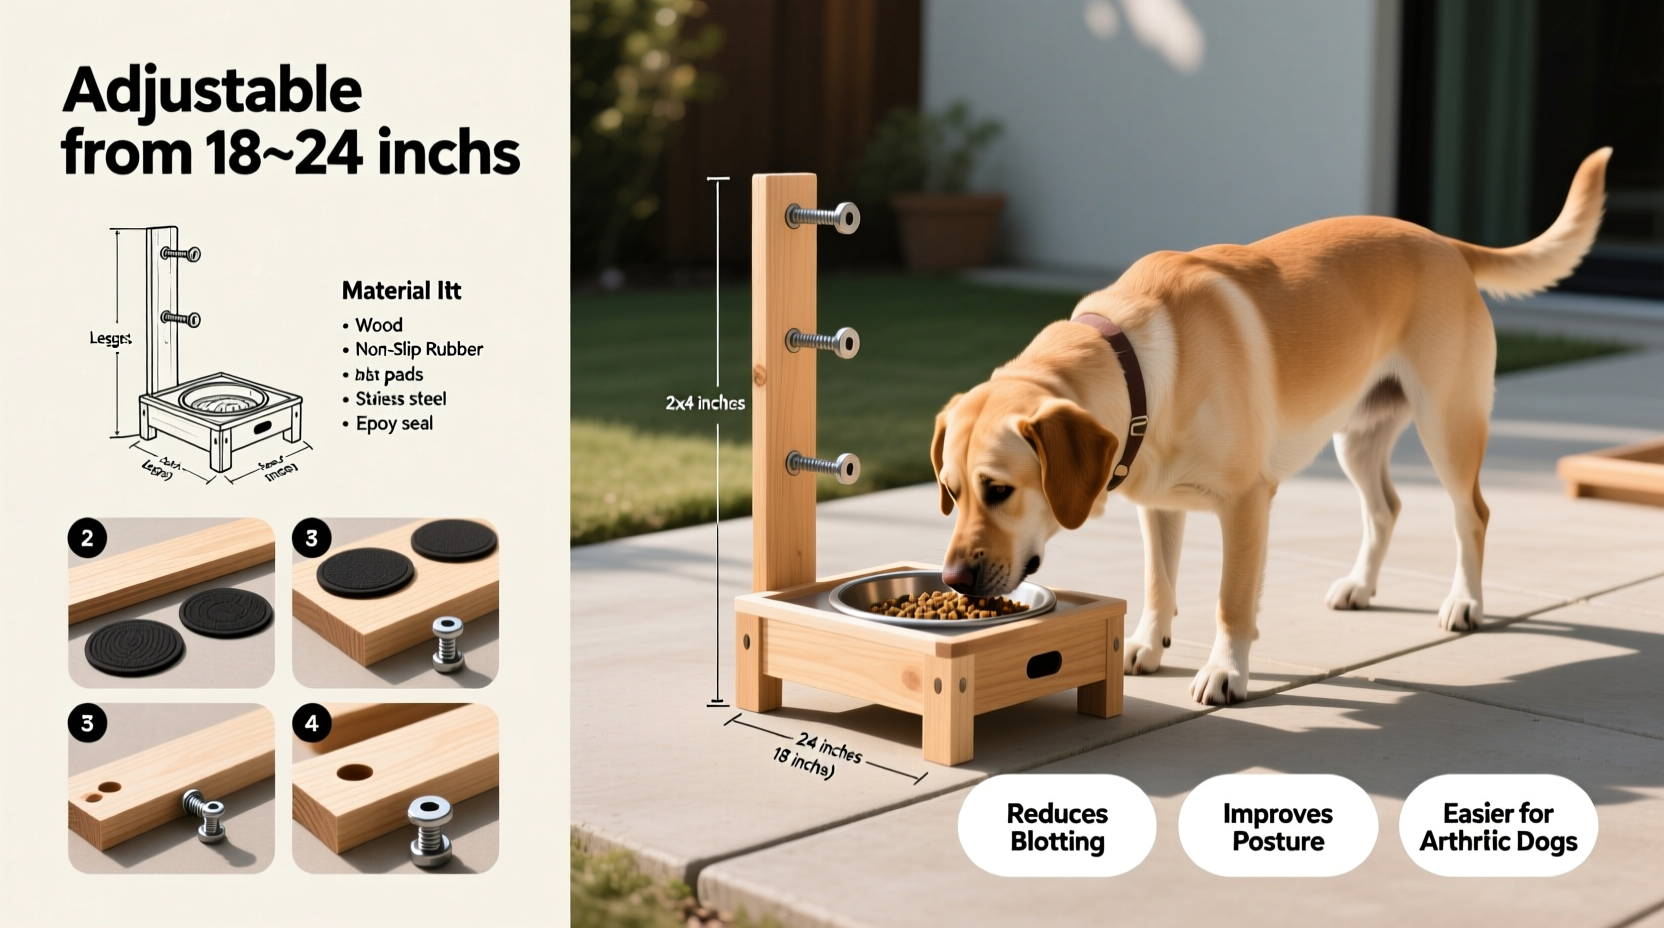
Elevating your dog’s feeding station isn’t just about convenience—it supports long-term health. Dogs with arthritis, hip dysplasia, or neck pain benefit significantly from reduced bending. Large and deep-chested breeds like Great Danes, Labradors, and German Shepherds are also prone to bloat (gastric dilatation-volvulus), and while elevation alone doesn’t prevent it, proper posture may reduce air swallowing during meals.
“Elevated feeders can improve ergonomics for dogs with orthopedic conditions, making mealtime less taxing on their joints.” — Dr. Rachel Nguyen, DVM, Canine Rehabilitation Specialist
The ideal height for an elevated feeder is mid-chest level—measured from the ground to the top of the shoulders (withers). This ensures your dog maintains a neutral spine while eating. Custom construction lets you hit this exact measurement, unlike one-size-fits-all store-bought models.
Planning Your Custom Feeder: Design and Materials
Before picking up tools, sketch a basic design. Consider your dog’s size, eating habits, and where the feeder will live in your home. Will it stay in the kitchen? Need to be portable? Should it match your furniture?
Most DIY elevated feeders use wood for its strength, ease of workability, and natural look. Pine, poplar, or hardwoods like oak offer durability. For a modern twist, consider metal legs with a wooden tray or even concrete and wood composites for a minimalist aesthetic.
Standard dual-bowl designs work well for most dogs, but if your pet tends to move the bowls around, consider embedding them into cutouts or using non-slip silicone inserts. Stainless steel bowls are recommended—they’re hygienic, durable, and dishwasher-safe.
Material Comparison Table
| Material | Pros | Cons | Best For |
|---|---|---|---|
| Pine Wood | Affordable, easy to cut, stains well | Soft, can dent or scratch | Indoor use, light-duty feeders |
| Oak or Maple | Durable, beautiful grain, long-lasting | More expensive, harder to cut | Heavier dogs, permanent fixtures |
| Stainless Steel Bowls | Hygienic, resistant to chewing | Can clang, may slide | All dogs, especially messy eaters |
| Plastic Bowls | Cheap, lightweight | Scratches easily, harbors bacteria | Temporary or outdoor use only |
Step-by-Step Build Guide
Follow this detailed process to create a sturdy, attractive elevated feeder in under a weekend.
- Measure your dog: Have your dog stand naturally on the floor. Measure from the floor to the withers (top of the shoulders). Subtract 4–6 inches to allow for head tilt while eating. Example: A dog with a 24-inch shoulder height needs a 18–20 inch feeder.
- Cut the platform: Use a 1x12 or 1x10 board (actual thickness ~¾ inch) cut to 24” long. This provides space for two bowls with room to grow. Sand all edges smooth.
- Mark bowl positions: Place bowls on the platform, spacing them 6–8 inches apart. Trace the outer rim. Then trace a slightly smaller circle inside to guide a jigsaw cutout.
- Cut bowl recesses: Drill starter holes inside each traced circle. Use a jigsaw to carefully cut along the inner line. Test-fit bowls—they should sit snugly with rims flush or slightly recessed.
- Build the legs: Cut four legs from 2x2 lumber. For an 18-inch feeder, cut legs to 17¼ inches (¾ inch will attach to the underside of the platform). Bevel the bottom edges slightly for stability.
- Assemble the base: Attach legs to the platform corners using wood screws and carpenter’s glue. Reinforce with corner brackets if desired. Pre-drill holes to prevent splitting.
- Finish the wood: Apply pet-safe wood finish—water-based polyurethane or food-grade mineral oil. Avoid varnishes with toxic solvents. Let dry fully (24–48 hours) before use.
- Add non-slip feet: Attach rubber pads or felt glides to the bottom of each leg to protect floors and prevent sliding.
Real-Life Example: Max the Labrador’s Feeding Upgrade
Max, a 2-year-old yellow Labrador, began showing reluctance to eat his evening meal. His owner noticed him hunching low and lifting his head quickly after each bite. A vet visit ruled out illness but suggested trying an elevated feeder due to early signs of elbow stress. With no suitable commercial options matching their farmhouse kitchen, the owner built a pine-and-oak feeder stained to match their dining table. After assembly and a week of gradual introduction (placing it beside the old bowl), Max began eating faster, standing more comfortably, and even waited patiently by the new station at mealtimes. Six months later, the feeder remains stable, easy to clean, and a functional piece of decor.
Common Mistakes to Avoid
- Setting the feeder too high: Over-elevation forces dogs to eat with raised chins, straining neck muscles. Stick to the withers-minus-5-inch rule.
- Using unstable joints: Pocket screws or glue alone may fail over time. Reinforce with corner braces or dowels.
- Skipping the finish: Unsealed wood absorbs spills and becomes a breeding ground for bacteria. Always apply a waterproof, non-toxic sealant.
- Ignoring bowl security: Loose bowls encourage pawing and tipping. Recessed cuts or anti-slip mats help keep them in place.
Customization Ideas for Style and Function
Your feeder doesn’t have to be purely utilitarian. Add value with smart upgrades:
- Slide-out tray: Install a small drawer beneath the platform for storing treats or utensils.
- Integrated water bowl cover: A flip-up lid keeps dust out and doubles as a splash guard.
- Magnetic bowl retention: Embed small magnets in the platform and use steel-backed bowls for quick removal and cleaning.
- Theme matching: Paint or stencil your dog’s name, breed, or a fun pattern to complement nursery or mudroom decor.
Frequently Asked Questions
Can an elevated feeder cause bloat?
Studies show mixed results. While some older research linked elevated feeders to increased bloat risk in large breeds, more recent veterinary consensus suggests posture improvement may actually reduce air ingestion. Always consult your vet, especially for deep-chested dogs, and avoid vigorous exercise around mealtimes.
How do I clean a wooden elevated feeder?
Wipe the surface daily with a damp cloth and mild soap. Remove bowls and wash separately. Every few weeks, inspect the finish for wear. Reapply sealant annually or when water stops beading on the surface.
Can I make a collapsible version for travel?
Absolutely. Use lightweight plywood and removable bolt-on legs. Or design a knock-down model with cam locks for easy disassembly. Just ensure all finishes are fully cured and non-toxic before use.
Final Checklist Before You Begin
- ✅ Measure your dog’s withers accurately
- Ensure correct ergonomic height
- ✅ Choose non-toxic, durable materials
- Solid wood and stainless steel are ideal
- ✅ Plan for easy cleaning
- Recessed bowls and sealed surfaces simplify maintenance
- ✅ Sand and finish all wood parts
- Prevent splinters and moisture damage
- ✅ Test stability before first use
- Ensure no wobbling when your dog leans in
Conclusion: Craft Comfort One Meal at a Time
Building a custom elevated dog feeder blends craftsmanship with compassion. It’s a simple project with profound impact—transforming a daily routine into a moment of comfort and care. By tailoring the design to your pet’s body and your home’s character, you create more than a feeding station; you build a lasting symbol of thoughtful pet ownership. Whether you're a seasoned woodworker or a weekend DIYer, this project offers immediate rewards: a happier dog, a cleaner kitchen, and the pride of having made something truly useful by hand.


 浙公网安备
33010002000092号
浙公网安备
33010002000092号 浙B2-20120091-4
Comments
No comments yet. Why don't you start the discussion?