
Elevated dog feeders are more than just a stylish addition to your kitchen or laundry room—they serve a real functional purpose. Raising food and water bowls to an optimal height reduces strain on your dog’s neck, shoulders, and spine, especially beneficial for larger breeds, seniors, or dogs with joint conditions like arthritis or hip dysplasia. While commercial options exist, many come with high price tags and limited design flexibility. Building your own elevated dog feeder allows you to customize dimensions, materials, and aesthetics while saving money and adding a personal touch to your home.
This guide walks through the creative and practical aspects of designing and constructing a durable, safe, and attractive elevated dog feeder using common tools and accessible materials. Whether you're a seasoned DIYer or tackling your first woodworking project, these tips will help you create a functional piece that both you and your dog will appreciate.
Why Elevation Matters: The Health Benefits for Dogs
Dogs aren't built to eat from the floor. When a large or deep-chested dog bends down to reach their bowl, it forces unnatural spinal curvature and can compress internal organs over time. Elevated feeders promote better posture during meals, which supports digestion and reduces the risk of bloat—a life-threatening condition particularly common in deep-chested breeds like Great Danes, German Shepherds, and Boxers.
“Elevating food and water bowls can significantly reduce cervical and lumbar strain in large-breed dogs. It's a simple adjustment with meaningful long-term benefits.” — Dr. Lena Torres, DVM, Canine Orthopedic Specialist
The ideal height for an elevated feeder is typically mid-chest level—measured from the ground to the top of your dog’s shoulders (withers). This ensures the dog doesn’t have to lower its head excessively, allowing for a neutral spine alignment while eating.
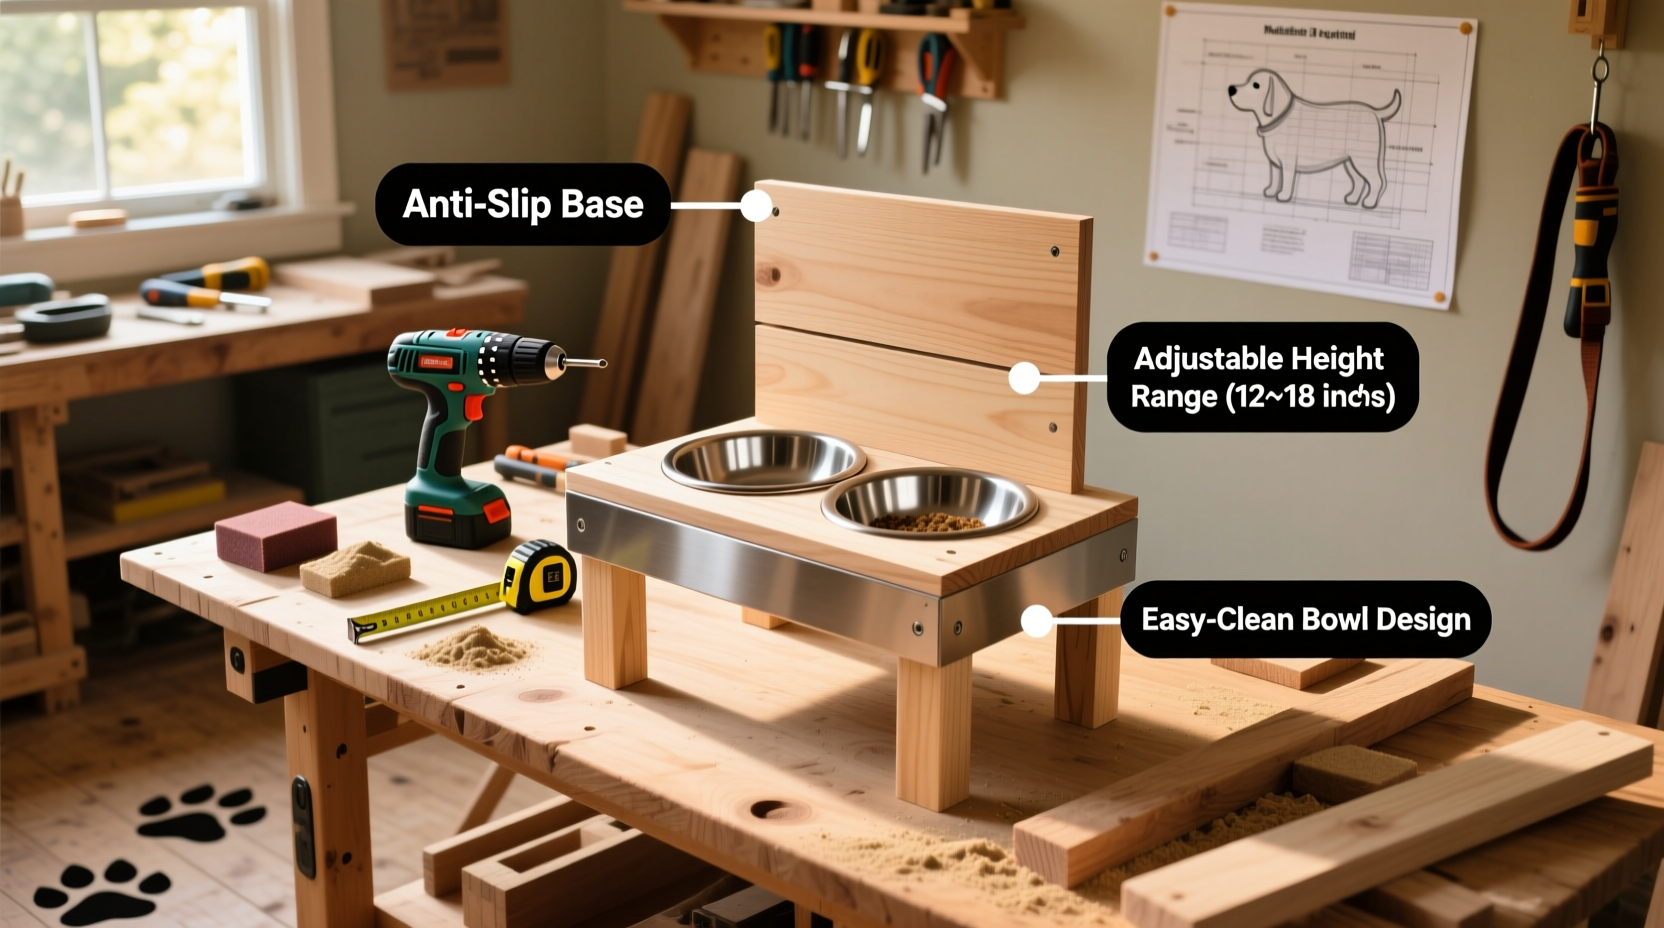
Step-by-Step Guide to Building Your Custom Feeder
Constructing a sturdy elevated feeder doesn’t require advanced carpentry skills. With basic tools and careful planning, you can complete this project in a weekend. Below is a detailed timeline and process:
- Measure your dog: Use a tape measure to record the height from the floor to your dog’s withers. Subtract 4–6 inches to determine the ideal stand height.
- Select materials: Choose rot-resistant, non-toxic wood such as cedar, pine, or birch. Avoid treated lumber, which may leach chemicals.
- Cut the components: You’ll need two side panels (A-frames or rectangular), a top platform, and support braces. Use a saw to cut pieces according to your design.
- Assemble the frame: Secure the sides to the top platform using wood screws and waterproof wood glue. Reinforce joints with corner brackets if desired.
- Sand and finish: Smooth all surfaces to prevent splinters. Apply a pet-safe sealant or food-grade mineral oil, especially if the feeder will be near water.
- Add non-slip feet: Attach rubber pads or felt glides to the bottom to prevent sliding and protect your floors.
- Insert bowls: Use stainless steel or ceramic bowls secured in cutouts or held by rim clips to prevent tipping.
Design Variations and Creative Upgrades
One of the biggest advantages of a DIY approach is customization. Consider these creative enhancements to make your feeder both functional and beautiful:
- Adjustable height legs: Use threaded wooden dowels or metal hairpin legs that allow you to modify height as your dog grows or ages.
- Integrated storage: Add a small drawer or shelf underneath to store treats, scoop, or cleaning cloths.
- Theme matching: Stain or paint the feeder to match your kitchen cabinetry or home décor. Rustic farmhouse? Modern minimalist? Make it cohesive.
- Dual-level design: For multi-dog households, build staggered platforms so each dog eats at their ideal height without crowding.
- Wheeled base: Attach locking casters for easy mobility—ideal for cleaning or moving between rooms.
For smaller spaces, consider wall-mounted versions that fold down when in use and swing up when not needed. Just ensure the mounting hardware is anchored into studs for safety.
Material Comparison: Choosing What’s Best
Not all materials are created equal. The table below compares common options for elevated feeders based on durability, safety, and maintenance.
| Material | Pros | Cons | Best For |
|---|---|---|---|
| Hardwood (e.g., oak, birch) | Durable, natural look, easy to refinish | Can warp if not sealed properly | Indoor use, long-term installations |
| Plywood (exterior grade) | Affordable, stable, resists warping | Edges need sealing; less premium appearance | Budget builds, painted finishes |
| Bamboo | Eco-friendly, naturally antibacterial | Expensive, limited availability | Sustainable homes, modern designs |
| Recycled plastic lumber | Mold-resistant, zero maintenance | Heavy, harder to work with | Outdoor or humid environments |
Real Example: How One Owner Solved Her Dog’s Digestive Issues
Sarah, a Labrador Retriever owner from Portland, noticed her 7-year-old dog Max was frequently regurgitating food shortly after meals. After ruling out medical causes, her vet suggested trying an elevated feeder to improve posture during eating. Instead of buying one, Sarah decided to build a custom unit from reclaimed barn wood she had stored in her garage.
She measured Max at 28 inches to the withers and set the feeder height at 22 inches. She added a pull-out tray beneath to catch spills and used silicone adhesive to secure stainless steel bowls. Within a week, Max’s regurgitation stopped, and Sarah loved how the rustic feeder complemented her kitchen’s aesthetic. “It cost under $30 in supplies,” she said, “and now it’s one of my favorite pieces in the house.”
Essential Checklist Before You Begin
Before picking up your tools, run through this checklist to ensure a smooth build:
- ✅ Measure your dog’s wither height accurately
- ✅ Choose non-toxic, splinter-free materials
- ✅ Confirm bowl size and trace cutouts beforehand
- ✅ Sand all surfaces to a smooth finish
- ✅ Use pet-safe wood finishes or sealants
- ✅ Test stability—ensure no wobbling when in use
- ✅ Clean regularly; avoid standing water under bowls
Frequently Asked Questions
How high should an elevated dog feeder be?
The ideal height is approximately 6 inches below your dog’s wither (top of the shoulder). For example, if your dog measures 30 inches at the shoulder, aim for a feeder height of 24 inches.
Are elevated feeders safe for all dogs?
Most adult dogs benefit from elevation, but puppies under 6 months should generally eat from floor-level bowls to support natural growth patterns. Consult your vet if your dog has existing health conditions.
Can I use a plastic bowl with a homemade feeder?
Stainless steel or ceramic bowls are preferred because they’re more hygienic and harder for dogs to tip. Plastic bowls can harbor bacteria and may be chewed or flipped by enthusiastic eaters.
Build Smarter, Feed Better
Creating a custom elevated dog feeder is a rewarding project that combines craftsmanship with care for your pet’s well-being. Beyond functionality, it reflects thoughtfulness—a tangible expression of how much you value your dog’s comfort and health. With the right measurements, materials, and attention to detail, you can build a feeder that lasts for years and becomes a seamless part of your home.
Don’t settle for mass-produced solutions when you can design something better, safer, and uniquely suited to your lifestyle. Grab your tools, involve the family, and turn this simple project into a lasting upgrade for your four-legged companion.


 浙公网安备
33010002000092号
浙公网安备
33010002000092号 浙B2-20120091-4
Comments
No comments yet. Why don't you start the discussion?