
Turning broken crayons into new, colorful creations is more than just a craft—it’s a way to reduce waste, spark creativity, and spend quality time with children. Instead of buying new crayons every few months, you can repurpose old or snapped ones by melting them down and pouring them into custom-shaped molds. The best part? You don’t need specialized tools or expensive supplies. With household items and a bit of imagination, you can create unique crayon shapes that inspire drawing, storytelling, and play.
Why Make Your Own Crayon Molds?
Homemade crayon molds offer more than just aesthetic appeal. They encourage resourcefulness, teach basic principles of recycling, and support fine motor development in children. When kids help design and pour their own crayons, they engage in sensory learning and take pride in using something they helped create.
Melting down old crayons also prevents unnecessary waste. According to the Environmental Protection Agency, art supplies like crayons often end up in landfills despite being fully recyclable through creative reuse. By making your own molds, you contribute to a circular approach to crafting—turning what was once discarded into vibrant new tools for expression.
Materials You’ll Need
The beauty of this project lies in its simplicity. Most materials are already found in a typical kitchen or craft drawer. Here’s what you’ll need to get started:
- Old crayons (peeled or unpeeled)
- Silicone molds, ice cube trays, or handmade clay molds
- A silicone baking cup or heat-safe container
- Oven or microwave
- Parchment paper or wax paper
- Tongs or oven mitts
- Kitchen knife (optional, for cutting crayons)
No toxic chemicals or industrial equipment required. Everything used is non-toxic and child-safe when handled properly under adult supervision.
Step-by-Step Guide to Creating Custom Crayon Molds
- Collect and Prepare Crayons: Gather broken, short, or unused crayons. Remove paper wrappers by peeling or soaking them in warm water for easier removal.
- Sort by Color or Theme: Group similar colors together for solid tones, or mix complementary shades for swirled effects (e.g., red + yellow = orange).
- Break Into Small Pieces: Use a knife or hands to break crayons into smaller chunks. Smaller pieces melt faster and more evenly.
- Choose Your Mold: Select silicone molds in fun shapes (stars, animals, letters) or use muffin tins lined with paper cups. For full customization, see next section on making DIY clay molds.
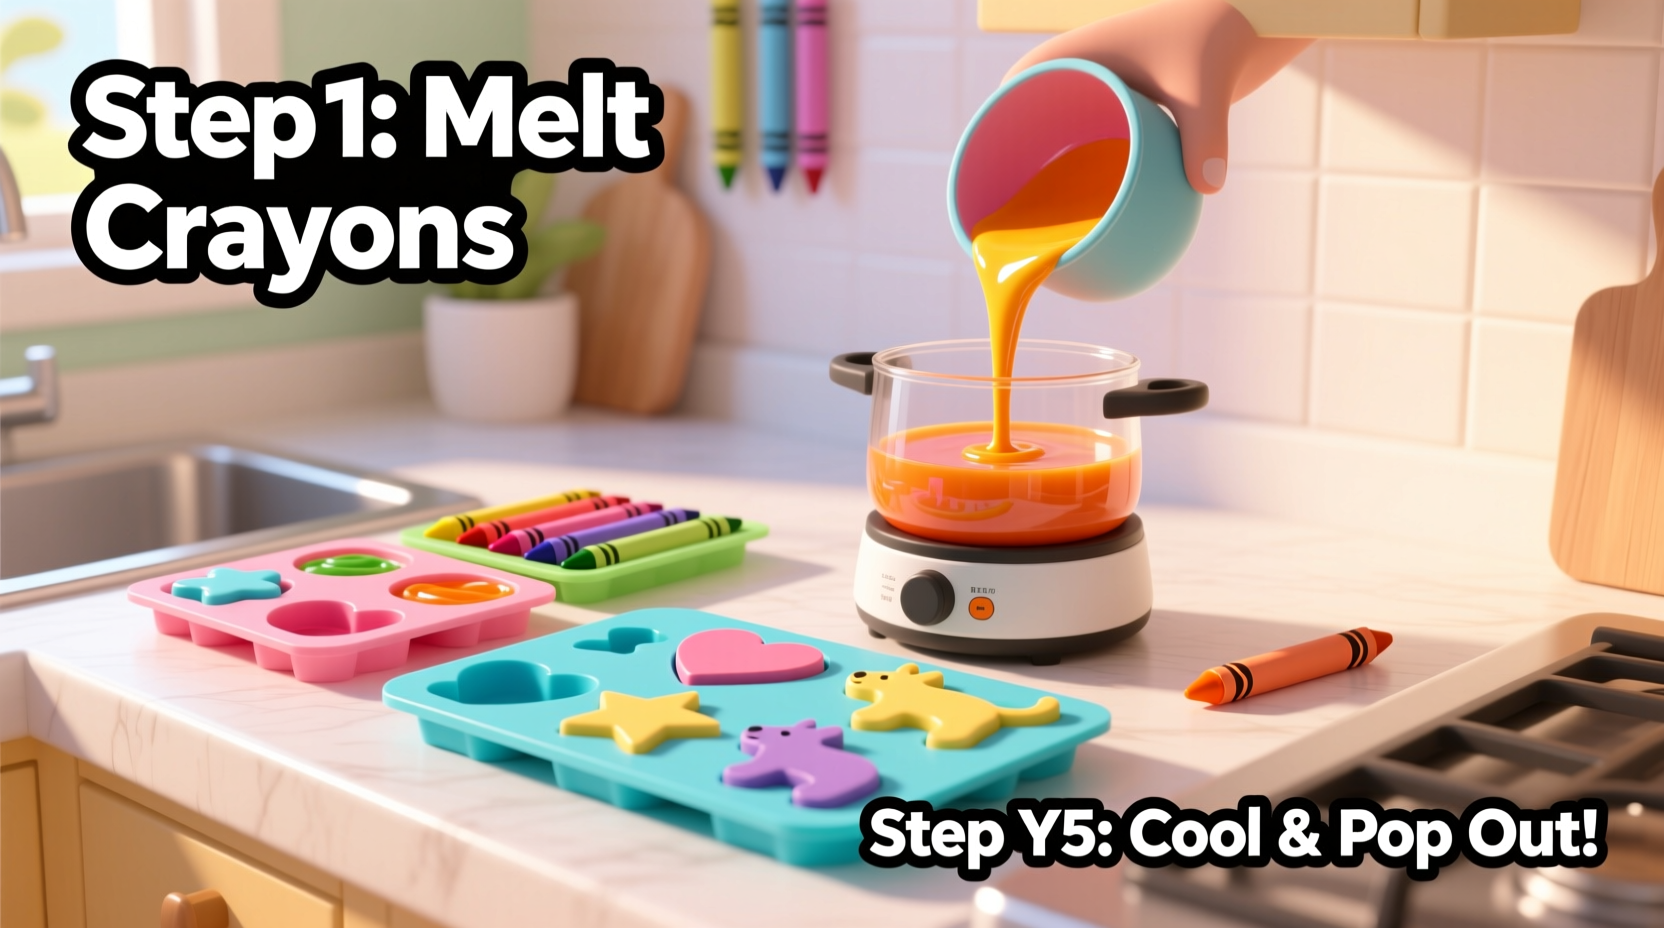
- Preheat Oven to 250°F (120°C): This low temperature ensures even melting without burning.
- Fill Molds: Place crayon pieces into each mold cavity, filling about ¾ full to allow for expansion.
- Bake for 15–20 Minutes: Check periodically. Crayons are ready when fully liquefied with no visible chunks.
- Cool Completely: Remove from oven and let sit at room temperature for 1–2 hours until solidified.
- Pop Out Crayons: Gently press the back of silicone molds or flex plastic trays to release the new crayons.
- Label and Store: Keep in a dry container, optionally labeled by color or shape for easy access during art time.
How to Make DIY Clay Molds Without Special Tools
If you want truly one-of-a-kind crayon shapes, consider making your own molds using modeling clay. This method allows limitless creativity and teaches sculpting basics.
Use air-dry or polymer clay to form impressions of natural objects like leaves, shells, or toy figures. Press the object firmly into a flat piece of clay, then carefully remove it, leaving behind a detailed impression. Let the clay harden according to package instructions. Once set, place the clay mold on a tray and pour in melted crayon wax.
For durability, bake polymer clay molds before use to strengthen them against heat. Air-dry versions work well but should be used gently and kept away from excess moisture.
“Children who participate in creating their own art supplies develop stronger emotional connections to their creative process.” — Dr. Lena Torres, Child Development Specialist
Best Materials for Reusable Molds: A Comparison
| Material | Pros | Cons | Best For |
|---|---|---|---|
| Silicone Molds | Flexible, heat-resistant, reusable, easy release | Limited shapes unless purchased in variety packs | Frequent use, classroom settings |
| Ice Cube Trays (Plastic) | Inexpensive, widely available, geometric shapes | May warp over time; harder to remove crayons | Beginners, quick projects |
| Muffin Tins + Paper Liners | Large surface area, great for chunky crayons | Less precise shaping | Group activities, gift-making |
| DIY Clay Molds | Custom designs, educational value, artistic freedom | Less durable, not always heat-stable | Special occasions, personalized gifts |
Real Example: Turning a Rainy Day into a Craft Adventure
Last winter, Sarah, a homeschooling parent from Portland, faced a week of constant rain. Her two young sons were restless and bored. Remembering a pile of broken crayons in the closet, she decided to try making new ones. She used alphabet-shaped silicone molds she already owned and let the boys sort the crayons by color.
They experimented with mixing purple and silver for “space crayons” and green with specks of blue for “jungle magic.” After baking, the boys proudly used their homemade crayons to draw stories about astronauts and dinosaurs. What started as a simple activity turned into a full afternoon of imaginative play and storytelling. Sarah now keeps a rotating set of themed crayon molds—seasonal shapes for holidays, animals for science units, and letters for spelling practice.
Checklist: How to Successfully Make Crayon Molds at Home
- ✅ Gather all broken crayons and peel off wrappers
- ✅ Break crayons into small, uniform pieces
- ✅ Choose mold type (silicone, tray, or handmade)
- ✅ Preheat oven to 250°F (120°C)
- ✅ Fill molds ¾ full with crayon pieces
- ✅ Bake for 15–20 minutes until fully melted
- ✅ Cool completely before removing
- ✅ Test crayon smoothness on paper; adjust future batches if too brittle
- ✅ Store in labeled containers by color or shape
- ✅ Involve kids in cleanup and organization
Frequently Asked Questions
Can I use a microwave instead of an oven?
Yes, but with caution. Place crayon pieces in a microwave-safe container and heat in 30-second intervals, stirring between each, until fully melted. Avoid overheating, as wax can ignite. The oven provides more consistent, safer results for multiple molds.
Are homemade crayons safe for toddlers?
Yes, as long as they’re made from standard non-toxic crayons and used under supervision. Ensure edges are smooth—some hand-poured crayons may have sharp ridges. Sand lightly with fine-grit sandpaper if needed.
What if my crayons come out cracked or brittle?
This usually happens due to rapid cooling or uneven melting. Try cooling molds slowly at room temperature (not in the fridge), and ensure crayon pieces are small enough to melt uniformly. Adding a teaspoon of soy wax or beeswax can improve binding and texture.
Get Creative and Start Crafting Today
Making your own crayon molds isn’t just a craft—it’s a sustainable habit, a teaching tool, and a doorway to imaginative play. Whether you're revitalizing a box of forgotten crayons, designing holiday-themed sets as gifts, or guiding a child through their first science-meets-art experiment, the process is as rewarding as the result.
You don’t need fancy equipment or prior experience. With a little patience and creativity, you can transform clutter into colorful tools that inspire joy and learning. So gather those broken crayons, choose your mold, and turn ordinary moments into extraordinary memories.


 浙公网安备
33010002000092号
浙公网安备
33010002000092号 浙B2-20120091-4
Comments
No comments yet. Why don't you start the discussion?