
Transforming natural elements into functional art is one of the most satisfying forms of creative expression. Among coastal-inspired crafts, a shell paper clock stands out as both elegant and meaningful—a fusion of beachcombing memories and handmade design. This guide walks you through crafting a stunning wall clock using real seashells, paper mache, and basic tools. Whether you're decorating a seaside cottage or adding organic texture to a modern space, this project delivers timeless charm with minimal cost.
Selecting Materials with Purpose
The beauty of a shell paper clock lies in its authenticity. Unlike mass-produced decor, each piece reflects personal collection and intention. Begin by gathering materials that balance durability and aesthetics. Seashells should be clean, dry, and free of cracks. Opt for a mix of sizes and shapes—small periwinkles for detail work, medium cowries for focal points, and larger scallops or conchs as anchors.
Paper mache serves as the structural base. Use brown craft paper or recycled newspaper soaked in a flour-and-water paste (two parts water to one part flour) or pre-mixed white glue solution. This lightweight foundation holds shape well and accepts adhesive easily during shell application.
Step-by-Step Construction Process
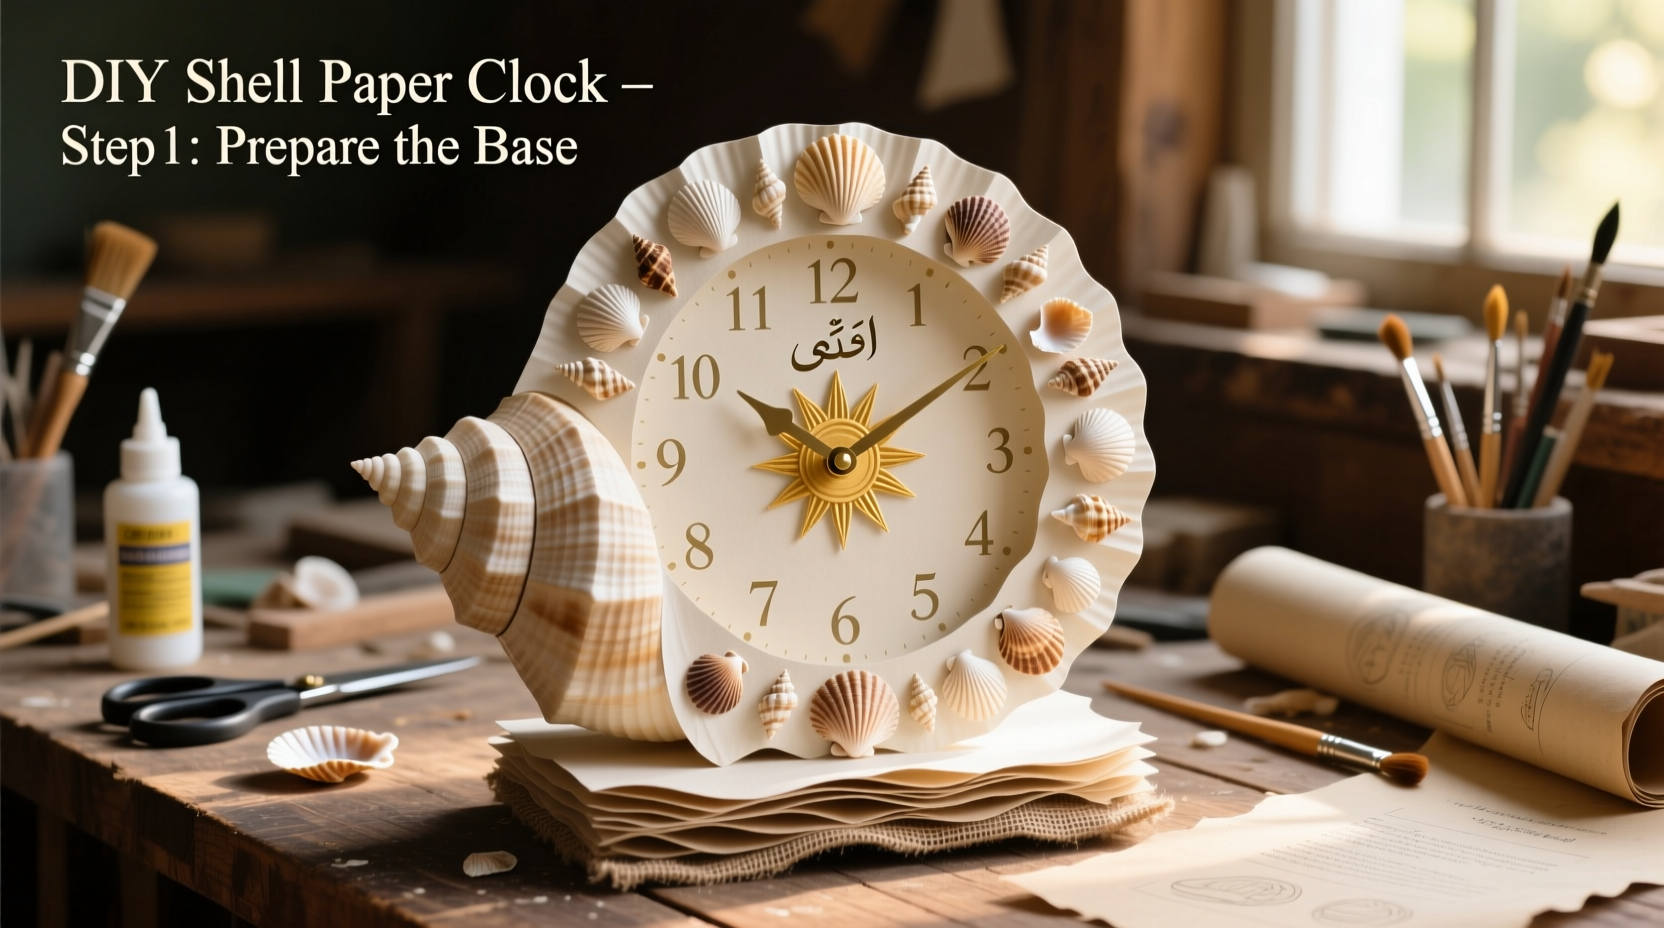
- Create the clock base: Cut two identical circles from sturdy cardboard (10–14 inches in diameter). Stack them and apply three layers of paper mache between and around the edges. Allow 24 hours to dry completely.
- Reinforce the center: Punch a small hole where the clock mechanism will go. Reinforce it with a washer or metal grommet to prevent tearing over time.
- Apply base coat: Paint the entire surface with white or off-white acrylic paint to create a neutral backdrop that enhances shell colors.
- Dry-fit your shell layout: Arrange shells on the surface without glue to test patterns. Radial symmetry works best—start from the center and spiral outward.
- Glue shells in place: Use strong craft adhesive or E6000 glue. Press each shell firmly and allow 1–2 minutes to set before moving to the next.
- Fill gaps with paper accents: Tear thin strips of decorative paper (tissue, rice paper, or handmade sheets) and layer them between shells for visual depth.
- Install clock mechanism: Insert the shaft through the back, secure with nut and washer, then attach hands according to manufacturer instructions.
This process takes approximately 4–6 hours spread over two days, mainly due to drying times. Patience ensures longevity and precision.
Design Variations and Aesthetic Choices
No two shell clocks need to look alike. Personalize yours by choosing a theme or color palette inspired by your environment. For example, a monochrome scheme using only white and cream shells evokes calmness, ideal for bathrooms or meditation spaces. Alternatively, incorporate coral fragments and turquoise beads for a vibrant, tropical feel.
Consider edge treatment: leave the rim raw for a rustic look, wrap it in jute twine, or glue smaller shells edge-to-edge for a continuous border. You might also embed tiny sea glass pieces between shells for subtle sparkle.
| Style | Shell Type | Color Scheme | Best Room |
|---|---|---|---|
| Rustic Coastal | Clamshells, whelks, barnacles | Natural whites, grays, browns | Kitchen, porch |
| Elegant Nautical | Cowries, olive shells, augers | Ivory, navy, gold accents | Dining room, entryway |
| Tropical Statement | Conch, scallop, coral chips | Pink, orange, teal | Bathroom, sunroom |
Common Pitfalls and How to Avoid Them
- Using weak adhesives: Regular school glue won’t hold heavy shells long-term. Always use industrial-strength craft glue.
- Skipping the dry-fit stage: Jumping straight to gluing often leads to overcrowding or imbalanced designs.
- Ignoring weight distribution: Heavy shells clustered on one side can cause the clock to tilt on the wall.
- Overlooking humidity: In damp areas like bathrooms, seal the finished piece with clear matte varnish to protect paper layers.
“Natural materials bring soul to interiors, but they demand respect in construction. Balance beauty with structural integrity.” — Lila Torres, Sustainable Home Artisan
Mini Case Study: The Beach House Makeover
Sarah M., a designer from Cape May, NJ, renovated her client’s guest bedroom overlooking the Atlantic. The space had clean lines but felt impersonal. She proposed a custom shell paper clock made from shells gathered during family beach walks. Using a radial pattern of pearly moon snails and pink mussels, she created a centerpiece that guests consistently complimented. “It’s not just a clock,” Sarah noted. “It tells the story of their summers together.” Within weeks, the homeowner commissioned two more—one for the kitchen, another as a gift.
This example underscores how personalized craftsmanship adds emotional value beyond mere decoration.
Essential Tools and Safety Checklist
Before beginning, ensure you have all necessary supplies at hand. Working efficiently prevents interruptions and reduces risk of errors.
- Cardboard or foam board (double-layered)
- Scissors or craft knife
- Mixing bowl and brush (for paper mache)
- Acrylic paint and primer
- Assorted seashells (cleaned and sorted)
- High-bond adhesive (E6000 or epoxy)
- Clock mechanism kit (with hands and shaft)
- Protective gloves and mask (when handling glue)
- Clear sealant spray (optional for humid rooms)
Work in a ventilated area when using strong adhesives. Wear nitrile gloves to avoid skin contact and keep surfaces covered with newspaper or silicone mats for easy cleanup.
Frequently Asked Questions
Can I use fake shells instead of real ones?
Yes, artificial shells work well and offer consistent color and shape. However, real shells provide unique textures and a genuine connection to nature. If using faux shells, choose resin-based ones—they’re lighter and bond better than plastic.
How do I replace the battery or fix the mechanism later?
Most clock kits have a removable back plate or access door. Ensure the mechanism is installed flush with the rear so the cover isn’t obstructed by glued shells. Leave a small gap near the center if possible, or plan to remove one central shell temporarily when maintenance is needed.
Is this project safe for children to participate in?
With supervision, yes. Children can help sort shells, apply paper mache, or paint the base. Avoid letting them handle strong glues or sharp tools. Use non-toxic, water-based adhesives like Tacky Glue for kid-friendly versions.
Final Touches and Longevity Tips
Once assembled, let the clock cure for 48 hours before hanging. Choose a location away from direct sunlight to prevent fading and minimize thermal expansion that could loosen shells. Dust gently with a soft brush—never wipe, as moisture may degrade adhesive over time.
To extend life, reseal every 12–18 months in high-traffic or humid environments. A quick spray of UV-protective matte sealant preserves both paper and shell luster.
Conclusion: Craft Time, Not Just a Clock
A shell paper clock is more than a timepiece—it’s a narrative of tides, travel, and tactile creativity. By investing effort into thoughtful material selection, balanced design, and careful assembly, you create something that measures moments while embodying them. This project proves that beauty doesn’t require complexity; it emerges from attention, patience, and personal meaning.


 浙公网安备
33010002000092号
浙公网安备
33010002000092号 浙B2-20120091-4
Comments
No comments yet. Why don't you start the discussion?