
Creating handmade accessories adds a personal touch to everyday items, and a tiny elephant keychain is both whimsical and meaningful. Elephants symbolize wisdom, strength, and good luck in many cultures, making this small craft not just decorative but also symbolic. With basic crafting supplies and a bit of patience, you can design a unique keychain that reflects your creativity. Whether you're making it for yourself or as a heartfelt gift, this project blends simplicity with charm.
Why Make a DIY Elephant Keychain?
Handmade crafts offer more than aesthetic appeal—they connect the creator to the object through time, effort, and intention. A miniature elephant keychain is compact enough for beginners yet customizable enough to challenge experienced crafters. Unlike mass-produced items, your version can feature personalized colors, textures, and details. Plus, crafting has been shown to reduce stress and improve focus, turning this project into a mindful activity as much as a creative one.
“Small handmade objects carry emotional weight. They become talismans of memory and care.” — Lena Ruiz, Art Therapist & Craft Educator
Materials You’ll Need
Gathering the right supplies ensures a smooth crafting experience. Most of these items are affordable and widely available at craft stores or online. Choose quality where possible—especially with threads and adhesives—to ensure durability.
- Felt fabric (gray, pink, or pastel shades for contrast)
- Embroidery floss (black, white, or colored for details)
- Needle (embroidery or sharp hand-sewing type)
- Scissors (small, precision-cutting preferred)
- Pins or clips (to hold layers together)
- Keychain ring (metal or plastic, 25–30mm)
- Fabric glue or hot glue gun (low-temp recommended)
- Stuffing (polyester fiberfill or scrap fabric)
- Pencil or chalk for tracing
- Printed elephant template (or draw freehand)
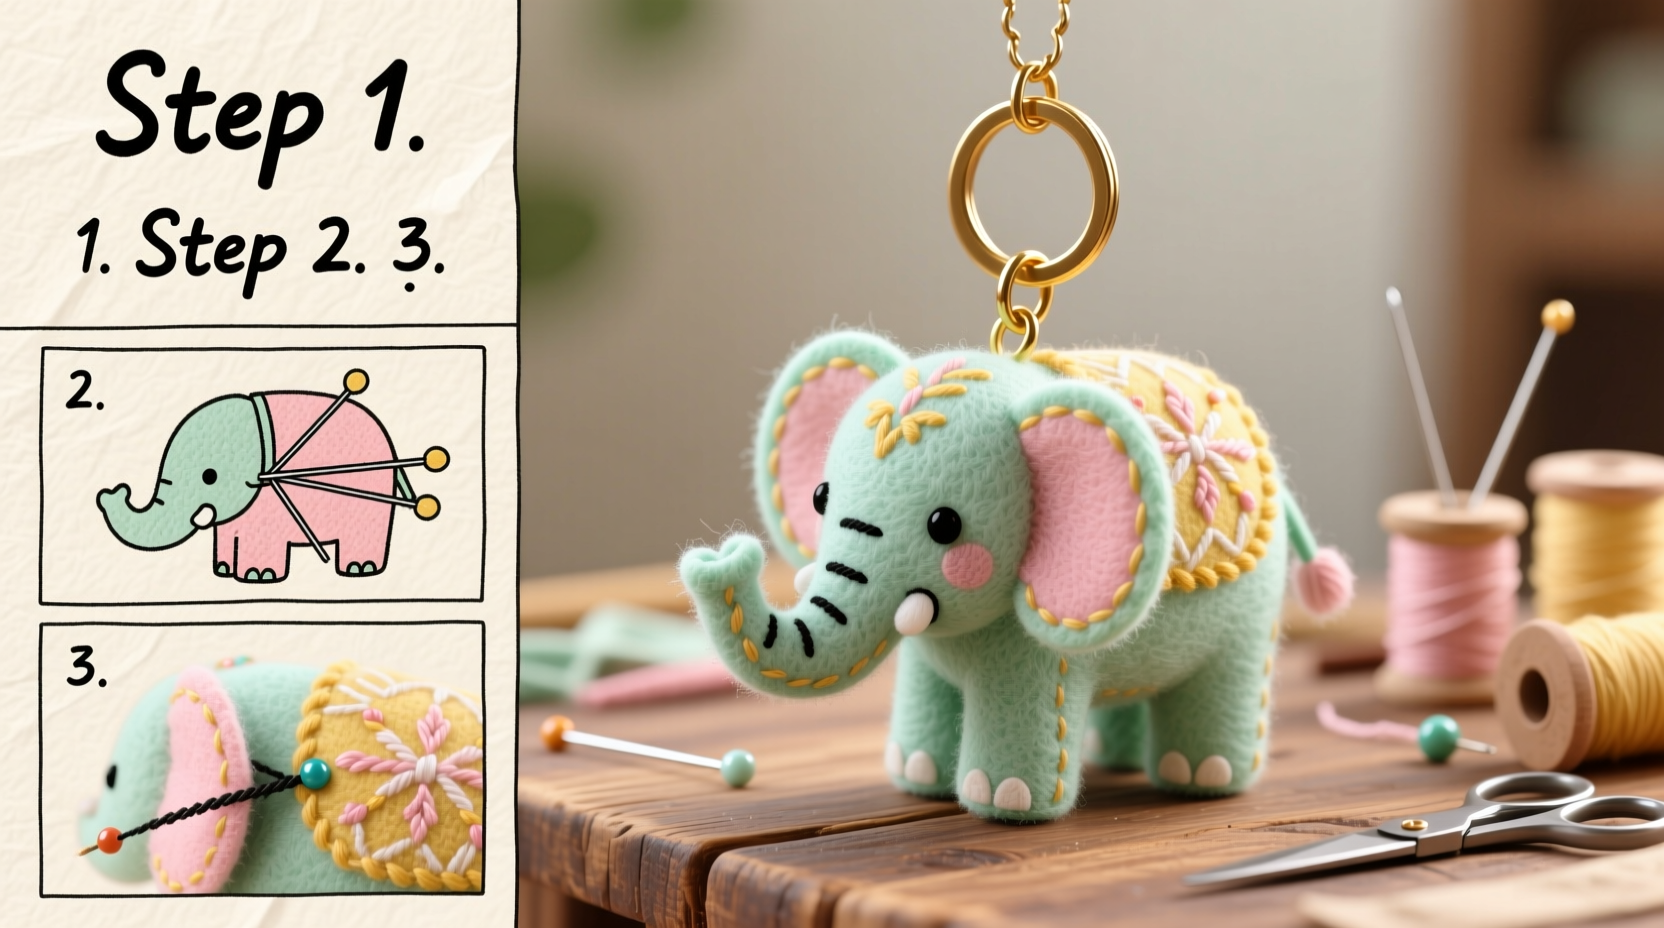
Step-by-Step Assembly Process
Follow this detailed sequence to build your elephant keychain from start to finish. Each stage builds on the last, ensuring clean seams and balanced proportions.
- Print and cut the template: Find a simple side-profile elephant silhouette online or sketch one freehand. Resize it to about 2.5 inches tall. Trace it onto cardboard or thick paper to create a reusable stencil.
- Trace and cut felt pieces: Place the template on folded gray felt and trace around it twice—once for each side of the elephant. Cut out both shapes carefully. Also cut separate pieces for ears (two large ovals or fan shapes) and a tail (small curled strip).
- Attach the ears: Position each ear on the back side of one elephant piece, aligning the base near the head. Secure with a few stitches or a dab of fabric glue. Let dry if gluing.
- Sew the main body (almost closed): Align the two elephant fronts together, right sides facing inward. Using a whip stitch or backstitch with contrasting thread, sew around the entire edge—except for a 1-inch gap along the bottom. This opening allows for stuffing.
- Turn and stuff: Flip the elephant right-side out through the gap. Use a pencil or chopstick to gently push out the trunk and ears. Add a small pinch of stuffing—don’t overfill; keep it firm but lightweight.
- Add facial features: Embroider eyes with French knots (black thread), and a smiling mouth with a single curved stitch. Optional: add blush dots with pink fabric paint or embroidery.
- Close the bottom and attach the keychain: Thread your needle and ladder-stitch the opening shut. Before closing completely, slide the keychain ring into the seam so it’s secured inside the final stitch line.
- Final embellishments: Glue or sew on a tiny pom-pom tail, or twist a thin braid of floss for a curly tail effect.
Design Variations and Customization Ideas
Once you’ve mastered the basic structure, experiment with styles to match personalities or occasions.
| Variation | Description | Ideal For |
|---|---|---|
| Boho Style | Beaded tusks, embroidered patterns on ears | Festival goers, jewelry lovers |
| Baby Gift Version | Pastel felt, satin ribbon bow, soft edges | Newborn presents, nursery decor |
| Minimalist Design | No stuffing, flat silhouette, laser-cut look | Modern keyrings, office use |
| Seasonal Themes | Red scarf for winter, flower behind ear for spring | Holiday gifting, seasonal swaps |
A Real Example: Crafting for a Cause
Jessica, a middle school art teacher in Portland, used this exact method to lead a student workshop before Teacher Appreciation Week. She simplified the steps for younger hands, pre-cutting felt pieces and using glue instead of sewing. Each student made an elephant keychain to gift their favorite teacher. The project took under 45 minutes, cost less than $2 per kit, and received heartfelt thank-you notes. “It wasn’t about perfection,” she said. “It was about giving something made with care.”
Common Challenges and How to Solve Them
Even simple projects come with hiccups. Here’s how to handle frequent issues without frustration.
- Lopsided stitching: Pin layers securely before sewing and check alignment frequently. Use shorter stitches for better control.
- Over-stuffing: A bulging keychain loses its shape. Use small amounts of stuffing and test firmness by gently pressing the surface.
- Ears won’t stand: Reinforce them with a layer of interfacing or double-thick felt. Alternatively, lightly starch and press before attaching.
- Thread tangling: Cut manageable lengths (about 18 inches), wax the thread lightly with beeswax, and re-thread often.
“Mistakes in handcrafting aren’t failures—they’re signatures of authenticity.” — Marcus Tran, Textile Artist
Dos and Don'ts at a Glance
| Action | Do | Don't |
|---|---|---|
| Cutting Felt | Use sharp scissors for clean edges | Stretch or pull the fabric while cutting |
| Sewing | Backstitch at start and end for durability | Knot threads excessively—can create lumps |
| Gluing | Apply small dabs and clamp briefly | Use too much glue—can seep out and stain |
| Storing Finished Keychains | Keep in a fabric pouch away from moisture | Leave in direct sunlight—fading risk |
FAQ
Can I wash the felt keychain?
Felt is delicate and shouldn’t be machine-washed. If needed, spot-clean with a damp cloth and mild soap. Avoid soaking, as it can cause shrinking or distortion.
Is this suitable for children to make?
Yes, with supervision. Replace needles with fabric glue for younger kids. Pre-cut all pieces and provide stickers or markers for facial details to simplify the process.
How long does it take to make one keychain?
For beginners, allow 45–60 minutes. Experienced crafters can complete one in 25–30 minutes. Batch-making multiple at once reduces overall time per unit.
Checklist: Make Your Elephant Keychain in Order
- ☐ Gather all materials listed
- ☐ Print or draw the elephant template
- ☐ Cut two body pieces and two ears from felt
- ☐ Attach ears to one body piece (glue or stitch)
- ☐ Sew around edges, leaving a gap at the bottom
- ☐ Turn right-side out and stuff lightly
- ☐ Embroider facial features
- ☐ Insert keychain ring and close the opening
- ☐ Add tail and final decorations
- ☐ Inspect for loose threads or weak seams
Conclusion: Bring Joy One Stitch at a Time
There’s quiet satisfaction in holding something you’ve made with your own hands. This little elephant keychain may be small in size, but it carries big meaning—of mindfulness, creativity, and generosity. Whether tucked onto a set of keys, gifted to a loved one, or used to decorate a zipper pull, it serves as a daily reminder of intentional living. Start with one, then try a set in different colors. Share the idea with friends, host a crafting night, or donate handmade keychains to a local charity event. The only limit is your imagination.


 浙公网安备
33010002000092号
浙公网安备
33010002000092号 浙B2-20120091-4
Comments
No comments yet. Why don't you start the discussion?