
Crafting isn't just about creating something beautiful—it's about the joy of making, personalizing, and gifting with meaning. One of the most charming and accessible projects for beginners and seasoned crafters alike is the handmade strawberry keychain. With its bright red hue, tiny seeds, and leafy green top, it captures whimsy in miniature form. More than just an accessory, it’s a statement of creativity. This guide walks you through every step of crafting a plush, hand-stitched strawberry keychain using simple materials and thoughtful techniques that ensure durability and cuteness in equal measure.
Gathering Your Materials: What You’ll Need
The beauty of this project lies in its simplicity. Most supplies are affordable, reusable, and easy to find at local craft stores or online. Here’s what to prepare before stitching begins:
- Felt fabric (red for the body, green for the leaves)
- Embroidery floss (black, yellow, white)
- A small embroidery needle
- Polyester fiberfill stuffing
- Scissors (preferably fabric-cutting)
- Keychain ring or lobster clasp
- Pins or clips for securing fabric
- Chalk or fabric marker
- Ruler and template (optional but helpful)
Designing the Strawberry Shape: Precision Matters
To achieve a balanced, realistic look, consistency in shape is crucial. Begin by sketching or printing a strawberry outline approximately 2.5 inches tall. You’ll need two identical red felt pieces for the front and back of the berry. For the calyx (the leafy green top), cut three to five individual leaf shapes from green felt, varying slightly in size to mimic natural layers.
When tracing onto felt, use a chalk pencil or washable fabric marker so lines can be removed if needed. Pin the pattern securely before cutting to prevent shifting. Accuracy here ensures clean seams later on.
“Even the smallest crafts benefit from intentional design. A well-proportioned strawberry feels authentic, not cartoonish.” — Lila Chen, Textile Artist & Craft Educator
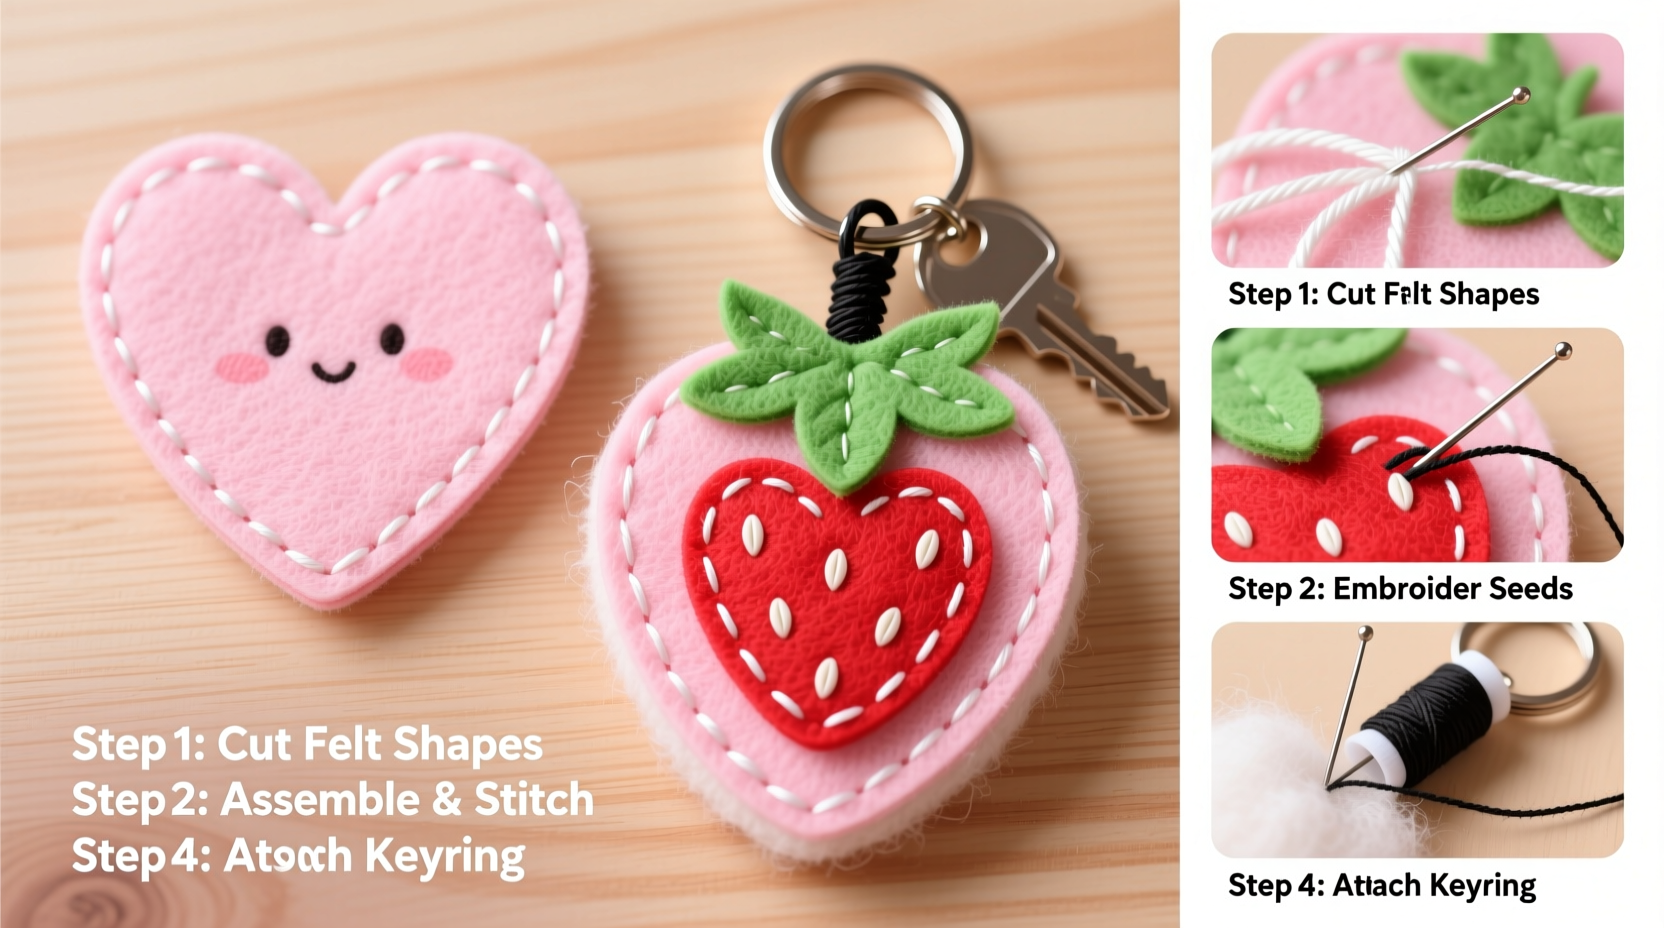
Step-by-Step Assembly Process
Follow this detailed sequence to assemble your keychain with precision and charm.
- Trace and cut: Transfer your strawberry template to red felt and cut two matching pieces. Cut 4–5 pointed oval leaves from green felt.
- Embellish the berry: Using black embroidery floss, add small French knots across one red piece to simulate seeds. Space them evenly but not symmetrically—nature isn’t perfect.
- Begin stitching: Place the two red felt pieces together, front sides facing inward. Sew around the edge using a whip stitch or backstitch with strong thread. Leave a 1-inch gap at the base for turning and stuffing.
- Turn and stuff: Flip the strawberry right-side out through the opening. Use a blunt tool like a chopstick to push out the tip gently. Fill with a small amount of fiberfill—just enough to give shape without overstuffing.
- Attach the leaves: Arrange the green leaves in a fan shape over the top opening. Secure them with a few tight stitches through the center, closing the gap simultaneously. Reinforce this knot for durability.
- Add finishing details: Use yellow floss to embroider tiny stamens in the center of the leaves. Optional: add a white highlight dot on each seed for dimension.
- Connect the hardware: Thread a jump ring through the topmost leaf or sew a loop of thread between the leaves. Attach a keychain ring or lobster clasp.
Customization Ideas and Creative Variations
Once you’ve mastered the basic design, explore variations that reflect personality or purpose. These ideas turn a simple craft into a signature piece.
- Glow-in-the-dark seeds: Use phosphorescent thread for the seed dots.
- Scented filling: Mix a pinch of dried lavender or vanilla powder into the stuffing.
- Miniature size series: Make a set of tiny strawberries (1 inch) as zipper pulls.
- Seasonal twists: Add a tiny bow for Valentine’s Day or glitter for holiday versions.
- Personalized tags: Sew a tiny fabric tag with initials or a date underneath.
| Variation | Materials Needed | Ideal For |
|---|---|---|
| Glow-in-the-Dark Seeds | Phosphorescent embroidery thread | Nighttime key finders, kids’ backpacks |
| Scented Version | Dried herbs, essential oil drops | Gifts, relaxation-themed crafts |
| Magnetic Closure | Tiny magnets, reinforced stitching | Functional mini pouches |
| Glitter Accent | Fabric-safe glitter glue | Holiday decor, party favors |
Real Example: Maya’s Handmade Market Success
Maya Rodriguez, a college student from Portland, began making strawberry keychains as stress-relief during finals week. She posted a photo on Instagram with a “DM to order” note—and within days, received 30 requests. Within two months, she launched a small Etsy shop. By refining her stitching technique and offering customizable options (like birthstone-colored leaves), she turned a hobby into a side income. Her best-selling item? A pair of strawberries connected by a vine, marketed as “best friend keychains.”
Her advice: “Start simple, focus on neat stitching, and don’t rush the seed embroidery. That’s what people notice first.”
Common Pitfalls and How to Avoid Them
Even experienced crafters encounter hiccups. Recognizing these early saves time and frustration.
- Overstuffing: Makes the strawberry look bloated and strains seams. Use light, even filling.
- Inconsistent seed placement: Too many seeds clustered in one area breaks visual balance. Step back and assess spacing.
- Weak leaf attachment: The top bears the most pull. Double-knot threads and anchor through multiple layers.
- Poor thread choice: Cheap thread snaps easily. Opt for 6-strand embroidery floss with 2–3 strands used per pass.
FAQ: Answering Key Crafter Questions
Can I wash my handmade strawberry keychain?
Spot clean only. Submerging it may cause the felt to pill or the stuffing to clump. Use a damp cloth with mild soap and air dry flat.
Is this project suitable for children?
Yes, with supervision. Older kids (ages 10+) can handle needlework safely. Consider pre-cutting shapes and using plastic needles for younger crafters.
How long does it take to make one keychain?
For beginners, expect 45–60 minutes. With practice, skilled makers complete one in under 25 minutes.
Final Checklist Before You Begin
- ✓ Gather all materials listed
- ✓ Print or draw a consistent template
- ✓ Cut two red berry pieces and 4–5 green leaves
- ✓ Embroider seeds on one berry half
- ✓ Stitch berry halves together, leaving gap
- ✓ Turn, stuff lightly, and close
- ✓ Attach leaves securely over top
- ✓ Add final embroidery details
- ✓ Attach keychain hardware
- ✓ Perform strength and aesthetic check
Bring Joy, One Stitch at a Time
Creating a strawberry keychain is more than a craft—it’s a gesture. Whether tucked into a lunchbox, gifted to a friend, or sold at a market, each piece carries intention. The process slows down a fast world, inviting mindfulness, patience, and pride. With every knot tied and seed placed, you’re not just making an object; you’re cultivating joy.


 浙公网安备
33010002000092号
浙公网安备
33010002000092号 浙B2-20120091-4
Comments
No comments yet. Why don't you start the discussion?