
In an age where smartphones are extensions of our daily lives, personalizing your device isn’t just about aesthetics—it’s about enhancing usability. A phone case that combines protection, style, and practical features like a built-in mirror and adjustable stand elevates everyday convenience. This guide walks you through crafting a fully functional, customizable DIY phone case using accessible materials. Whether you're preparing for touch-ups on the go or want hands-free viewing during video calls, this project delivers both form and function.
Selecting Materials for Maximum Functionality
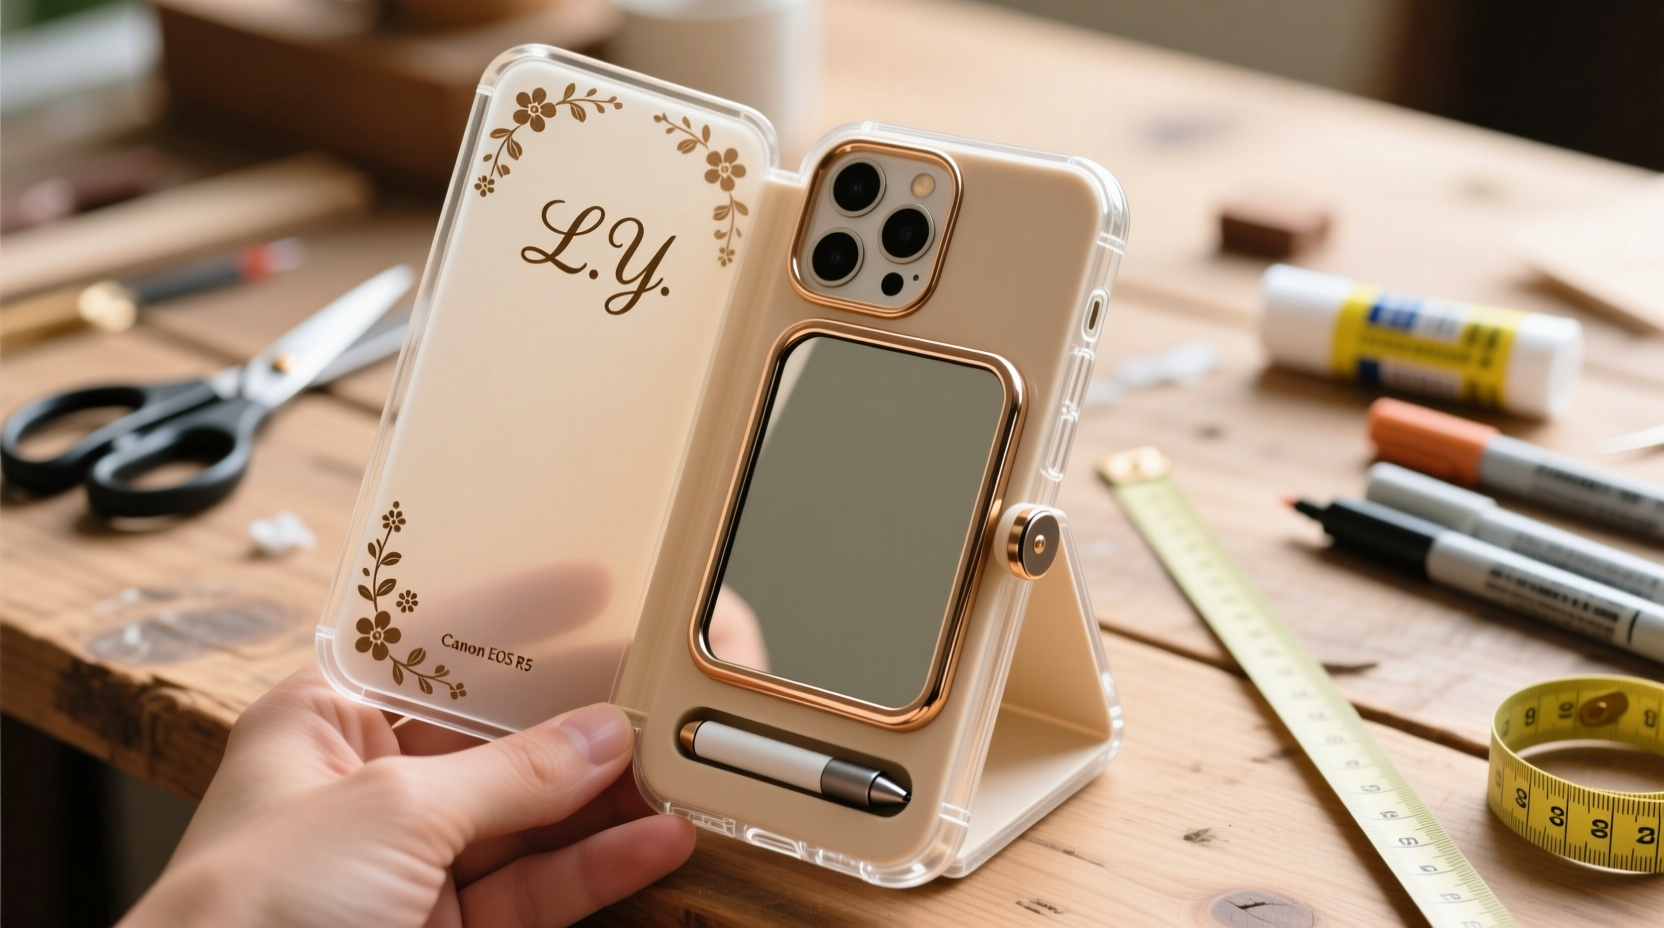
The success of your DIY phone case hinges on choosing the right components. Unlike mass-produced cases, a handmade version allows complete control over materials, ensuring durability and tailored design. Start with a sturdy base—preferably a hard-shell case made of polycarbonate or ABS plastic. These materials provide structural integrity and resist warping when modified.
For the mirror component, use a thin, shatter-resistant mirrored film or a pre-cut acrylic mirror no thicker than 1mm. Acrylic is lightweight and safer than glass, making it ideal for portable applications. The stand mechanism requires a flexible yet durable material such as bendable aluminum strip or spring steel, which can be sourced from old electronics or hardware stores.
Step-by-Step Assembly Process
- Measure and Mark: Place your phone inside the hard shell case. Identify the upper back portion (opposite the camera) as the mirror location. Use a ruler and fine-tip marker to outline a rectangle 3.5 cm x 2 cm.
- Cut the Mirror Opening: With a precision craft knife or rotary tool, carefully cut along the marked lines. Sand edges lightly to prevent sharpness.
- Attach the Mirror: Apply double-sided adhesive tape around the inner edge of the cutout. Press the acrylic mirror firmly into place. Wipe clean with a microfiber cloth.
- Create the Stand Arm: Cut a 6 cm length of bendable metal strip. File the ends smooth. Attach one end to the lower center of the case using epoxy resin, angling it slightly outward.
- Reinforce the Hinge Point: Allow the epoxy to cure for at least 12 hours. For added stability, wrap a small piece of heat-shrink tubing around the base of the arm.
- Test Functionality: Bend the arm forward to prop the phone upright on flat surfaces. Adjust the angle for optimal viewing between 45° and 70°.
The result is a sleek, multifunctional case: the mirror enables quick checks while the stand supports streaming, video conferencing, or recipe viewing. Because every measurement is based on your specific phone model, the fit remains secure without compromising access to ports or buttons.
Customization Ideas for Personal Expression
Beyond utility, this project invites creative expression. Once the functional elements are in place, personalize the exterior to reflect your style. Consider these options:
- Apply waterproof decoupage using magazine cutouts, washi tape, or printed photos sealed with Mod Podge.
- Use fabric scraps or faux leather patches adhered with textile glue for a textured finish.
- Incorporate glow-in-the-dark paint or reflective strips for nighttime visibility.
- Add magnetic strips inside the case to attach accessories like cardholders or earbud clips.
For those who frequently switch styles, design interchangeable panels that snap onto the base case using tiny magnets embedded in the corners. This modular approach extends the lifespan of your creation while allowing seasonal or mood-based updates.
Do’s and Don’ts: Building Smartly and Safely
| Do’s | Don’ts |
|---|---|
| Use protective gloves when cutting plastic or metal | Don’t rush epoxy drying—premature use weakens bonds |
| Seal all exposed edges with clear nail polish or sealant | Don’t use heavy mirrors that strain the case structure |
| Test stand stability on multiple surfaces (wood, glass, carpet) | Don’t block speaker grilles or charging ports during modifications |
| Label tools clearly and keep workspace organized | Don’t work near open flames when using adhesives |
“Integrating utility into personal accessories reflects thoughtful design. Users don’t just want beauty—they want solutions.” — Lena Torres, Industrial Designer & Sustainable Product Innovator
Real-Life Application: Maria’s Commute Upgrade
Maria, a freelance graphic designer based in Portland, spends two hours daily commuting via public transit. She often reviews client feedback videos and needs to check her appearance before virtual meetings. After building this DIY case, she replaced three separate items: her basic silicone case, compact mirror, and foldable phone stand.
“I used a rose-gold aluminum strip from an old laptop hinge,” she explains. “Now I can watch tutorials hands-free while applying lipstick during my bus ride. It saves time and reduces clutter in my bag.” Her version includes a removable photo panel featuring her dog, swapped monthly for fresh inspiration.
This real-world example underscores how integrating multiple functions into a single object improves efficiency without sacrificing individuality.
Frequently Asked Questions
Can this case work with wireless charging?
Yes, provided the modifications don’t cover the phone’s charging coil—typically located near the center. Avoid adding thick metal plates or excessive adhesive layers in that zone. Thin acrylic mirrors and narrow support arms generally do not interfere with Qi charging.
How durable is the bendable stand over time?
A well-attached metal arm can withstand hundreds of bends if made from spring steel or flexible aluminum. However, avoid forcing it beyond its natural range of motion. If fatigue occurs, replace the arm with a new strip—most repairs take less than 10 minutes.
Is this suitable for larger phones, like Pro Max models?
Absolutely. In fact, larger devices benefit more from built-in stands due to their weight and screen size. Reinforce the epoxy bond with additional support dots and consider using a wider mirror (up to 4.5 cm) for better visibility.
Final Checklist Before You Begin
- Materials Checklist:
- ✔ Hard-shell phone case (your exact model)
- ✔ Acrylic mirror (1–2 mm thick, pre-cut or self-trimmed)
- ✔ Bendable metal strip (aluminum or spring steel, ~6 cm)
- ✔ Epoxy resin or high-strength adhesive
- ✔ Double-sided adhesive tape
- ✔ Precision knife or rotary tool
- ✔ Ruler, marker, sandpaper, microfiber cloth
- ✔ Optional: decorative elements (paint, fabric, magnets)
Conclusion: Build, Use, and Inspire
A truly useful accessory doesn’t just protect—it adapts to your life. By combining a mirror and stand into a personalized phone case, you eliminate dependency on scattered gadgets and create something uniquely yours. This project proves that innovation doesn’t require advanced tools or expensive parts; it starts with observation, intention, and a willingness to make things better.


 浙公网安备
33010002000092号
浙公网安备
33010002000092号 浙B2-20120091-4
Comments
No comments yet. Why don't you start the discussion?