
Creating your own rope keychain is more than just a practical DIY project—it’s an opportunity to blend craftsmanship with personal style. A well-made keychain protects your keys, reduces bulk in your pocket, and serves as a thoughtful handmade gift. With the right materials and techniques, you can produce a piece that’s both rugged and refined. This guide walks you through every stage of crafting a high-quality rope keychain from scratch, emphasizing durability, aesthetics, and long-term usability.
Selecting the Right Rope Material
The foundation of a strong keychain lies in the choice of rope. Not all cords are created equal—some fray easily, others stretch over time, and many lack visual appeal. For a keychain that lasts, prioritize natural or synthetic fibers known for tensile strength and resistance to wear.
| Material | Pros | Cons |
|---|---|---|
| Paracord (550) | Extremely durable, UV-resistant, wide color range | Slightly thick for minimalist designs |
| Hemp Twine | Eco-friendly, rustic look, ages beautifully | Can degrade if exposed to moisture long-term |
| Braided Polyester | Smooth texture, colorfast, low stretch | Less grippy than paracord |
| Cotton Cord | Soft feel, easy to dye, beginner-friendly | Wears faster, not ideal for heavy use |
For most applications, 3–4mm paracord offers the best balance of strength, flexibility, and visual interest. If you prefer a more organic aesthetic, tightly spun hemp with a beeswax coating adds water resistance and a rich tactile quality.
Essential Tools and Supplies Checklist
Before beginning, gather the following tools. Having everything ready ensures a smooth workflow and minimizes interruptions.
- Measuring tape or ruler
- Sharp scissors or cord cutter
- Lighter or heat source (for sealing synthetic ends)
- Keyring or split ring (stainless steel recommended)
- Beeswax or thread conditioner (optional, for natural fibers)
- Alligator clip or third hand tool (to hold work in place)
- Leather punch or awl (if adding leather accents)
A small workspace with good lighting and minimal distractions helps maintain precision, especially when executing intricate knots.
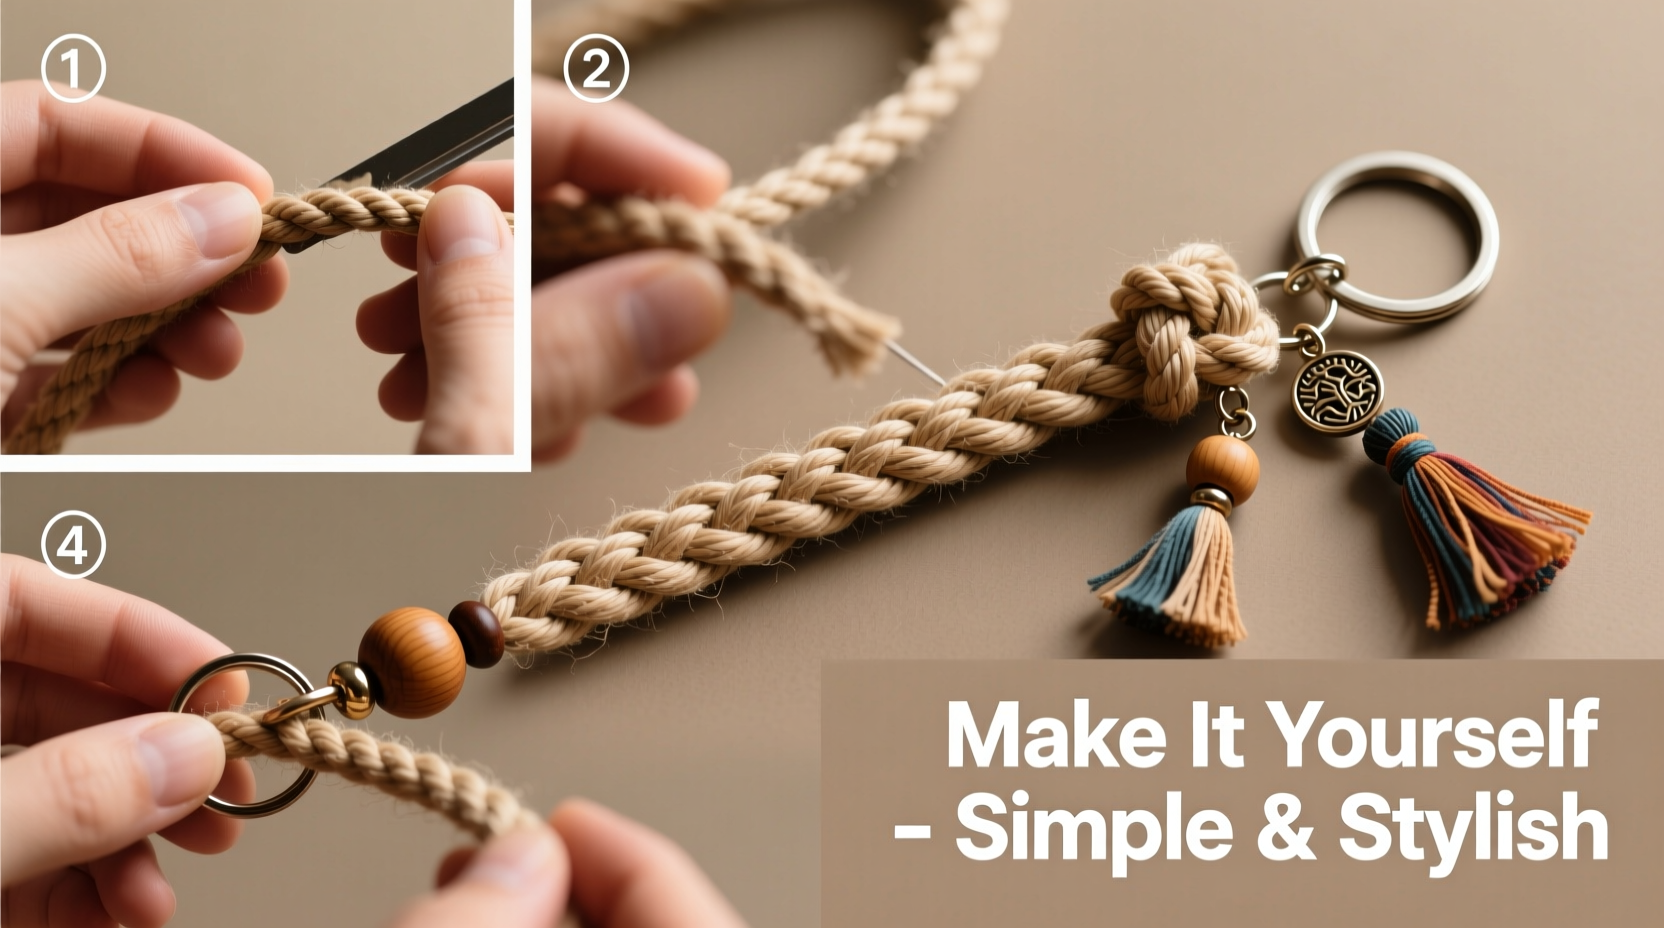
Step-by-Step Construction Guide
This method produces a compact, braided keychain using a four-strand diamond braid—a pattern that’s tight, symmetrical, and resistant to loosening.
- Cut two lengths of rope: One 36 inches (main strand), one 18 inches (binding end).
- Attach to keyring: Fold the longer strand in half and pass the loop through the keyring. Pull the loose ends through the loop to create a secure lark’s head knot.
- Prepare for braiding: Separate the doubled strand into four even legs. These will form the base of the braid.
- Begin the diamond braid:
- Cross the left outer strand over the adjacent inner strand.
- Cross the right outer strand over its inner neighbor.
- Now bring the new left outer strand under the next strand and up through the center.
- Repeat symmetrically on the right side.
- Maintain tension: Keep each crossover snug but not overly tight. Consistent pressure ensures uniformity.
- Braid for 3–4 inches: This length provides grip without excess bulk.
- Secure the end: Use the 18-inch cord to wrap the base of the braid tightly in a sinnet or whip finish. Tie off with a double half-hitch and trim excess.
- Seal the tip: For synthetic ropes, lightly melt the end with a lighter and press into a smooth point. For natural fibers, apply a drop of clear nail polish or fray check.
Take your time during the braiding phase. Rushing leads to uneven spacing and weak spots. Practice the sequence on scrap rope before committing to the final piece.
Enhancing Style and Longevity
Durability doesn’t have to come at the expense of design. Thoughtful finishing touches elevate a simple keychain into a statement accessory.
Incorporate colored threads by alternating strands in a checkerboard braid or weaving in metallic trims for subtle flair. For a vintage touch, add a small brass bead or antique fob at the bottom. Some artisans embed initials using micro-stitching or pyrography on leather tags tied into the chain.
“Knots are only as strong as their weakest turn. Uniform tension and proper anchoring determine real-world performance.” — Rafael Mendez, Maritime Knot Specialist & Craft Instructor
To extend lifespan, avoid prolonged exposure to moisture and direct sunlight. Store unused keychains in breathable cotton pouches. Occasionally inspect for fraying, especially near stress points like the keyring attachment.
Real Example: Crafting a Commemorative Keychain
Sophie, a hobbyist in Portland, wanted to create meaningful gifts for her hiking group after completing the Pacific Crest Trail. She used navy-blue paracord for the main braid, symbolizing resilience, and wove in thin red and white threads representing trail markers. Each keychain was 4.5 inches long, terminated with a whipped knot and a stamped aluminum tag engraved with the trail’s endpoint: “Cascade Locks, OR.”
Two years later, all members still use their keychains daily. The consistent braid structure prevented unraveling, and the sealed ends resisted dirt buildup. Sophie attributes the success to pre-shrinking the cord and practicing the braid pattern five times before production.
Frequently Asked Questions
Can I wash my rope keychain?
Yes, but gently. Hand wash with mild soap and lukewarm water. Avoid machine washing, which can loosen knots. Air dry completely before reuse.
How do I replace a worn section?
If the top near the keyring shows wear, carefully cut below the damage, reattach to the ring with a lark’s head knot, and rebraid the lower portion. You can also splice in a new segment using a short splice technique for paracord.
What’s the strongest knot for attaching to the keyring?
The lark’s head (cow hitch) is ideal because it tightens under load and won’t slip. For extra security, follow it with a clove hitch around the standing part.
Conclusion: Make It, Use It, Share It
A handmade rope keychain is more than a functional item—it’s a testament to attention to detail and personal expression. By choosing quality materials, mastering foundational knots, and refining your finishing techniques, you create something that withstands daily use while reflecting your taste. Whether you’re making one for yourself or a batch for friends, the process builds skill and confidence in hands-on creation.


 浙公网安备
33010002000092号
浙公网安备
33010002000092号 浙B2-20120091-4
Comments
No comments yet. Why don't you start the discussion?