
Transforming everyday materials into functional art is one of the most satisfying aspects of DIY culture. Cardboard, often dismissed as disposable, can be engineered into surprisingly strong and elegant objects when handled with care. One such project is building a durable wall clock entirely from repurposed cardboard. This guide walks you through constructing a long-lasting, visually appealing timepiece that blends sustainability with craftsmanship. With attention to structural integrity, weather resistance, and design precision, your cardboard clock can function reliably for years while adding character to any room.
Why Build a Clock from Cardboard?
Cardboard isn’t just packaging—it’s a versatile, lightweight, and eco-friendly material ideal for prototyping and permanent crafts. When layered, glued, and sealed properly, it becomes rigid and stable enough to support moving parts like clock mechanisms. Beyond sustainability, creating a clock from cardboard allows full creative control over shape, size, and finish. Whether you prefer minimalist geometry or intricate cutouts, the material bends to your vision. Plus, the cost is negligible: most supplies can be sourced from household waste or dollar stores.
Materials and Tools You’ll Need
Before cutting or assembling, gather all necessary components. Precision starts with preparation.
- Corrugated cardboard (at least three identical large sheets)
- Strong craft glue or white PVA adhesive
- Box cutter or utility knife
- Ruler and metal straightedge
- Compass or circular template (for round clocks)
- Sandpaper (medium grit, 120–180)
- Acrylic gesso or primer
- Waterproof sealant (polyurethane or mod podge outdoor formula)
- Standard quartz clock movement kit (with hands and shaft)
- Washers and nut for securing mechanism
- Pencil, masking tape, clamps or heavy books
“Cardboard, when laminated correctly, rivals wood in stiffness-to-weight ratio.” — Dr. Lena Torres, Sustainable Materials Researcher, MIT
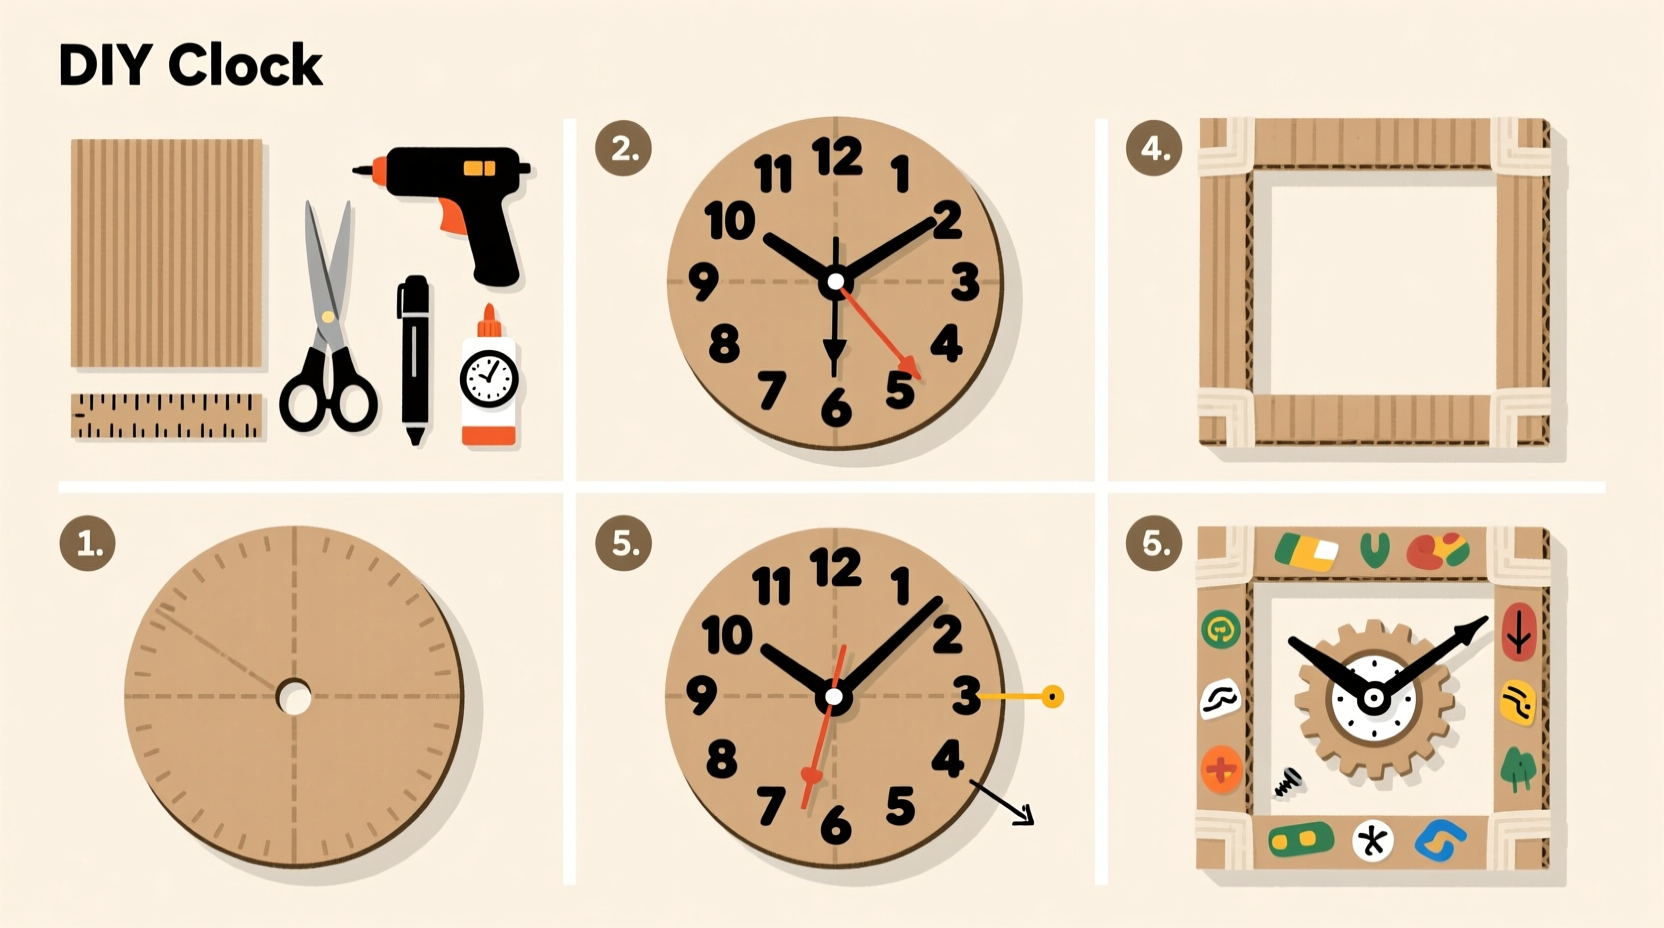
Step-by-Step Construction Process
Follow this sequence to ensure durability and accuracy in your final piece.
- Design Your Clock Face: Decide on size (common diameters: 12”, 16”, or 20”) and shape. Sketch numerals or markers. For symmetry, divide the circle into 12 equal segments using a protractor or print a template.
- Cut Identical Base Layers: Trace your chosen diameter onto three cardboard sheets. Cut carefully with a sharp blade and straightedge for clean edges. Accuracy here prevents warping later.
- Laminate for Strength: Apply even layers of PVA glue between each sheet. Press together firmly and clamp under heavy books for at least 4 hours. This creates a dense, vibration-resistant core.
- Drill the Center Hole: Once dry, mark the exact center. Use a drill or awl to create a 3/8” hole for the clock mechanism shaft. Keep it straight and smooth.
- Add Design Elements: Cut out numerals or hour markers from leftover cardboard. Glue them on in alignment. For depth, stack two layers per number and sand edges smooth.
- Sand and Prime: Sand the entire surface lightly to remove fibers and roughness. Wipe clean, then apply 2–3 coats of acrylic gesso. Let each coat dry fully.
- Seal Against Moisture: Brush on 2–3 layers of waterproof sealant, covering front, back, and edges. Allow 24 hours to cure completely before installing mechanics.
- Install the Clock Mechanism: Insert the shaft through the center hole. Attach the washer and tightening nut behind. Connect hour, minute, and second hands according to kit instructions.
- Test and Hang: Insert battery. Confirm smooth hand movement. Attach a sawtooth hanger or wire loop to the back for display.
Structural Reinforcement Tips for Longevity
Durability hinges on smart engineering. Cardboard absorbs moisture and can sag if unsupported. Prevent failure with these techniques:
- Edge Banding: Wrap the perimeter with strips of cardboard glued vertically. This reinforces sides and hides layered cores.
- Internal Bracing: For clocks larger than 18”, add cross-supports beneath the face using X-shaped ribs glued to the back layer.
- Controlled Environment: Avoid placing the clock in humid areas like kitchens or bathrooms. Stable indoor climates extend lifespan.
- Rotational Balance: Ensure hands are aligned and don’t drag. Imbalance strains the motor and wears gears prematurely.
| Do | Don’t |
|---|---|
| Use multiple thin glue layers instead of one thick, wet application | Flood cardboard with glue—this causes warping and weak bonds |
| Sand between primer coats for a smooth finish | Skip priming—unsealed cardboard pills and stains easily |
| Allow 24+ hours for sealant to fully cure | Hang immediately after sealing—moisture traps cause delamination |
| Check hand clearance regularly during first week | Ignore ticking irregularities—they signal mechanical stress |
A Real Example: The Library Study Clock
In Portland, Oregon, high school teacher Marcus Reed built a 16-inch hexagonal clock for his home study using discarded Amazon boxes. He laminated five layers for extra rigidity, painted Roman numerals in matte black, and sealed it with marine-grade varnish. After two years of continuous use, including seasonal humidity shifts, the clock remains accurate and intact. “I expected it to last six months,” he said. “Now my students ask how to make their own. It’s proof that thoughtful construction turns humble materials into heirlooms.”
Customization Ideas for Personal Expression
Your clock doesn’t have to mimic traditional designs. Explore creative variations:
- Nature Themes: Cut leaf-shaped cutouts around the edge; paint branches radiating from the center.
- Geometric Patterns: Use triangles or tessellated hexagons for a modern look.
- Text-Based Faces: Replace numbers with words like “Coffee Time,” “Dinner,” or “Bedtime.”
- Glow-in-the-Dark Details: Paint numerals with phosphorescent pigment for nighttime visibility.
FAQ: Common Questions About Cardboard Clocks
Can a cardboard clock really last more than a year?
Yes—when properly laminated, sealed, and maintained, cardboard clocks can last five years or more. The key is moisture protection and structural layering. Several documented DIY clocks have operated reliably beyond seven years in climate-controlled homes.
Where do I get a clock movement kit?
These are widely available online (Amazon, Etsy, craft stores) or at hardware shops. Look for “quartz clock movement replacement kits”—they typically include hands, shaft, washer, and nut. Standard sizes fit openings up to 3/8 inch.
Is cardboard safe near electronics?
Yes, as long as it’s sealed. Uncoated cardboard can shed fibers, but once sealed with polyurethane or mod podge, it becomes inert and non-conductive. Keep the battery compartment accessible for easy replacement.
Final Checklist Before Assembly
- ✅ All cardboard pieces cut precisely and identically
- ✅ Layers glued, clamped, and fully dried (minimum 4 hours)
- ✅ Center hole drilled cleanly and centered
- ✅ Design elements attached and sanded smooth
- ✅ Primed with 2–3 coats of gesso
- ✅ Sealed with waterproof finish on all surfaces
- ✅ Clock mechanism tested independently
- ✅ Hands balanced and moving freely
Conclusion: Turn Waste Into Wonder
Creating a durable clock from cardboard is more than a craft—it’s a statement about resourcefulness and design intelligence. With careful layering, sealing, and attention to mechanical detail, you build not just a timekeeper, but a conversation piece rooted in sustainability. This project proves that durability doesn’t require industrial materials; it comes from process, patience, and purpose. Whether you’re furnishing a studio apartment, teaching kids about recycling, or simply enjoying hands-on creativity, your cardboard clock stands as a testament to what’s possible with imagination and glue.


 浙公网安备
33010002000092号
浙公网安备
33010002000092号 浙B2-20120091-4
Comments
No comments yet. Why don't you start the discussion?