
There’s a quiet joy in carrying a handmade accessory that reflects personality and care. The DIY strawberry keychain has surged in popularity not just for its whimsical charm, but for the tactile satisfaction of creating something both functional and delightful. More than a trend, it's an accessible entry point into fiber arts and soft crafting—perfect for beginners, gift-makers, or anyone looking to add a playful pop of color to their everyday carry.
This guide walks you through every stage of making your own strawberry keychain from scratch. Whether you're new to sewing or looking to refine your hand-stitching technique, this project blends creativity with practicality. With affordable materials and clear instructions, you’ll finish with a charming keepsake that doubles as a conversation starter.
Gathering Your Materials
The beauty of this project lies in its simplicity. Most supplies can be found at craft stores, online retailers, or even repurposed from household items. Here’s what you’ll need:
- Felt fabric (red for the body, green for leaves, optional white for seeds)
- Embroidery floss (black or beige for seed details)
- A small metal keyring (available in jewelry or hardware sections)
- Polyester stuffing (or cotton balls as a substitute)
- Sharp scissors
- Needle (embroidery or tapestry needle works best)
- Pins or clips for holding fabric layers
- Chalk or washable fabric marker
- Ruler or measuring tape
Designing the Strawberry Shape
Start by sketching the strawberry outline. A classic shape is teardrop-like: rounded at the base and gently tapered toward the top. Draw two identical red felt pieces—these will form the front and back of your strawberry.
Measure approximately 2.5 inches in height and 1.75 inches at the widest point. For consistency, cut a paper template first, then trace it onto the felt. Precision isn’t critical—slight variations give handmade charm—but symmetry helps during assembly.
Next, cut three to five leaf-shaped calyx pieces from green felt. These should resemble elongated ovals with a pointed tip and slightly curved edges, about 0.75 inches long. These will sit at the top of the strawberry, mimicking the fruit’s natural cap.
“Handmade accessories gain emotional value over time. A tiny imperfection often becomes a signature trait.” — Lila Chen, Textile Artist & Craft Educator
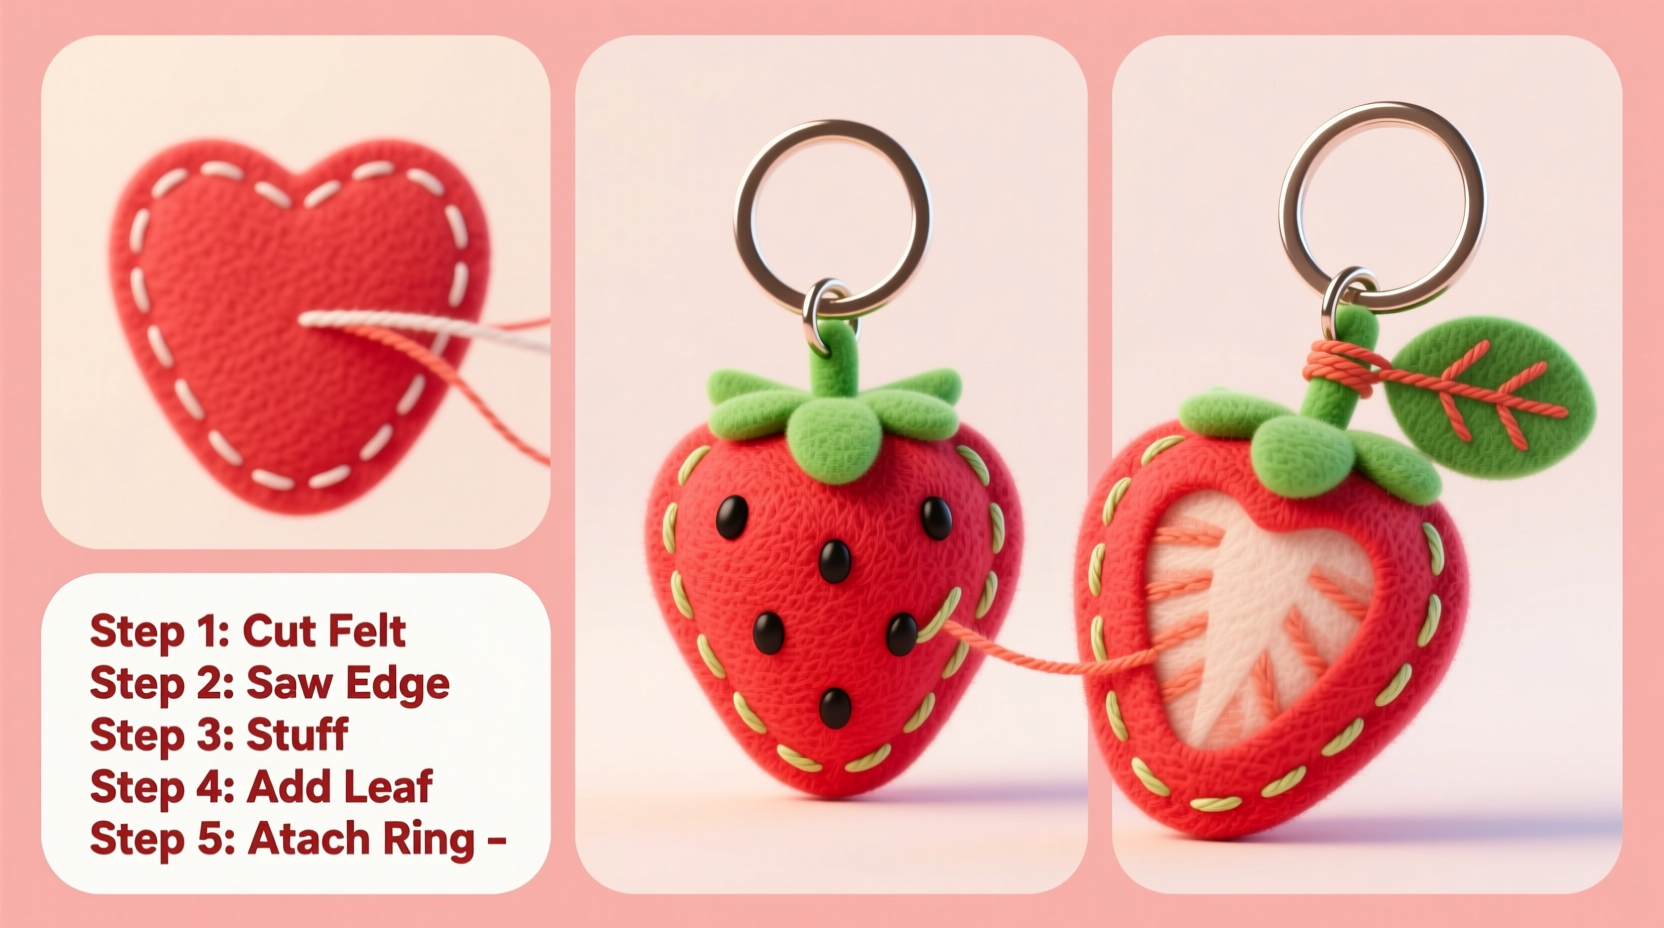
Step-by-Step Assembly Process
Follow this structured sequence to assemble your strawberry keychain cleanly and securely.
- Trace and Cut: Use your paper template to trace two strawberry shapes on red felt and multiple leaf shapes on green felt. Cut them out carefully.
- Add Seed Details: Using black or beige embroidery floss, stitch small French knots or straight stitches across one red piece to mimic strawberry seeds. Space them randomly for realism. Optionally, use tiny white felt circles glued or stitched on for contrast.
- Sew the Body: Place the two red felt pieces together, reverse sides facing out. Thread your needle and use a whipstitch or backstitch along the edge, leaving a 0.5-inch gap at the bottom for turning and stuffing.
- Turn and Stuff: Flip the strawberry right-side out through the opening. Use a pencil or chopstick to gently push out the tip for a rounded shape. Add a modest amount of stuffing—firm enough to hold form, soft enough to feel plush.
- Attach the Leaves: Position the green leaf pieces overlapping slightly at the top of the strawberry. Sew them in place using a few secure stitches through the center. Reinforce from the inside if needed.
- Close the Bottom: Fold the raw edges of the opening inward and use a ladder stitch (invisible stitch) to close the gap neatly.
- Add the Keyring: Loop the keyring through the base of the strawberry or, more securely, attach it between the body and the leaf cluster before finalizing the top stitches.
Customization Ideas and Creative Variations
Once you’ve mastered the basic design, personalization elevates your keychain from cute to unique. Consider these creative twists:
- Glow-in-the-Dark Felt: Use glow-in-the-dark red or green felt for a fun nighttime surprise.
- Scented Stuffing: Mix a few drops of strawberry-scented essential oil into the stuffing for a sensory touch.
- Mini Embellishments: Add tiny beads, sequins, or even a miniature bow for extra flair.
- Size Variation: Make a mini version (1 inch tall) for zipper pulls or a jumbo one (4 inches) as a bag charm.
- Color Play: Try pastel pink for a “white strawberry” effect or yellow for a lemon-inspired twist.
For those interested in broader applications, this same method can be adapted to create blueberries, cherries, or watermelons—making a full fruit series both feasible and enjoyable.
Common Pitfalls and How to Avoid Them
Even simple projects come with learning curves. Below is a comparison of common mistakes and how to correct them.
| Do’s | Don’ts |
|---|---|
| Use tight, even stitches for durability | Leave large gaps between stitches |
| Stuff moderately—overstuffing distorts shape | Overpack the interior until the felt stretches |
| Secure thread knots inside the body | Cut threads too short; risk of unraveling |
| Wash hands before handling light-colored felt | Work on dirty surfaces that stain fabric |
| Test keyring attachment strength before finalizing | Assume glued rings will last long-term |
Mini Case Study: Maya’s First Craft Fair Success
Maya, a college student majoring in graphic design, started making strawberry keychains during exam season as a stress-relief hobby. After gifting a few to friends, she received consistent praise and requests. Encouraged, she refined her design—adding embroidered initials and experimenting with textured stitches—and sold 37 units at her campus craft fair over a single weekend.
Her secret? Consistency in size and quality. She created a reusable cardboard template, pre-cut all components in batches, and used a stitch counter app to maintain uniformity. What began as a personal project evolved into a micro-business, funding her art supplies for the semester.
Frequently Asked Questions
Can I machine-wash my DIY strawberry keychain?
No. Hand-crafted felt items should be spot-cleaned only. Submerging them in water may cause shrinking, color bleeding, or stuffing clumping. Use a damp cloth with mild soap for surface cleaning.
Is embroidery experience necessary?
Not at all. The French knot for seeds is beginner-friendly. Practice five to ten knots on scrap fabric first. If stitching feels challenging, glue on small dots of white felt instead.
How long does it take to make one keychain?
For a first-timer, expect 30–45 minutes. With practice, assembly can be reduced to 15–20 minutes per unit, especially when working in batches.
Final Checklist Before You Begin
Run through this quick checklist to ensure you’re fully prepared:
- ✅ All materials gathered and colors selected
- ✅ Template drawn and tested on paper
- ✅ Needle threaded and scissors sharp
- ✅ Work area clean and well-lit
- ✅ Keyring accessible during final steps
- ✅ Extra thread and felt on hand for corrections
Bring Joy, One Stitch at a Time
Crafting a DIY strawberry keychain is more than a fleeting activity—it’s a mindful practice that rewards patience and creativity. In a world dominated by mass-produced goods, handmade objects carry intention. They remind us that beauty lives in the details: the slight wobble of a hand-sewn line, the soft crunch of felt under needle, the pride in seeing something you made brighten someone’s day.
Whether you keep it for yourself, gift it to a friend, or start a small collection, this little red charm is proof that joy can be stitched, stuffed, and carried with you—literally—wherever you go.


 浙公网安备
33010002000092号
浙公网安备
33010002000092号 浙B2-20120091-4
Comments
No comments yet. Why don't you start the discussion?