
Customizing Metal Heroes models—whether from the iconic Chogokin line, Soul of Chogokin series, or other die-cast figure ranges—is more than a hobby; it’s an art form. These figures combine intricate sculpting with premium materials, making them ideal canvases for personal expression. While factory finishes are impressive, true enthusiasts elevate their builds using advanced techniques that transform standard releases into museum-worthy displays. From precision painting to mechanical upgrades, mastering customization opens new dimensions in collecting.
Mastering Surface Preparation for Flawless Finishes
The foundation of any high-end customization is surface prep. Skipping this step leads to paint peeling, uneven coats, and wasted effort. Die-cast zinc alloys and plastic parts react differently to solvents and primers, so understanding material compatibility is essential.
Begin by disassembling the model carefully. Use precision screwdrivers and keep track of small screws—label containers or use magnetic trays. Clean each part with isopropyl alcohol (70% or higher) to remove mold release agents and fingerprints. For stubborn grease, a mild dish soap solution works well, followed by thorough drying.
Sand surfaces lightly with 600–1000 grit wet/dry sandpaper. This creates micro-abrasions that help primer adhere. After sanding, wipe down again with alcohol. Apply a thin coat of plastic-compatible primer (such as Mr. Surfacer 1000) in a well-ventilated area. Multiple light coats beat one heavy spray. Let dry completely before proceeding.
Advanced Painting & Weathering Techniques
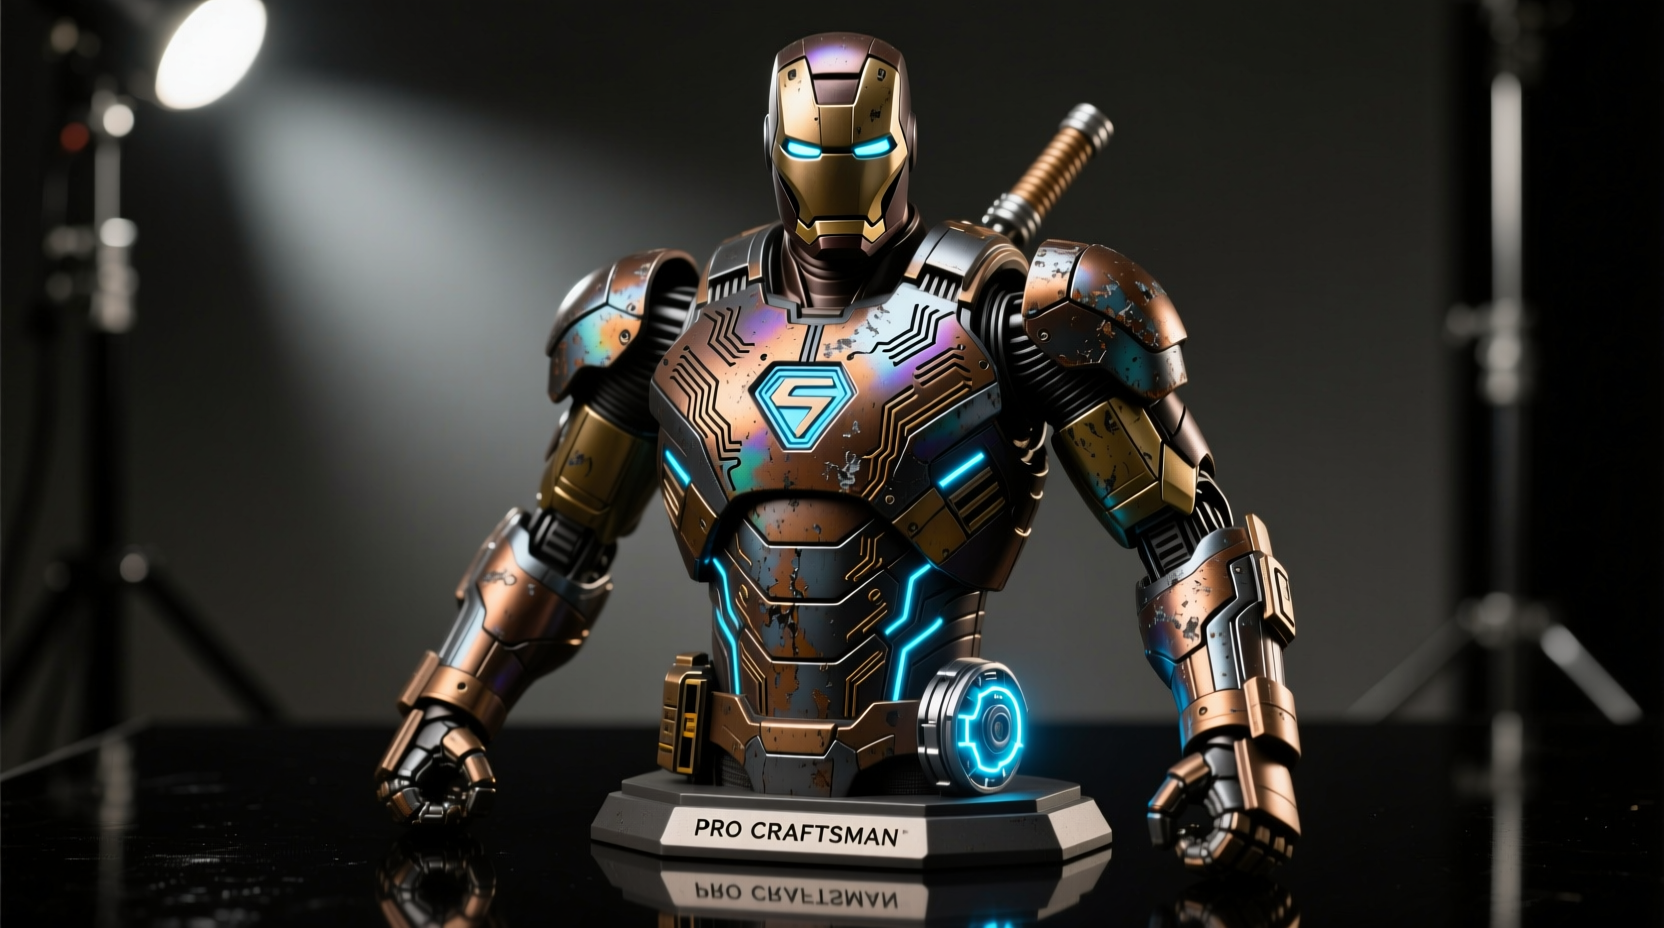
Factory color schemes often prioritize brand consistency over realism. Custom painters go further, adding depth through layering, shading, and weathering. The goal isn’t just to change colors but to tell a story—battle damage, age, atmospheric exposure.
Use airbrushes for smooth gradients and base layers. Acrylic lacquers like Tamiya TS or Mr. Color offer durability and excellent flow. Build up colors gradually: start with dark undercoats, then apply mid-tones and highlights. Dry brushing—lightly dragging a nearly dry brush across raised details—emphasizes panel lines and armor ridges.
For weathering, consider these methods:
- Chipping: Use a fine sponge or old toothbrush dipped in silver or aluminum paint to simulate scraped metal.
- Panel lining: Apply dark wash (e.g., black or brown pigment mixed with thinner) into recessed lines, then wipe excess for aged definition.
- Rust effects: Mix red-brown pigments with matte medium and stipple onto joints or damaged areas.
- Oil streaks: Drip thinned black or dark brown enamel along seams and let it run naturally.
“Realism comes not from perfection, but from controlled imperfection.” — Kenji Saito, Professional Model Kit Designer at Bandai Spirits
Step-by-Step Guide: Creating Realistic Battle Damage
- Mask off surrounding areas with low-tack tape.
- Lightly sand the impact zone to break the paint layer.
- Apply a silver metallic base for exposed alloy.
- Dab on rust-colored pigments with a damp brush.
- Blend edges with a soft gray transition to mimic oxidation spread.
- Seal with matte clear coat to unify the finish.
Magnetization & Articulation Upgrades
One of the most practical yet underused techniques is internal magnetization. Factory joints can be stiff or pose-unstable. Adding tiny neodymium magnets enhances both articulation and display flexibility.
Select disc-shaped N52 magnets (1mm x 0.5mm to 2mm x 1mm) depending on space. Drill precise holes in limbs and torso using a pin vise. Insert magnets with two-part epoxy, ensuring polarity alignment—opposite poles must face each other for attraction. Common upgrade zones include shoulders, hips, hands, and weapon mounts.
This allows for tool-less weapon swapping and dynamic posing without fear of collapse. Some customizers even embed magnets in display stands for floating effects.
| Upgrade Area | Magnet Size | Benefit |
|---|---|---|
| Shoulders | 1.5mm x 0.8mm | Improved arm rotation and stability |
| Hands | 1mm x 0.5mm | Quick weapon interchange |
| Feet | 2mm x 1mm | Better balance on stands |
| Chest/Back | 2mm x 0.8mm | Attachable armor or FX pieces |
Creating Custom Accessories & Conversion Parts
True customization goes beyond paint. Enthusiasts often craft entirely new accessories—alternate heads, weapons, flight stands, or transformation effects. Resin casting, 3D printing, and scratch-building are common approaches.
For small-scale parts, green styrene sheets and rods are ideal. Cut, shape, and glue with cement designed for polystyrene. To create energy blade effects, use transparent polycarbonate rods sanded to a taper and painted with fluorescent gradients.
Some collectors commission 3D-printed parts via services like Shapeways or use desktop resin printers. STL files can be sourced from communities like MyMiniFactory or customized in Fusion 360. Post-processing—washing, curing, and priming—is crucial for seamless integration.
Mini Case Study: Transforming a Standard RX-78 into a “Desert Recon” Variant
A Tokyo-based collector, Haruto Matsuda, transformed his SOF Ver. Ka Gundam into a desert combat unit. He stripped the original blue-white scheme, applied a tan-gray primer, then layered sand-textured paint using a stippling brush. He added hand-sculpted dust guards around the joints using epoxy putty and painted subtle oil stains near the thrusters. Internal magnets allowed him to swap between beam rifles and a custom sand-blaster cannon he 3D-printed. The final piece won top honors at the 2023 Japan Custom Figure Expo.
Essential Customization Checklist
Follow this checklist to ensure no step is missed during your next project:
- ✅ Disassemble model safely and organize parts
- ✅ Clean all components with alcohol
- ✅ Sand and prime surfaces appropriately
- ✅ Test paint on scrap material
- ✅ Apply base coat, then build up layers
- ✅ Add weathering effects (chips, grime, rust)
- ✅ Install magnets if upgrading articulation
- ✅ Craft or attach custom accessories
- ✅ Seal with appropriate clear coat (gloss, satin, or matte)
- ✅ Reassemble and test range of motion
Frequently Asked Questions
Can I customize a sealed box collectible without devaluing it?
Yes, but only if you’re prepared to open the package. Mint-in-box items retain higher resale value. Many collectors maintain both stock and custom versions—one for display, one for modification.
What clear coat should I use after weathering?
For a natural look, use matte clear. If simulating polished armor or energy fields, opt for gloss. Always apply in thin layers to avoid clouding pigments. Brands like Mr. Super Clear offer UV-resistant formulas ideal for long-term display.
Are there non-permanent customization options?
Absolutely. Use removable decals, interchangeable magnetized armor plates, or slip-on fabric capes. These allow you to switch styles without altering the original figure.
Elevate Your Craft
Customizing Metal Heroes models isn’t about replacing the original—it’s about honoring it while expressing individuality. With patience, precision, and creativity, even entry-level builders can produce professional-grade results. Every chip, weld, and brushstroke adds narrative depth, turning a mass-produced figure into a unique artifact.
Start small: repaint a helmet, add a single magnet, or design a new insignia. As skills grow, so will ambition. Join online forums, share progress shots, and learn from others’ techniques. The community thrives on collaboration and inspiration.


 浙公网安备
33010002000092号
浙公网安备
33010002000092号 浙B2-20120091-4
Comments
No comments yet. Why don't you start the discussion?