
For years, mechanical keyboards were niche tools for typists and gamers. Today, they’re cultural artifacts—personalized, expressive, and often hand-assembled. The rise of the custom mechanical keyboard scene has created a divide: buy a ready-to-use prebuilt model, or dive into the intricate world of DIY builds. But with kits costing hundreds of dollars and assembly requiring hours of meticulous work, many wonder—is this hobby truly worth the investment?
The answer isn’t simple. It depends on your priorities: typing feel, aesthetics, budget, and how much value you place on craftsmanship. While prebuilt keyboards offer convenience and reliability, custom builds deliver unmatched personalization and long-term satisfaction. Understanding both sides reveals not just cost differences, but philosophical ones—utility versus expression.
The Real Cost of Custom Keyboards: More Than Just Price Tags
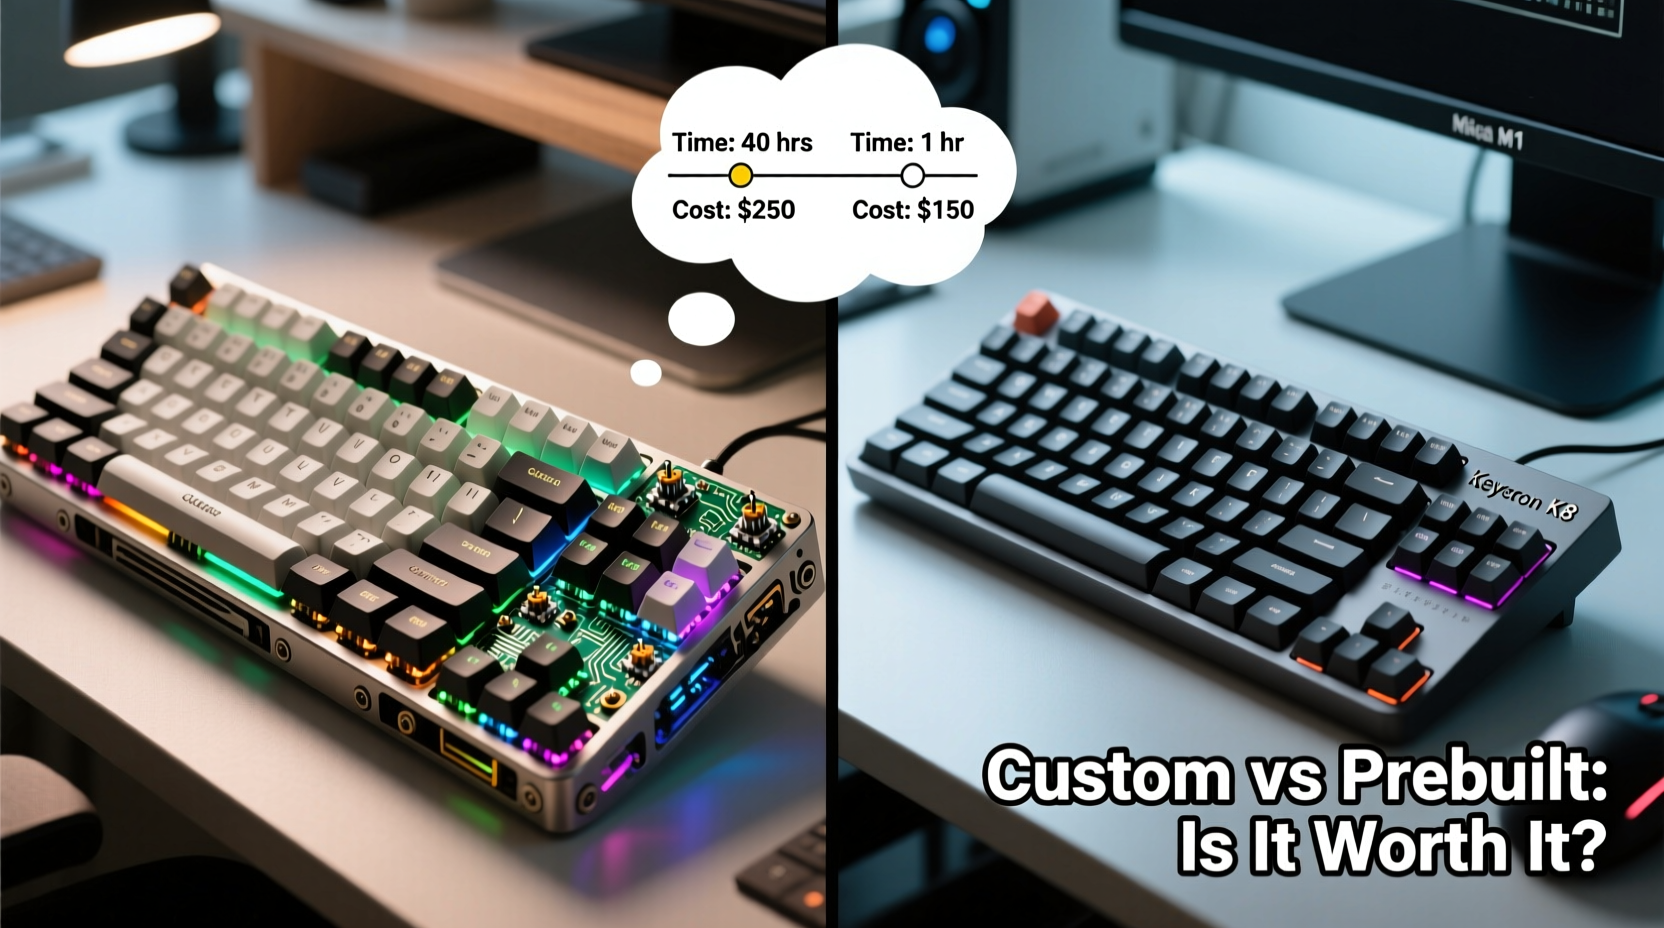
At first glance, custom mechanical keyboards appear expensive. A complete build—case, plate, switches, keycaps, PCB, stabilizers, and accessories—can easily exceed $250, even before factoring in tools. High-end cases made from machined aluminum or exotic materials can cost over $150 alone. Compare that to prebuilt models like the Keychron Q1 Pro or Drop ALT, which offer solid specs for under $100, and the math seems questionable.
But cost isn’t only financial. Time is an equally critical factor. Building a custom keyboard takes anywhere from 3 to 8 hours for a beginner, including desoldering (if needed), lubing switches, installing foam, mounting components, and troubleshooting. That’s a weekend project, not a quick setup.
Yet, many enthusiasts argue that this investment pays dividends. Unlike mass-produced boards, custom builds are designed to last. Components are often higher quality: PBT keycaps resist shine, Gasket mounts reduce fatigue, and boutique switches offer refined tactile feedback. You're not buying a product—you're curating an experience.
“Building a keyboard is less about saving money and more about gaining control. Every choice reflects your preferences.” — Julian Park, Keyboard Designer at NovelKeys
Performance and Feel: Why Enthusiasts Swear by Custom Builds
Prebuilt keyboards have improved dramatically. Many now feature hot-swappable switches, RGB lighting, and solid metal cases. However, few match the acoustic profile or typing sensation of a well-tuned custom board.
Custom builders prioritize sound dampening: silicone padding, case foam, switch film, and lubed stabilizers eliminate ping and rattle. The result is a deep, thocky sound that many find satisfying—a sensory reward for each keystroke. Prebuilt boards rarely include these refinements out of the box, and modifying them can void warranties.
Mounting styles also differ. Most prebuilts use tray mounts, which create a stiffer, more rigid feel. In contrast, custom boards often use gasket mounts—soft silicone or rubber buffers that allow the plate to flex slightly upon impact. This reduces finger strain during long typing sessions and produces a smoother actuation curve.
Switch selection is another differentiator. While prebuilt keyboards ship with standard switch types (e.g., Gateron Reds or Kailh Speed Silvers), custom builders can select from dozens of boutique options: Zealios for crisp tactility, Holy Pandas for hybrid smoothness, or T1s for buttery linear travel. These switches aren't typically available in retail models.
| Feature | Custom Mechanical Keyboard | Prebuilt Mechanical Keyboard |
|---|---|---|
| Typing Sound | Deep, muted, customizable (\"thock\") | Brighter, hollow (\"clack\") |
| Mount Type | Gasket, top, or flex mount | Tray or screw-in mount |
| Switch Options | Full range, including boutique | Limited to mainstream variants |
| Build Quality | Premium materials, hand-finished | Mass-produced, variable consistency |
| Repairability | Modular, user-replaceable parts | Often glued or sealed |
A Beginner’s Timeline: From Curiosity to Completed Build
If you’ve never built a keyboard, the process may seem daunting. But it’s methodical and learnable. Here’s a realistic timeline for someone starting from scratch:
- Week 1: Research & Planning – Read forums (r/MechanicalKeyboards, Deskthority), watch YouTube reviews, and identify a target layout (60%, 75%, TKL). Decide on a theme (minimalist, retro, anime).
- Week 2–3: Purchasing Parts – Join a group buy (via KeebShop, Drop, or NovelKeys) for a case, PCB, and plate. Order compatible switches and keycaps. Budget for lube, tweezers, and a soldering iron if needed.
- Week 4: Preparation – Lube switches (optional but recommended). Install foam layers in the case. Test PCB with a switch tester if possible.
- Week 5: Assembly – Mount the PCB, install stabilizers, seat switches, then snap in keycaps. Flash firmware if using QMK/VIA.
- Week 6: Refinement – Tune stabilizers, adjust o-rings, tweak sound via additional foam. Share your build online for feedback.
This six-week journey transforms abstract curiosity into tangible pride. Each step teaches something new—how switches work, why stabilizers matter, how firmware enables customization. By the end, you don’t just own a keyboard; you understand it.
Real Example: Sarah’s First Build and Lasting Satisfaction
Sarah, a freelance writer from Portland, had used a Logitech prebuilt for years. She wanted something quieter and more comfortable for long writing sessions. After seeing a friend’s custom board with a soft thock sound, she decided to try building one herself.
She started modestly: a $75 plastic 65% case, a $30 PCB, and a $45 set of GMK-inspired keycaps. She spent two evenings lubing Gateron T1 switches and assembling the board. The first attempt had a wobbly spacebar—she reseated the stabilizer and added extra tape. On the second try, everything clicked.
Now, six months later, she says it’s her favorite tool. “It sounds incredible, and I love that I made it. When people ask about it, I can explain every part. I’ve already ordered parts for my next build—a titanium case with a split design.”
Her story isn’t unique. Many enter the hobby seeking better ergonomics or sound, only to stay for the creative fulfillment.
Checklist: Is a Custom Build Right for You?
Before committing, assess your goals. Use this checklist to determine if the hobby aligns with your expectations:
- ✅ I care about typing sound and tactile feedback
- ✅ I enjoy hands-on projects and problem-solving
- ✅ I want a keyboard that reflects my personal style
- ✅ I’m willing to spend 5–10 hours learning and building
- ✅ I plan to use the keyboard daily for years
- ❌ I need a keyboard immediately for work
- ❌ I’m only interested in RGB effects and macros
- ❌ I don’t want to troubleshoot issues myself
If most checkmarks are positive, a custom build could be deeply rewarding. If not, a high-quality prebuilt might serve you better—especially models like the Vortex Core, Dygma Raise, or ZSA Moonlander, which blend premium features with plug-and-play usability.
Frequently Asked Questions
Can I save money by building my own keyboard?
Generally, no. A comparable custom build costs 30–100% more than a prebuilt. Savings only occur if you reuse parts or score rare deals. The value lies in customization, not cost efficiency.
Are custom keyboards harder to repair?
No—the opposite. Most are modular. Switches can be hot-swapped, keycaps replaced, and firmware updated. Prebuilt boards often use proprietary parts or sealed designs that complicate repairs.
Do I need soldering skills?
Not anymore. Most modern kits support hot-swap sockets, allowing switch changes without soldering. Soldering is only needed for non-hot-swap PCBs or wireless module installation—but tutorials make it accessible to beginners.
Conclusion: Worth It If You Value Craftsmanship Over Convenience
The question isn’t whether custom mechanical keyboards are objectively better. They’re different—crafted rather than manufactured. For those who type for hours, express themselves through gear, or simply enjoy making things, the hobby delivers lasting returns.
Yes, it costs more. Yes, it takes time. But few prebuilt products inspire the same emotional connection as a keyboard you’ve built yourself. It becomes an extension of your workflow, a reflection of taste, and a conversation piece. The joy isn’t just in the final product—it’s in the process.
If you’ve ever looked at your desk setup and thought, “I wish this felt more like me,” then the answer is clear. The time and cost aren’t expenses. They’re investments—in comfort, creativity, and ownership.


 浙公网安备
33010002000092号
浙公网安备
33010002000092号 浙B2-20120091-4
Comments
No comments yet. Why don't you start the discussion?