
A dehumidifier is an essential appliance in damp environments, helping maintain healthy indoor air quality by reducing excess moisture. However, when it starts icing up, its efficiency plummets, and operation can halt entirely. Ice forming on the coils or inside the unit isn’t normal under typical conditions and signals underlying issues that need immediate attention. Understanding the root causes and knowing how to respond quickly can save you time, energy, and costly repairs.
Why Dehumidifiers Ice Up: The Science Behind the Problem
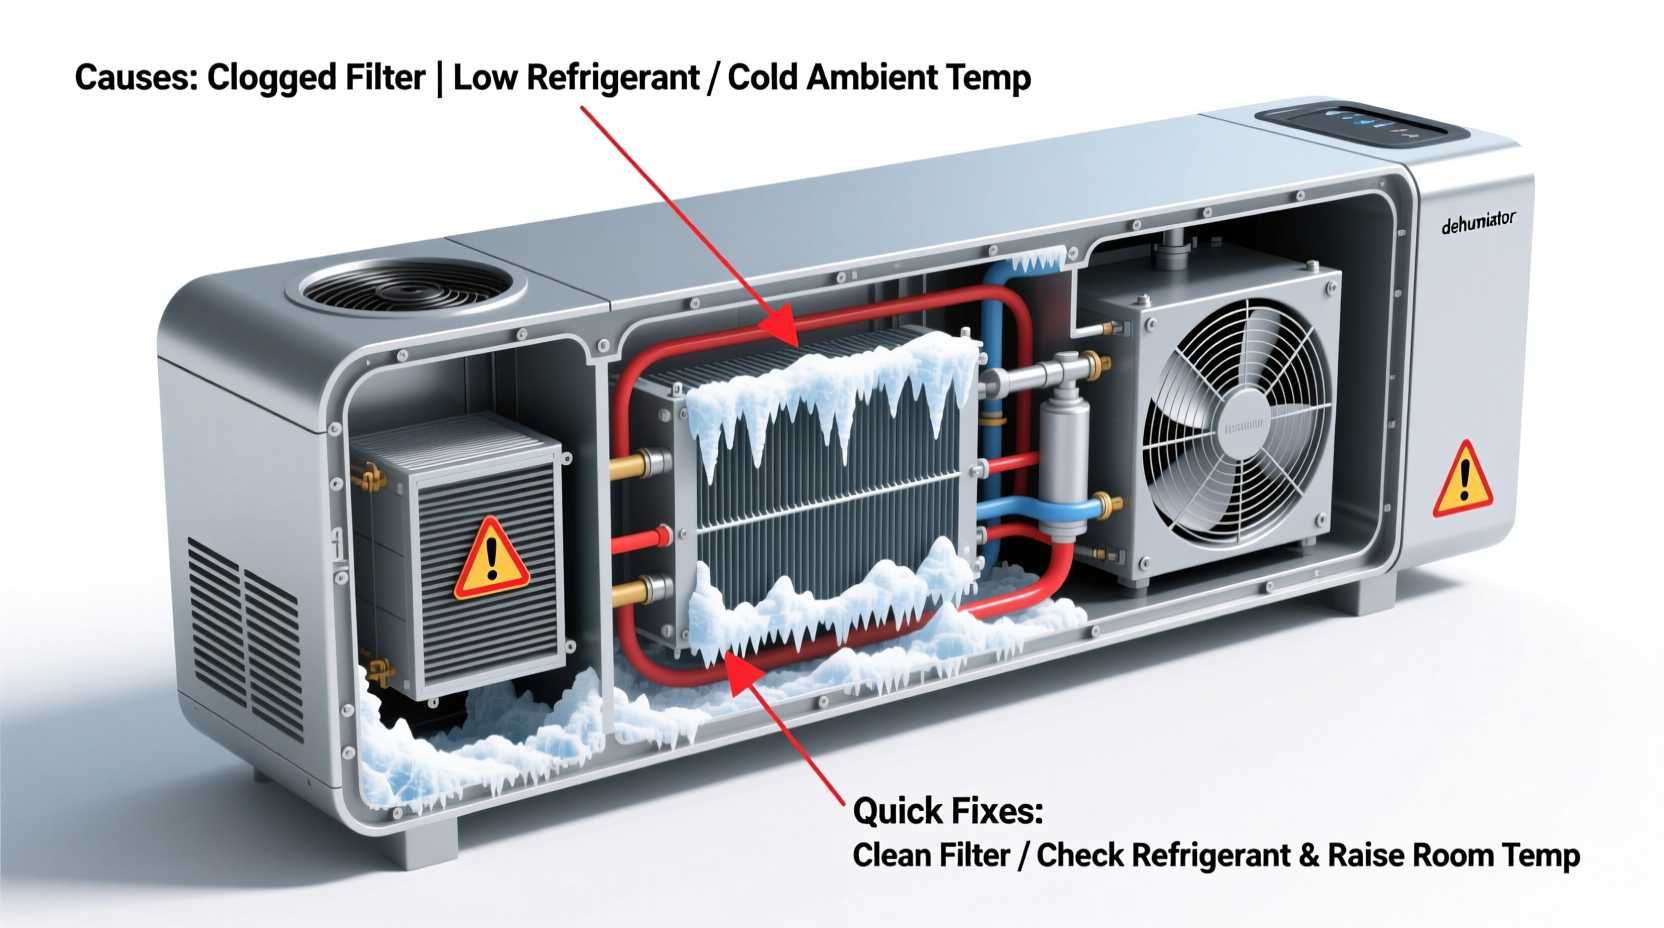
Dehumidifiers work by drawing in moist air over refrigerated coils. As warm, humid air passes over these cold surfaces, moisture condenses into water droplets, which collect in a tank or drain. The now-dry air is reheated slightly and released back into the room. This process depends on maintaining an optimal temperature balance within the system.
When the evaporator coils become too cold—typically below freezing—moisture freezes instead of draining. This results in frost or ice buildup. While occasional light frost may occur in cooler environments, significant or recurring ice indicates malfunction or misuse.
“Cold ambient temperatures are the leading cause of dehumidifier icing, but poor maintenance and airflow restrictions often compound the issue.” — Dr. Alan Reeves, HVAC Systems Engineer
Top 5 Reasons Your Dehumidifier Is Icing Up
1. Low Room Temperature
Most standard dehumidifiers operate best in environments above 65°F (18°C). Below this threshold, the evaporator coils can drop below freezing, causing condensation to turn into ice. This is especially common in basements, garages, or during colder seasons.
2. Dirty Air Filter or Coils
Dust and debris restrict airflow across the cooling coils. Reduced airflow means the coils stay colder longer, increasing the chance of ice formation. A clogged filter forces the unit to work harder while receiving less warm air—creating ideal icing conditions.
4>3. Faulty Fan Motor or Blower
The fan circulates air over the coils. If it’s running slowly or not at all due to mechanical failure or obstruction, there won't be enough warm air moving through the system. Without proper airflow, even units in adequately warm rooms can develop ice.
4. Refrigerant Leak
If the refrigerant level is low due to a leak, the pressure in the cooling system drops. This causes the evaporator coil to become excessively cold, promoting ice buildup. Unlike other issues, this requires professional diagnosis and repair.
5. Defrost Sensor or Control Board Failure
Newer models come equipped with automatic defrost systems that pause cooling when ice is detected. If the sensor malfunctions or the control board fails, the unit won’t initiate defrost mode, allowing ice to accumulate unchecked.
Quick Fixes You Can Try Today
Before calling a technician, try these practical solutions to resolve or rule out common causes of icing.
- Check the room temperature. Use a thermometer near the unit. If below 65°F, consider relocating the dehumidifier to a warmer area or switching to a low-temperature model designed for cooler spaces.
- Clean or replace the air filter. Most filters are washable. Rinse under lukewarm water, let dry completely, then reinstall. Do this every 2–4 weeks in high-dust environments.
- Inspect and clean the coils. Turn off and unplug the unit. Use a soft brush or vacuum attachment to gently remove dust from the coils. Be careful not to bend the fins.
- Ensure unrestricted airflow. Keep at least 12 inches of clearance around the unit. Avoid placing it behind furniture or in tight corners.
- Verify fan operation. Listen for unusual noises or reduced airflow. If the fan isn’t spinning freely, check for obstructions or signs of motor strain.
- Let the unit defrost completely. Unplug it and leave it upright for 24 hours to allow all ice to melt. Wipe down any residual moisture before restarting.
Do’s and Don’ts When Dealing With Icing Issues
| Do’s | Don’ts |
|---|---|
| Use a hygrometer to monitor humidity and temperature | Run a standard dehumidifier in temps below 65°F |
| Clean filters monthly | Ignore persistent icing after cleaning |
| Choose a low-temp model for basements | Use sharp objects to remove ice |
| Keep vents unobstructed | Overfill the water tank, risking overflow during thaw |
| Allow full defrost cycle before restarting | Operate the unit without a filter |
Mini Case Study: Solving Basement Icing in Winter
Mark, a homeowner in upstate New York, noticed his basement dehumidifier frequently shutting down mid-cycle, covered in frost. He initially assumed it was broken and considered replacement. After measuring the temperature, he found it averaged 58°F during winter months—below the recommended operating range.
Instead of buying a new unit immediately, Mark moved the dehumidifier to a heated utility closet adjacent to the basement, routing the intake hose through a small opening. He also switched to a low-temperature model the following year. The combination of better ambient heat and appropriate equipment eliminated icing completely, saving him hundreds in premature replacement costs.
Step-by-Step Troubleshooting Timeline
Follow this timeline to diagnose and fix icing efficiently:
- Day 1 – Observe and Isolate
Unplug the unit. Note where ice has formed. Check ambient temperature and humidity levels. - Day 1 – Begin Thawing
Leave the unit unplugged in a warm room for 12–24 hours to fully defrost. - Day 2 – Clean Components
Wash the filter, inspect coils, and clear exterior vents. Confirm no blockages in airflow paths. - Day 2 – Test in Optimal Conditions
Place the unit in a room above 65°F with moderate humidity. Plug in and monitor for 2–3 hours. - Day 3 – Evaluate Performance
If no ice forms and drainage is normal, the issue was likely environmental or maintenance-related. If icing returns, suspect internal faults like refrigerant leaks or failed sensors. - Day 4+ – Seek Professional Help
Contact a certified technician if problems persist, especially if you suspect refrigerant issues or electrical failures.
Frequently Asked Questions
Can I use any dehumidifier in a cold basement?
No. Standard compressor-based models struggle below 65°F. For colder areas, use a “low-temperature” or “cold climate” dehumidifier specifically designed to prevent icing through adaptive defrost cycles and enhanced coil management.
How often should I clean my dehumidifier to prevent icing?
Clean the air filter every 2–4 weeks and inspect the coils quarterly. In dusty or pet-heavy homes, increase frequency. Regular maintenance ensures consistent airflow and reduces strain on cooling components.
Is some frost normal in winter?
Minimal surface frost may appear briefly in marginal temperatures, but visible ice buildup is never normal. It indicates the unit is operating outside safe parameters and should be addressed promptly to avoid damage.
Preventative Checklist for Long-Term Reliability
- ✅ Monitor room temperature regularly
- ✅ Install a low-temperature model if needed
- ✅ Clean filter every month
- ✅ Inspect coils twice a year
- ✅ Ensure 12+ inches of clearance around the unit
- ✅ Empty water tank daily or connect to continuous drain
- ✅ Schedule annual inspection for older units
- ✅ Replace units over 5 years old showing frequent issues
Final Thoughts and Action Steps
Dehumidifier icing isn’t just inconvenient—it’s a warning sign. Whether caused by cold environments, dirty components, or mechanical failure, ignoring it leads to reduced efficiency, higher energy bills, and potential system breakdown. The good news is that most causes are preventable or easily corrected with routine care and informed usage.
Start today: check your unit’s surroundings, clean the filter, and verify the room temperature. If problems continue, escalate to deeper inspection or professional service. Choosing the right model for your environment and maintaining it diligently ensures reliable moisture control year-round.


 浙公网安备
33010002000092号
浙公网安备
33010002000092号 浙B2-20120091-4
Comments
No comments yet. Why don't you start the discussion?