
Handmade jewelry has surged in popularity, with DIY bracelets becoming a favorite craft for creative individuals. Many assume that making your own accessories at home is automatically cheaper than buying them from stores. But is that always true? The answer depends on several factors — from initial material costs to long-term usage, craftsmanship, and personal satisfaction. A closer look reveals that while DIY can save money over time, the upfront investment and learning curve may surprise first-time crafters.
The Real Cost of DIY Bracelets
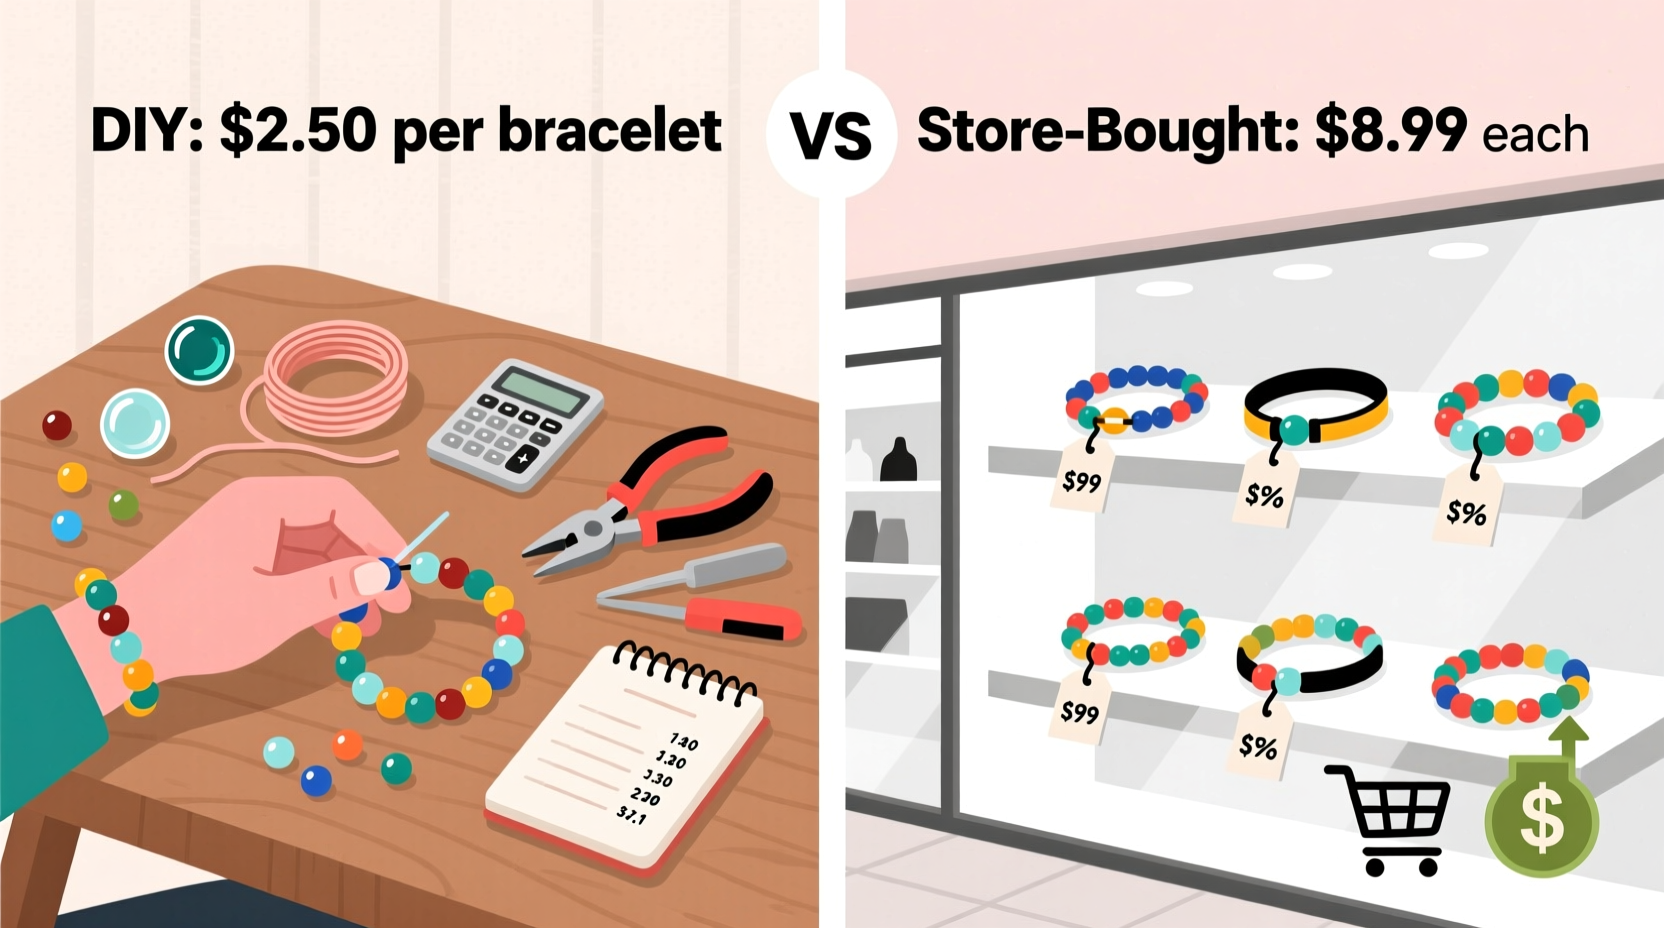
At first glance, crafting your own bracelets seems like an economical choice. You buy beads, string, clasps, and tools once, then reuse them across multiple projects. However, the reality is more nuanced. Initial purchases often include bulk materials and specialty tools that inflate early spending. For example, a beginner might spend $60 on pliers, wire cutters, bead organizers, and assorted beads just to make three bracelets.
Let’s break this down:
- Beads: Glass or gemstone beads range from $2 to $15 per strand.
- Stringing materials: Stretch magic cord ($8 for 50 feet), memory wire ($10 per roll), or leather cord ($6 per yard).
- Findings: Clasps, crimp beads, jump rings — around $1–$3 per bracelet when sourced individually.
- Tools: Round-nose pliers, wire cutters, crimping tool — $40+ if starting from scratch.
After accounting for all components, a single handmade bracelet can cost between $5 and $12 in materials alone — not including labor or design time. Compare this to a similar-looking store-bought piece priced at $15–$25, and the savings seem minimal — especially for occasional crafters.
Store-Bought Bracelets: Price vs. Perceived Value
Purchased bracelets vary widely in price and quality. Department store options ($8–$20) often use inexpensive metals, synthetic stones, and mass-produced designs. Higher-end brands sell artisan-crafted pieces for $50–$150, leveraging brand reputation, ethical sourcing, and professional finishing.
What you’re paying for includes:
- Design innovation and trend forecasting
- Quality control and durability testing
- Branding, marketing, and retail overhead
- Convenience and immediate wearability
A $25 beaded bracelet from a boutique may use lab-certified stones, hypoallergenic metals, and hand-knotted techniques — features difficult to replicate without experience. Yet, many consumers feel they can \"do better\" at home, especially with online tutorials guiding every step.
“While DIY offers customization, commercial jewelry benefits from economies of scale and consistent supply chains.” — Lila Nguyen, Jewelry Designer & Educator
Comparative Cost Analysis: DIY vs. Store Bought
| Factor | DIY Bracelet (Homemade) | Store-Bought Bracelet |
|---|---|---|
| Initial Investment | High (tools + materials) | Low (pay only for final product) |
| Per-Unit Material Cost (after setup) | $3–$10 | N/A |
| Labor & Time | 1–2 hours per piece (beginner) | None (ready to wear) |
| Customization | Full control over design | Limited to available styles |
| Durability | Varies by skill level | Generally tested and reliable |
| Emotional Value | High (personal meaning) | Moderate (brand appeal) |
This comparison shows that DIY becomes cost-effective only after producing multiple items. If you plan to make five or more bracelets, the per-unit cost drops significantly as fixed tool expenses are spread across projects. However, if you're making one bracelet for a gift, buying one off-the-shelf is often more economical and less time-consuming.
When DIY Actually Saves Money
DIY shines when approached strategically. Consider these scenarios where homemade bracelets clearly outperform store-bought alternatives:
- You already own tools and basic supplies. No initial investment means lower marginal cost per bracelet.
- You make gifts regularly. Custom friendship bracelets for birthdays or holidays add sentimental value while cutting gifting expenses.
- You repurpose old jewelry. Salvaging beads, chains, and clasps from broken pieces reduces material costs to nearly zero.
- You join crafting communities. Bead swaps, group buys, and shared resources lower individual spending.
- You improve skills over time. Faster assembly and efficient techniques reduce labor waste and material errors.
Mini Case Study: Sarah’s Summer Craft Project
Sarah, a college student, wanted personalized bracelets for her bridesmaids. She found matching sets online for $22 each — $110 total for five. Instead, she invested $35 in seed beads, elastic cord, and a beading loom. Each bracelet took about 45 minutes to complete. Total time: under 4 hours. Final cost: $7 per bracelet. Not only did she save $75, but the bridesmaids cherished the handmade touch. Over the next year, Sarah reused her tools for holiday gifts, bringing her average project cost down to $4 per bracelet.
Step-by-Step Guide to Making Cost-Effective DIY Bracelets
- Assess your needs. Are you making one bracelet or planning ongoing projects?
- Invent your current supplies. Check for usable beads, cords, or tools before buying anything new.
- Buy smart. Choose affordable starter kits or shop discount sections at craft stores.
- Start simple. Try stretch bracelets or braided designs before advancing to wire work.
- Track costs. Record how much each bracelet uses in materials and time.
- Scale up gradually. As confidence grows, invest in higher-quality materials selectively.
- Reuse and recycle. Deconstruct damaged jewelry for salvageable parts.
Checklist: Is DIY Right for You?
- ✅ Do you enjoy hands-on creative activities?
- ✅ Will you make more than three bracelets in the next six months?
- ✅ Can you access discounted or recycled materials?
- ✅ Are you willing to learn basic techniques (knotting, crimping, looping)?
- ✅ Do recipients value personalization over polish?
If you answered yes to most of these, DIY is likely a cost-effective and fulfilling option.
Frequently Asked Questions
Is it cheaper to make bracelets if I buy materials in bulk?
Yes — bulk purchasing reduces the per-unit cost of beads and stringing materials. However, only buy what you’ll realistically use. Overbuying leads to clutter and wasted funds. Look for mixed lots or closeout deals to minimize risk.
Can I match the quality of store-bought bracelets at home?
With practice, yes. Beginners often struggle with clasp security, even tension, and design balance. But after a few projects, quality improves dramatically. High-end findings and proper tools help bridge the gap.
How long does it take to make a DIY bracelet?
A simple stretch bracelet takes 20–30 minutes for a novice. More complex designs like woven metal cuffs or multi-strand pieces can take 2–3 hours. Speed increases significantly with repetition.
Final Thoughts: Value Beyond the Price Tag
The question isn’t just whether DIY bracelets are cheaper — it’s whether they’re worth it. For some, the joy of creation, the ability to personalize, and the pride in wearing something self-made outweigh any financial calculation. Others prioritize convenience and consistency, favoring store-bought reliability.
True savings emerge not from a single project, but from sustained engagement. If you approach bracelet-making as a hobby rather than a one-off task, the investment pays off in both cost and creativity. Tools last for years. Skills compound. And each bracelet tells a story no retail tag can capture.


 浙公网安备
33010002000092号
浙公网安备
33010002000092号 浙B2-20120091-4
Comments
No comments yet. Why don't you start the discussion?