
Creating a dedicated, secure space for your cat doesn’t have to mean spending hundreds on specialty furniture. A well-built DIY cat crate can provide your feline with a personal retreat that’s both functional and cozy. Whether you're preparing for travel, introducing a new pet to the home, or simply giving your cat a quiet zone, a custom-built crate offers control over safety, comfort, and aesthetics. With careful planning and attention to feline behavior, you can construct a space that meets your cat’s needs while blending seamlessly into your living environment.
Why Build Your Own Cat Crate?
Commercial pet carriers and crates often prioritize portability over long-term comfort. Many are made from flimsy plastic, offer poor ventilation, or lack enough room for movement. By designing your own crate, you can tailor dimensions, materials, and features—like bedding, visibility, and access points—to suit your cat’s temperament and size.
Additionally, a homemade crate encourages enrichment. You can integrate hiding spots, scratching surfaces, or even small shelves for climbing. For multi-cat households, modular designs allow expansion. Most importantly, building it yourself ensures non-toxic materials and secure construction, minimizing risks during use.
“Cats thrive in environments where they feel in control. A thoughtfully designed crate gives them autonomy within a safe boundary.” — Dr. Lena Reyes, Feline Behavior Specialist
Planning Your Cat Crate: Key Design Principles
Before cutting any wood, consider these foundational elements of feline-friendly design:
- Size: The crate should allow your cat to stand, turn around, stretch, and lie down comfortably. A general rule is 1.5 times your cat’s length (nose to tail base).
- Ventilation: At least two sides should have airflow—mesh panels or slatted wood work well.
- Access: Include at least one wide door (preferably front-facing) for easy entry and cleaning.
- Security: All joints must be strong; doors should latch securely but open easily in emergencies.
- Comfort: Line the interior with washable padding and include a familiar-smelling item like an old T-shirt.
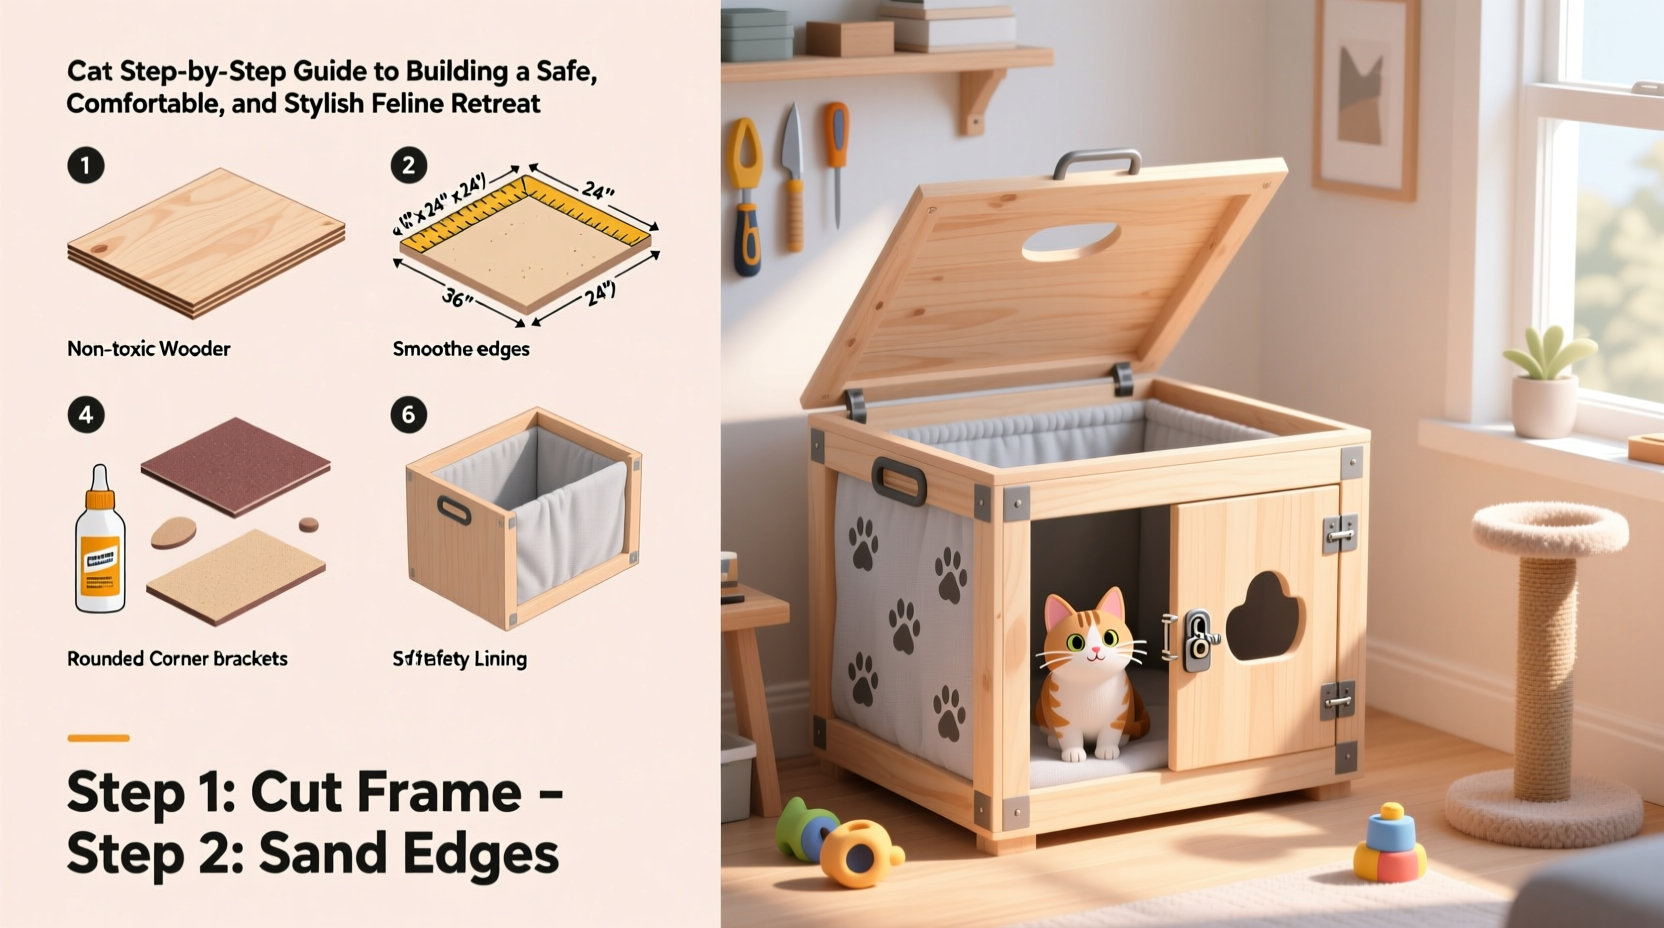
Step-by-Step Guide to Building the Crate
- Gather Materials and Tools
- ½-inch plywood or solid pine boards (for structure)
- Aluminum mesh or hardware cloth (for ventilation panels)
- Wood screws, wood glue, sandpaper
- Hinges and a secure latch
- Drill, saw, staple gun, measuring tape
- Non-toxic wood finish or paint (optional)
- Decide on Dimensions
For an average adult cat (9–12 lbs), aim for 24” long × 18” wide × 18” high. Adjust based on breed—Maine Coons need more space, while kittens can start smaller.
- Cut the Panels
Cut six pieces: top, bottom, two sides, front, and back. If using mesh, cut one side panel and the front with reduced solid area to accommodate screening.
- Build the Frame
Assemble the base and walls using wood glue and screws. Reinforce corners with L-brackets if needed. Sand all edges thoroughly to prevent splinters.
- Install Ventilation
Attach aluminum mesh to the inside of side or front panels using a staple gun. Ensure no sharp edges protrude into the interior.
- Add the Door
Cut a rectangular opening in the front panel (at least 8” × 10”). Attach with hinges on one side and a pet-safe latch on the other. Test smooth operation.
- Finish and Seal
If painting or staining, use only water-based, non-toxic finishes. Allow 48 hours of off-gassing before introducing your cat.
- Outfit the Interior
Add a removable cushion, soft blanket, or memory foam pad. Include a small litter tray if used for extended stays.
Do’s and Don’ts of Cat Crate Construction
| Do’s | Don’ts |
|---|---|
| Use untreated, solid wood | Avoid particle board or MDF (off-gasses formaldehyde) |
| Round all interior corners | Leave sharp edges or protruding nails |
| Include multiple ventilation zones | Block airflow with solid panels on all sides |
| Make bedding removable and washable | Use fabrics that shed lint or trap fur |
| Test stability by gently rocking the crate | Ignore wobbling legs or loose joints |
Real-Life Example: Introducing a Rescue Cat
Sarah adopted a shy tabby named Milo from a shelter. He was overwhelmed by the new apartment and hid under furniture constantly. Instead of forcing interaction, Sarah built a medium-sized crate with a fleece bed and placed it near the living room window. She left the door open and tossed treats inside daily. Within a week, Milo began napping in the crate voluntarily. After two weeks, he allowed petting while inside. The crate became his sanctuary—a place he could observe the world safely. Over time, Sarah removed the back panel to convert it into a permanent window perch.
Essential Checklist Before Use
- ✅ All screws are tightened and flush with the surface
- ✅ No toxic residues from finishes or adhesives
- ✅ Door opens and closes smoothly with a secure latch
- ✅ Mesh is firmly attached with no loose wires
- ✅ Bedding is non-slip and machine-washable
- ✅ Crate is placed in a quiet, draft-free area away from loud appliances
- ✅ Emergency contact info is labeled on the outside (if used for transport)
Frequently Asked Questions
Can I use this crate for air travel?
Only if it meets IATA (International Air Transport Association) standards. Most DIY crates don’t comply with airline regulations, which require specific labeling, bolted doors, and rigid construction. Use your DIY crate as a home base, and invest in a certified carrier for flights.
How do I clean the crate?
Remove all fabric items and wash separately. Wipe down hard surfaces with a damp cloth and mild vinegar solution (1:4 vinegar to water). Avoid chemical cleaners. Dry completely before reintroducing your cat.
My cat won’t go near the crate. What should I do?
This is common. Try placing treats, toys, or catnip inside. Feed meals next to it, then gradually move the bowl closer and eventually inside. Never force entry—positive reinforcement builds trust.
Final Thoughts: A Safe Space Is a Happy Cat
A DIY cat crate isn’t just a container—it’s a refuge. In homes with children, dogs, or frequent visitors, having a designated safe zone reduces stress and supports emotional well-being. When built with care, your handmade crate can become a beloved part of your cat’s daily routine, offering security without isolation.
The process of building it also deepens your understanding of your cat’s preferences. Did they prefer higher vantage points? Add a viewing shelf. Do they scratch when anxious? Incorporate sisal panels. This project evolves with your pet’s needs.


 浙公网安备
33010002000092号
浙公网安备
33010002000092号 浙B2-20120091-4
Comments
No comments yet. Why don't you start the discussion?