
Cats thrive on movement, exploration, and surprise. A well-designed tunnel taps into their natural instincts to stalk, pounce, and hide—offering both physical exercise and mental stimulation. While store-bought tunnels are available, many lack durability or become flimsy after weeks of enthusiastic use. By building your own DIY cat tunnel using flexible boning, you gain control over materials, size, and sturdiness. This guide walks through how to construct a long-lasting, engaging tunnel that withstands claws, bites, and repeated collapses without losing shape.
Why Use Boning in a Cat Tunnel?
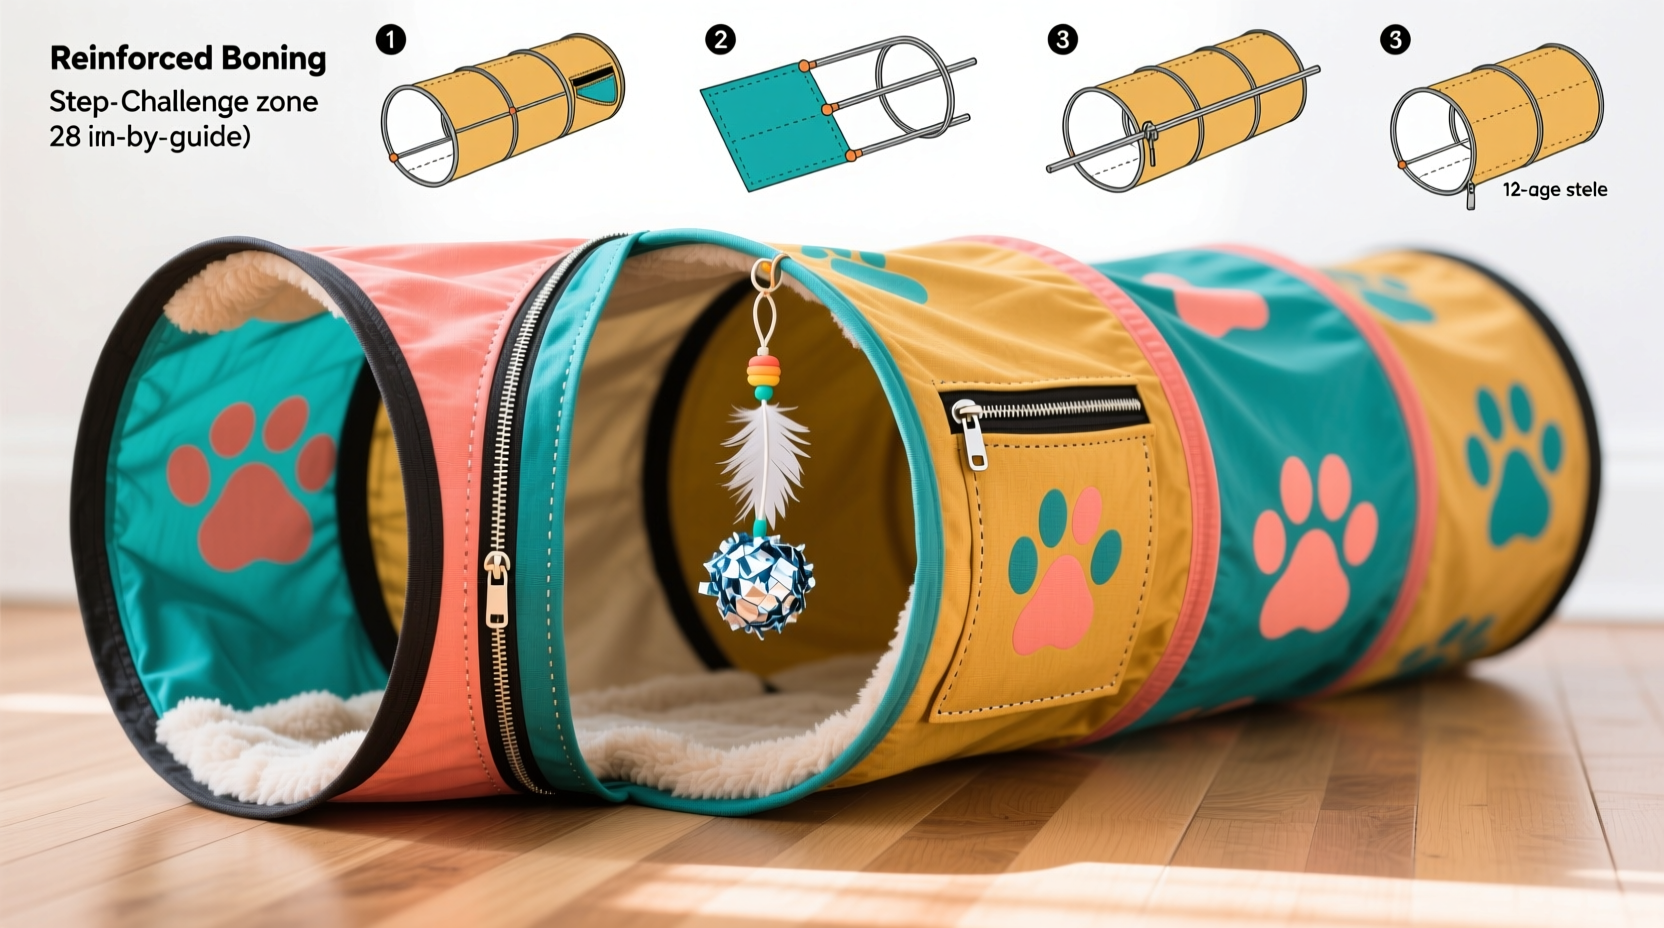
Flexible plastic boning—commonly used in garment waistbands and craft projects—provides just the right balance of structure and flexibility. Unlike wire, it won’t poke through fabric or injure curious paws. It bends easily but returns to its original shape, allowing the tunnel to twist, curve, and rebound even after being crushed under a determined feline wrestler.
Boning also prevents the tunnel from collapsing completely, ensuring your cat always has a clear path through. This consistent open structure encourages repeat use, especially when paired with treats or toys inside.
Materials You’ll Need
Gathering the right supplies ensures a smooth build and a more durable end product. Here’s what to have on hand before starting:
- Fabric (double-sided fleece, cotton drill, or upholstery-grade material) – 1 yard minimum
- Spiral plastic boning – 3–4 feet (available at craft stores or online)
- Heavy-duty thread (polyester or upholstery weight)
- Sewing machine (with adjustable tension)
- Scissors and fabric chalk
- Ruler or measuring tape
- Pins or clips
- Zip ties or elastic cord (for joining tunnel segments, optional)
- Decorative elements (felt shapes, crinkle fabric inserts, etc.)
For added engagement, consider integrating crinkle material (like laminated chip bags or commercial crinkle fabric) into the lining. The sound stimulates curiosity and mimics prey movement.
Step-by-Step Construction Guide
- Measure and cut the fabric: Decide on your tunnel diameter (typically 10–12 inches). Cut a rectangular strip 12 inches wide and 48–72 inches long. Wider tunnels suit larger cats; longer ones allow more complex layouts.
- Create the casing channels: Fold each long edge of the fabric inward by 1 inch and press or pin. Stitch along both edges to form two long tubes—these will house the boning. Leave about 2 inches unstitched at each end to insert the boning later.
- Sew the main seam: With right sides together, roll the fabric into a cylinder and align the short ends. Pin and sew a ½-inch seam to close the loop. Backstitch at start and end for strength.
- Turn and press: Flip the tunnel right-side out. Use a dowel or rolled-up magazine to push out the corners gently. Press lightly if fabric allows, avoiding melting synthetic fibers.
- Insert the boning: Cut the boning into 12-inch sections. Feed each piece into the casings using a safety pin or bodkin. Overlap the ends slightly where strips meet to prevent gaps. Once fully inserted, stitch the open ends closed securely.
- Reinforce stress points: Add bar tacks (tight zigzag stitches) at each end and where boning joints sit. These areas endure the most strain during play.
- Optional: Add modular connectors: Attach soft elastic loops or zip ties to each end so multiple tunnels can be linked. This creates dynamic configurations like spirals or mazes.
Durability Comparison: DIY vs. Store-Bought Tunnels
| Feature | DIY Tunnel (with Boning) | Store-Bought Tunnel |
|---|---|---|
| Frame Longevity | Years with proper care; boning resists kinking | Months; often uses weak wire or no support |
| Fabric Strength | User-chosen heavy-duty material | Often thin polyester or nylon |
| Repairability | Easy to replace boning or patch fabric | Limited; usually discarded when damaged |
| Customization | Adjustable length, color, texture | Fixed design and size |
| Cost (per foot) | $3–$5 | $8–$15 |
“Cats benefit from environments that challenge them physically and mentally. A resilient, interactive tunnel supports both.” — Dr. Lena Reyes, Feline Behavior Specialist
Real Example: Max the Adventurous Tabby
Max, a 3-year-old tabby in Portland, showed signs of boredom—over-grooming and nighttime zoomies disrupting sleep. His owner, Sarah, built a 6-foot boning-reinforced tunnel using navy-blue fleece and crinkle lining. She connected it in a figure-eight pattern across the living room, hiding feather toys at each bend.
Within days, Max was hunting through the tunnel daily. After six months of near-constant use—including being dragged under furniture and chewed at the ends—the tunnel remained intact thanks to reinforced seams and replaceable boning. Sarah reported improved sleep and reduced destructive behavior, crediting the tunnel for giving Max a constructive outlet.
Common Mistakes to Avoid
- Using wire instead of boning: Metal can break through fabric and harm paws or eyes.
- Skipping seam reinforcement: High-stress zones need extra stitching to last.
- Making the tunnel too narrow: Cats should move freely without squeezing.
- Leaving boning ends exposed: Always encase tips completely to prevent fraying or poking.
- Choosing stretchy fabric: Knits may distort under tension; tightly woven fabrics hold shape better.
FAQ
Can I wash the tunnel?
Yes, but spot-clean whenever possible. If machine washing, remove the boning first (if accessible), use cold water, and air dry. Heat can warp plastic components.
How long should my tunnel be?
Aim for at least 4 feet to allow full-body movement. For multi-cat homes or larger spaces, link two tunnels for 8+ feet of continuous play.
Is boning safe if my cat chews it?
The boning is enclosed in fabric and non-toxic, but chewing should be discouraged. Redirect with chew-safe toys if needed. Inspect regularly for wear.
Final Tips for Maximum Engagement
To keep your cat interested over time, rotate the tunnel’s layout weekly. Form S-curves, loops, or attach it to a cardboard box “cave” at one end. Introduce new scents like silver vine or catnip on fabric strips placed inside. You can also dangle teaser toys at openings to spark initial interest.
If your cat is hesitant, place treats along the path or play nearby with a wand toy to draw them in. Patience pays off—many cats take a few days to warm up to new structures.
“Environmental enrichment doesn’t require expensive gear. A thoughtfully built tunnel can become a cornerstone of daily feline activity.” — Dr. Arjun Patel, Veterinary Ethologist
Conclusion
Building a DIY cat tunnel with boning isn’t just a craft project—it’s an investment in your cat’s health and happiness. With durable materials and smart construction, you create a play space that survives roughhousing while encouraging instinctive behaviors. Unlike mass-produced alternatives, your custom tunnel can evolve with your cat’s needs, adapting in length, texture, and layout.


 浙公网安备
33010002000092号
浙公网安备
33010002000092号 浙B2-20120091-4
Comments
No comments yet. Why don't you start the discussion?