
Composting transforms kitchen scraps and yard waste into nutrient-rich soil that revitalizes gardens, reduces landfill contributions, and supports sustainable living. While commercial composters exist, building your own backyard compost bin is a cost-effective, customizable, and rewarding project. With basic tools and common materials, you can create a functional system that breaks down organic matter efficiently. This guide walks through the essential steps, design options, maintenance practices, and troubleshooting tips to ensure your DIY compost bin delivers results.
Why Build Your Own Compost Bin?
Store-bought compost bins can be expensive and limited in size or functionality. A DIY approach allows you to tailor dimensions, ventilation, and accessibility to your space and volume needs. Whether you have a small urban yard or a sprawling garden, a homemade compost bin can be adapted to fit. Additionally, constructing it yourself deepens your understanding of the composting process, helping you manage inputs and conditions more effectively.
Home composting diverts up to 30% of household waste from landfills, where organic material decomposes anaerobically and emits methane—a potent greenhouse gas. In a well-managed compost bin, decomposition occurs aerobically, minimizing emissions while producing valuable humus for lawns, flower beds, and vegetable gardens.
“Composting is one of the most impactful actions a homeowner can take to reduce waste and improve soil health.” — Dr. Linda Chen, Soil Scientist at the Sustainable Agriculture Research Institute
Choosing the Right Design for Your Needs
Several DIY compost bin designs suit different lifestyles and available resources. The best choice depends on your yard size, expected waste volume, and how quickly you want finished compost.
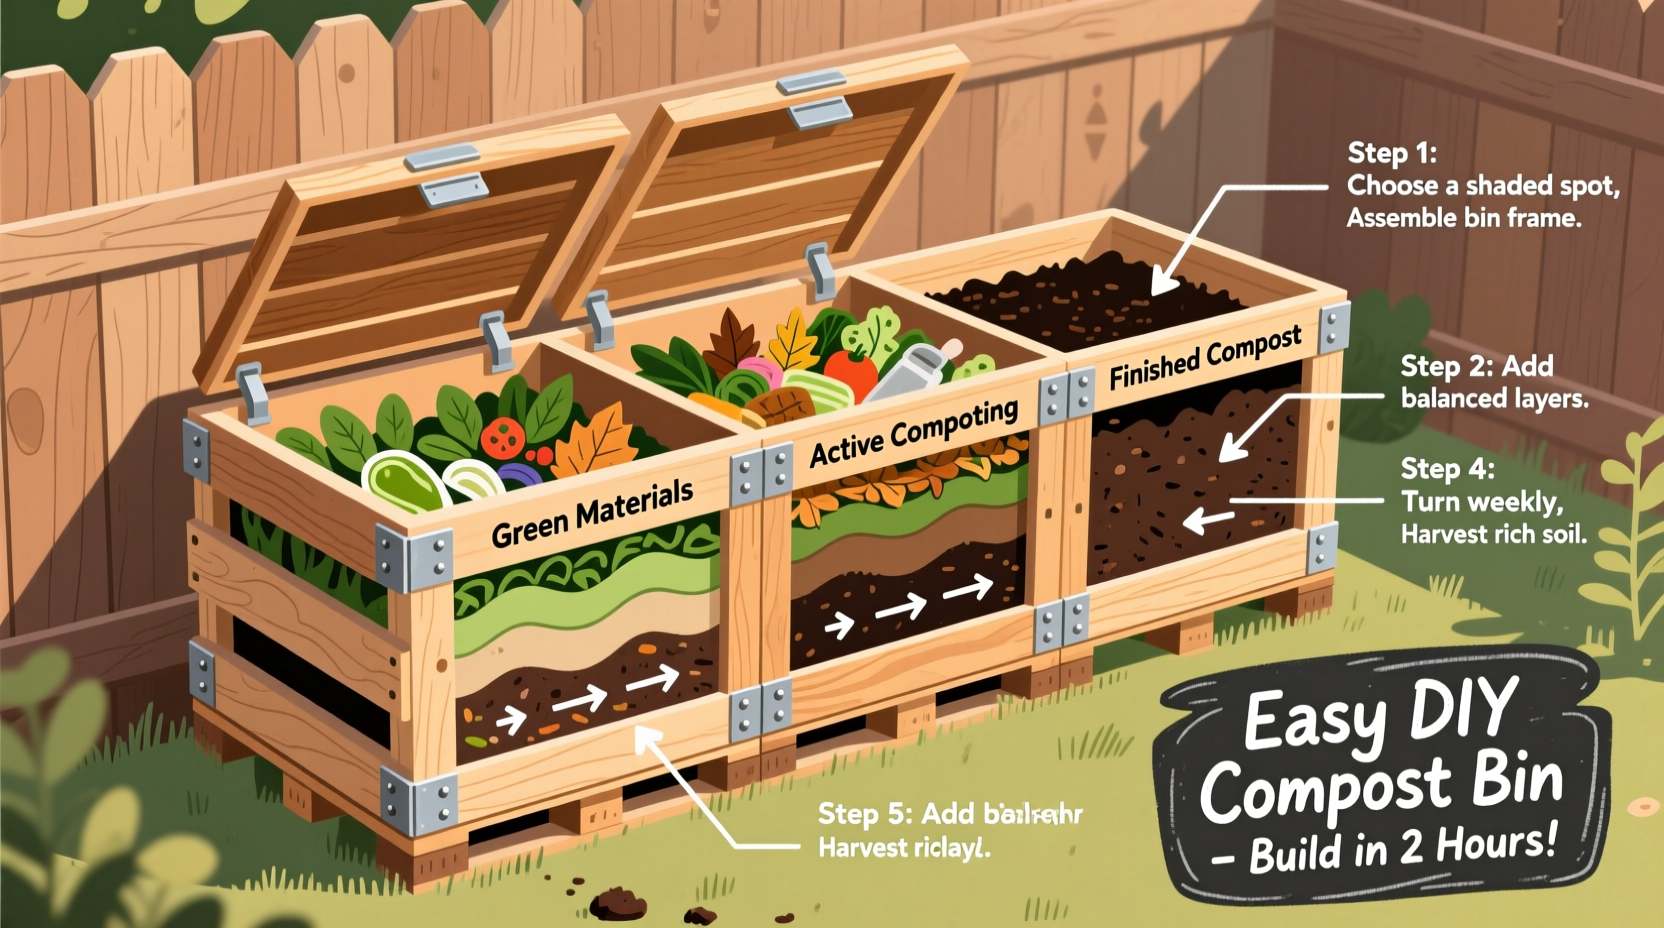
1. Stationary Bin (Ideal for Beginners)
A simple enclosed structure made from wood pallets, wire mesh, or plastic bins. It’s low-maintenance and blends easily into backyard spaces. Best for moderate waste producers who don’t need fast turnover.
2. Tumbling Composter (Faster Results)
Made from a rotating drum mounted on a frame. Turning the drum aerates the pile without manual mixing. Speeds up decomposition and deters pests but costs more in materials and effort to build.
3. Three-Bin System (For Serious Gardeners)
Three connected compartments allow continuous composting: one for fresh materials, one for active decomposition, and one for curing. Enables efficient batch processing and high-volume management.
Step-by-Step Guide to Building a Wooden Pallet Compost Bin
This beginner-friendly project uses reclaimed wooden pallets to create a sturdy, breathable, and attractive compost bin. Estimated build time: 1–2 hours.
- Gather Materials: Four untreated wooden pallets (same size), galvanized screws or zip ties, drill or screwdriver, gloves, and safety glasses.
- Select Location: Choose level ground with good drainage and easy access from the kitchen and garden. Avoid placing directly against wooden fences to prevent moisture damage.
- Position Back Wall: Stand one pallet upright to form the back wall. Secure it to stakes driven into the ground if needed for stability.
- Attach Side Walls: Position two pallets perpendicular to the back pallet, forming an open-front U-shape. Screw or tie them securely to the back corners.
- Add Front Gate (Optional): Use the fourth pallet as a removable front panel secured with hooks or bungee cords for easy access and turning.
- Line (Optional): Attach chicken wire to the inside walls to retain smaller particles without restricting airflow.
Once assembled, your bin should measure approximately 3x3x3 feet—the ideal size for heat retention and air circulation. Avoid using treated wood, which can leach chemicals into the compost.
What to Compost: Balancing Greens and Browns
Successful composting relies on a balanced mix of nitrogen-rich “greens” and carbon-rich “browns.” An optimal ratio is roughly 1 part greens to 2–3 parts browns by volume.
| Greens (Nitrogen-Rich) | Browns (Carbon-Rich) |
|---|---|
| Fruit and vegetable scraps | Dry leaves |
| Coffee grounds and filters | Straw or hay |
| Grass clippings (thin layers) | Shredded paper or cardboard |
| Plant trimmings | Wood chips or sawdust (untreated) |
| Eggshells (crushed) | Pine needles (moderate use) |
Avoid meat, dairy, oily foods, pet waste, and diseased plants, as these can attract pests or introduce pathogens. Chop or shred larger items to accelerate breakdown.
Maintaining Your Compost Bin for Optimal Results
A well-built bin requires regular care to maintain microbial activity and prevent odors or pests.
- Turn Weekly: Use a pitchfork or compost aerator tool to mix materials every 7–10 days. This introduces oxygen and redistributes moisture.
- Monitor Moisture: The pile should feel like a wrung-out sponge. Add water during dry spells or dry browns if it becomes soggy.
- Check Temperature: A warm center indicates active decomposition. If cold, add greens or turn more frequently.
- Layer Smartly: Alternate green and brown layers to maintain balance and prevent compaction.
Mini Case Study: The Urban Backyard Turnaround
Sarah, a homeowner in Portland, OR, struggled with clay-heavy soil and high grocery bills. After building a pallet compost bin in her 20x30-foot yard, she began composting daily food scraps and fallen leaves. Within five months, she harvested her first batch of dark, crumbly compost. She used it to amend raised beds for tomatoes, peppers, and herbs. By the second growing season, her plant yields increased by 40%, and she reduced household trash output by nearly half. The compost bin paid for itself in improved harvests and lower fertilizer costs.
Common Problems and How to Fix Them
Even well-managed systems encounter issues. Recognizing early signs helps correct imbalances before they escalate.
- Smelly Compost
- Usually caused by too many greens or poor airflow. Mix in dry browns and turn the pile immediately.
- Slow Decomposition
- May result from lack of nitrogen, insufficient moisture, or infrequent turning. Add fresh grass clippings or coffee grounds and water lightly.
- Pests (Rats, Flies)
- Buried food waste under 6 inches of browns and avoid adding forbidden items like meat. Secure lids or cover with hardware cloth if necessary.
Frequently Asked Questions
How long does it take to make compost?
With proper balance and maintenance, you can produce usable compost in 2–6 months. Cold piles may take up to a year. Tumbling bins often yield compost in 4–8 weeks.
Can I compost in winter?
Yes. While decomposition slows in cold weather, the core of a large pile retains heat. Insulate with straw or leaves and continue adding materials. Activity resumes in spring.
Do I need a compost activator?
Not required. Fresh greens, soil, or manure provide natural activators. Commercial products offer minimal benefit over proper layering and moisture control.
Final Checklist Before You Start
- ✅ Choose a level, well-drained location near a water source
- ✅ Gather safe, untreated materials for construction
- ✅ Stockpile dry browns (leaves, shredded paper) in advance
- ✅ Keep a small container in the kitchen for collecting scraps
- ✅ Plan to turn the pile weekly and monitor moisture
Start Composting Today—Your Garden Will Thank You
Building a DIY compost bin is more than a weekend project—it’s an investment in healthier soil, reduced waste, and greater self-reliance. With simple materials and consistent care, you can transform everyday scraps into black gold for your garden. Whether you opt for a rustic pallet bin or a tumbling design, the principles remain the same: balance, aeration, and patience. Begin small, learn as you go, and scale up as your confidence grows. The earth beneath your feet will become richer, your plants more vibrant, and your environmental footprint lighter.


 浙公网安备
33010002000092号
浙公网安备
33010002000092号 浙B2-20120091-4
Comments
No comments yet. Why don't you start the discussion?