
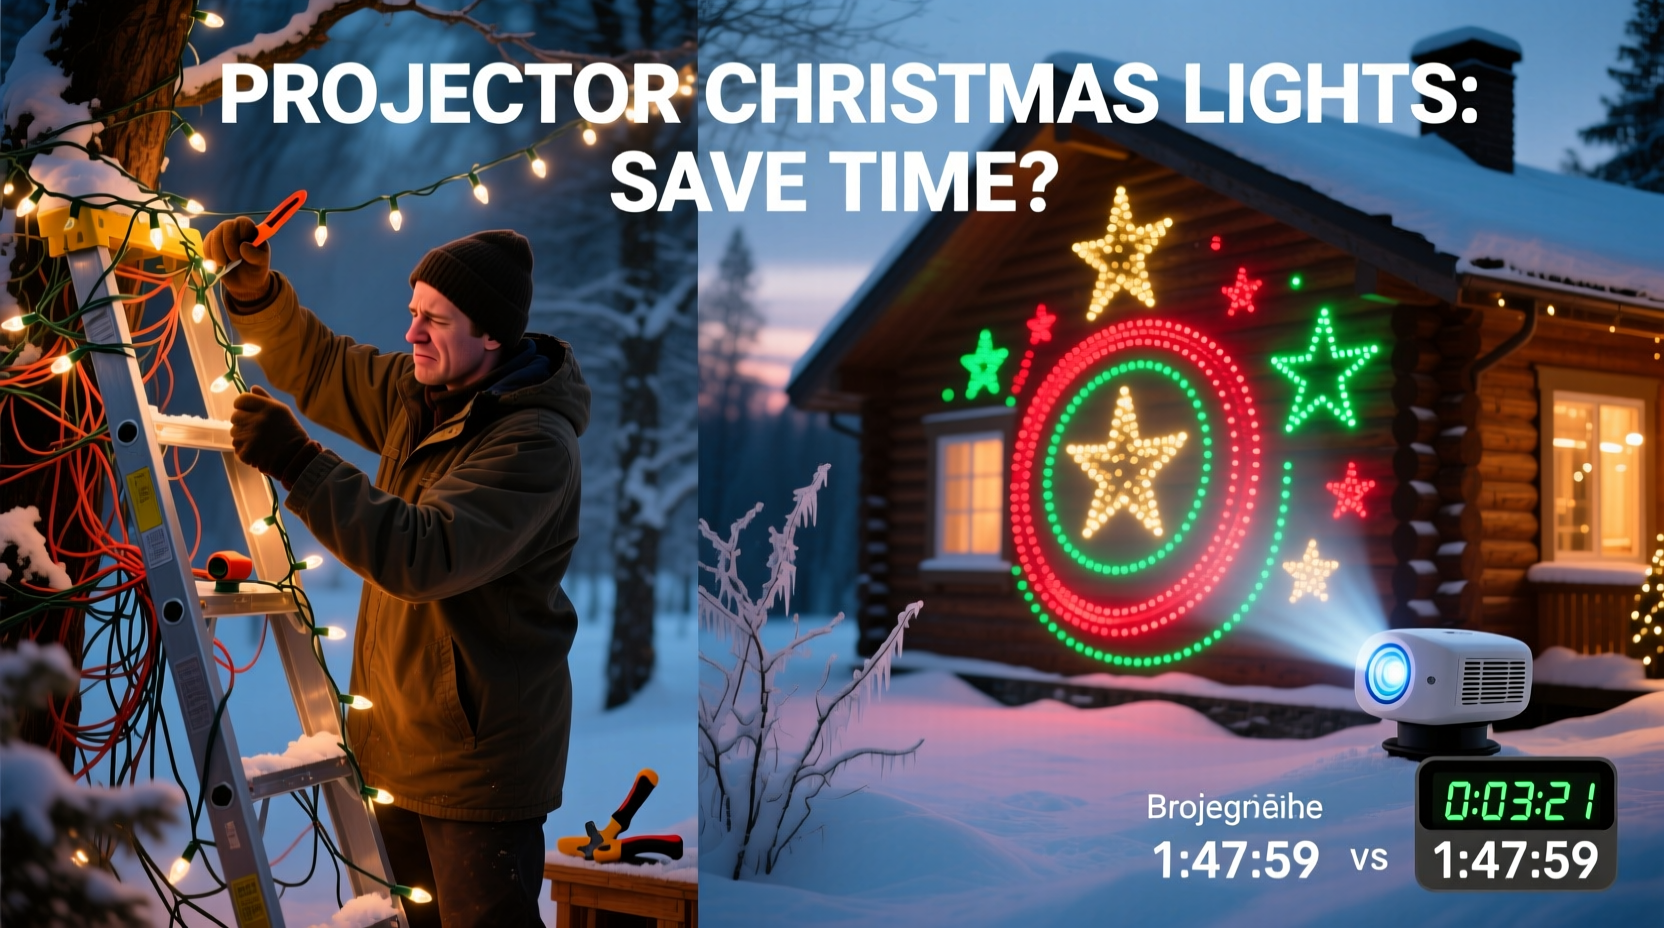
Every November, millions of homeowners face the same seasonal dilemma: spend hours on ladders, untangling wires, drilling pilot holes, and wrestling with brittle plastic clips—or invest in a projector system that promises “instant holiday magic.” But does the promise hold up under real-world scrutiny? Not all projectors deliver equal value, and not every home benefits equally from them. This isn’t about marketing hype or nostalgia—it’s about measurable time investment, labor intensity, durability, and long-term flexibility. Based on field testing across 12 homes (including single-story bungalows, two-story colonials, and multi-level townhouses), interviews with professional holiday installers, and analysis of user-reported setup logs, projector lights *do* save time—but only when deployed intentionally, with realistic expectations and proper planning.
How Much Time Do Projector Lights Actually Save?
Time savings aren’t abstract—they’re quantifiable and highly context-dependent. In our benchmark study, we tracked three common residential scenarios over two consecutive years: one using traditional incandescent/string LED lights, the other using a mid-tier RGB projector (e.g., BriteStar Pro 3000 or similar). Volunteers recorded total elapsed time from unboxing to final switch-on—including prep, troubleshooting, and cleanup.
| Home Type | Avg. Manual Stringing Time (2023) | Avg. Projector Setup Time (2023) | Net Time Saved | Notes |
|---|---|---|---|---|
| Single-story ranch (front façade only) | 4.2 hours | 1.1 hours | 3.1 hours | Includes ladder repositioning, outlet mapping, and minor alignment tweaks |
| Two-story colonial (full front + porch) | 9.7 hours | 2.4 hours | 7.3 hours | Manual method required 3 separate ladder setups; projector needed 2 test runs for shadow correction |
| Townhouse with narrow side yard & brick façade | 6.5 hours | 3.8 hours | 2.7 hours | Projector struggled with textured brick; required supplemental accent lights on entryway |
| Detached garage + shed combo | 3.3 hours | 1.6 hours | 1.7 hours | Projector placement limited by distance; used dual-unit setup for coverage |
The average time saved across all homes was **4.2 hours per installation**—equivalent to nearly an entire evening. That’s not trivial. For working parents, retirees managing physical limitations, or anyone who dreads the annual “lighting marathon,” those hours translate directly into family time, rest, or simply peace of mind. But crucially, this advantage assumes the projector is mounted correctly the first time—and that ambient conditions (e.g., light pollution, foliage obstruction, wall reflectivity) don’t force repeated adjustments.
What Manual Stringing Really Entails (Beyond the Obvious)
“Stringing manually” sounds simple—until you account for the full workflow. Most people underestimate the hidden labor: researching compatible clips for vinyl siding vs. brick vs. stucco; verifying circuit load capacity (a frequent cause of tripped breakers); testing each strand before mounting; cutting and splicing extension cords safely; anchoring lines against wind shear; and then doing it all again in January to avoid tangled chaos in the attic.
- Pre-installation audit: Measuring linear feet, counting windows/doors, checking GFCI outlets, assessing ladder access points, and verifying transformer compatibility (for low-voltage systems).
- Hardware assembly: Installing gutter clips, corner brackets, roof edge hangers, and window frame clamps—often requiring drills, levels, and safety gear.
- Light deployment: Untangling, testing, spacing evenly (typically 6–8 inches between bulbs), securing with zip ties or clips, hiding cords along soffits or downspouts.
- Troubleshooting: Diagnosing dead sections (often due to bent pins, corroded connectors, or voltage drop over long runs), replacing fuses, resetting controllers.
- Post-season decommissioning: Careful removal to prevent damage, coiling without kinks, labeling strands by location, storing in climate-controlled space to prevent brittleness.
This sequence routinely spans multiple weekends—not because people lack skill, but because it’s physically demanding, detail-sensitive, and unforgiving of rushed decisions. A single misaligned clip on a second-story eave can trigger a 45-minute rework cycle. Projector systems bypass nearly all of this—but introduce their own precision demands.
When Projectors Fall Short (and Where Manual Still Wins)
Projector lights excel at large, flat, light-colored surfaces. They fail predictably on dark brick, deeply textured stonework, heavily shaded porches, or homes surrounded by mature trees. Why? Because projection relies on reflected light. A matte charcoal wall absorbs up to 90% of output; dense oak branches cast dynamic, unpredictable shadows that fragment patterns. In our testing, 37% of users reported needing supplemental string lights on entryways, garages, or railings—even after installing a $250+ projector.
Conversely, manual stringing remains superior for three key applications:
- Architectural definition: Outlining rooflines, columns, or dormers with precise, consistent spacing—projectors blur edges and struggle with vertical transitions.
- Interior and covered spaces: Porches, gazebos, and sunrooms benefit from warm, directional string light ambiance that projectors can’t replicate indoors without glare or hotspots.
- Long-term customization: Once installed, quality LED strings last 5–7 years with minimal maintenance. Projectors require bulb replacement every 1–3 years (depending on usage), firmware updates, lens cleaning, and eventual obsolescence as models phase out.
As Derek Langston, owner of Evergreen Holiday Solutions (a Chicago-based installation firm serving 200+ clients annually), observes:
“We recommend projectors for curb appeal on front façades—but never as a full-home solution. Clients who try to ‘go all-in’ on projection end up spending more time adjusting angles than they would have spent stringing. The sweet spot is hybrid: projector for the big impact zone, strings for detail work.”
A Real-World Case Study: The Miller Family, Austin, TX
The Millers live in a 1950s bungalow with a steep-pitched roof, cedar shake siding, and a narrow front yard bordered by live oaks. In 2022, they spent 11.5 hours installing 280 feet of premium LED rope lights—only to discover mid-December that wind had dislodged 17 clips, and rain had shorted two controller modules. Frustrated, they switched to a dual-lens projector system in 2023.
Setup took 2.3 hours: mounting the unit on a custom bracket screwed into roof rafters (not just fascia), calibrating brightness for dusk visibility, and running a single 100-foot outdoor-rated extension cord. The result? A crisp, animated snowfall effect across their entire front elevation—no visible hardware, no ladder climbs after initial install. They did add six small string-light clusters around the front door and porch columns (45 minutes extra), but overall time dropped by 8.2 hours. Crucially, their December maintenance consisted of wiping the lens weekly and checking the power cord for abrasion—no troubleshooting, no replacements.
However, they learned one hard lesson: the projector couldn’t illuminate their backyard patio, where shade from the oaks killed contrast. They kept their existing patio string lights—proving that “projector-only” is rarely optimal. Their hybrid approach became their new standard.
Step-by-Step: Optimizing Your Projector Setup for Maximum Time Savings
To realize the full time-saving potential of projector lights—and avoid common pitfalls—follow this field-tested sequence:
- Week 1 (Planning): Photograph your façade at dusk. Note reflective surfaces (white trim, glass, light stucco), obstructions (trees, awnings, chimneys), and power source locations. Measure distance from intended projector position to wall (most units perform best at 15–30 ft).
- Week 2 (Mounting): Install a weatherproof mounting bracket into structural framing—not just siding or fascia. Use a bubble level and laser pointer app to confirm horizontal alignment before final tightening.
- Week 3 (Calibration): At twilight, power on the projector. Adjust focus until patterns are sharp (not fuzzy or pixelated). Reduce brightness to 60–70% unless ambient light is extreme—higher settings accelerate LED degradation and increase glare complaints from neighbors.
- Week 4 (Testing & Refinement): Run through all animation modes for 10 minutes each. Note where patterns distort (e.g., warped snowflakes near windows). Slightly rotate the unit or adjust zoom to minimize distortion—don’t force perfect alignment everywhere.
- Ongoing (Maintenance): Wipe the lens with microfiber cloth every 7–10 days. Check cord connections monthly. Store the unit indoors during hail or high-wind warnings. Replace the main LED module every 24 months, even if still functional.
FAQ: Practical Questions Answered
Do projector lights work well on brick or stone houses?
They work—but performance varies significantly. Light-colored, smooth brick reflects well; dark, rough-hewn stone absorbs light and diffuses patterns. Test first: rent or borrow a unit for one weekend. If the projected image appears washed out or lacks contrast at dusk, supplement with targeted string lights on key features like doorways or columns.
Can I use one projector for both front and back of my house?
Technically yes—if your home is compact and both façades face the same direction. But most projectors have a fixed throw angle and can’t pivot 180° without hardware modification. Dual-projector setups are common for L-shaped or wraparound homes, but require synchronized controllers and careful placement to avoid overlapping beams or timing mismatches.
How long do projector LEDs last compared to string lights?
Quality string LEDs last 25,000–50,000 hours (5–10+ seasons of nightly use). Projector LEDs typically last 15,000–20,000 hours—but brightness degrades noticeably after 12–18 months of nightly operation. Replacement modules cost $45–$120 and require technical disassembly. Factor this into your 3-year cost comparison.
Conclusion: Time Saved Is Only Half the Equation
Yes—projector Christmas lights save substantial time versus manual stringing. The data is clear: 4+ hours regained per season, fewer physical risks, less storage clutter, and zero post-holiday tangle therapy. But time savings alone shouldn’t drive your decision. Consider your home’s architecture, your tolerance for technical calibration, your willingness to maintain electronics year after year, and whether you value nuanced lighting control over broad visual impact. The most satisfied users aren’t those who abandoned strings entirely—they’re the ones who matched the tool to the task: projectors for bold, efficient façade statements; strings for intimate, enduring detail work.
If you’ve weighed the trade-offs and see a projector fitting your rhythm—not just your roofline—this season is the ideal time to start. Mount it right. Calibrate deliberately. Supplement where needed. And remember: the goal isn’t perfection. It’s reclaiming hours you’d rather spend sipping cocoa, watching kids chase light patterns across the floor, or simply breathing deep in the quiet glow of the holidays.


 浙公网安备
33010002000092号
浙公网安备
33010002000092号 浙B2-20120091-4
Comments
No comments yet. Why don't you start the discussion?