
A malfunctioning dryer can quickly disrupt daily routines, especially in households that rely on quick laundry turnarounds. When clothes remain damp after a full cycle or the machine doesn’t start at all, frustration sets in. The good news is that many dryer issues have simple explanations and solutions. Before scheduling a costly repair service, try diagnosing and fixing the problem yourself. Most common dryer failures stem from electrical issues, airflow blockages, or worn components—all of which are often within reach of a DIY fix.
Common Reasons Your Dryer Isn’t Working
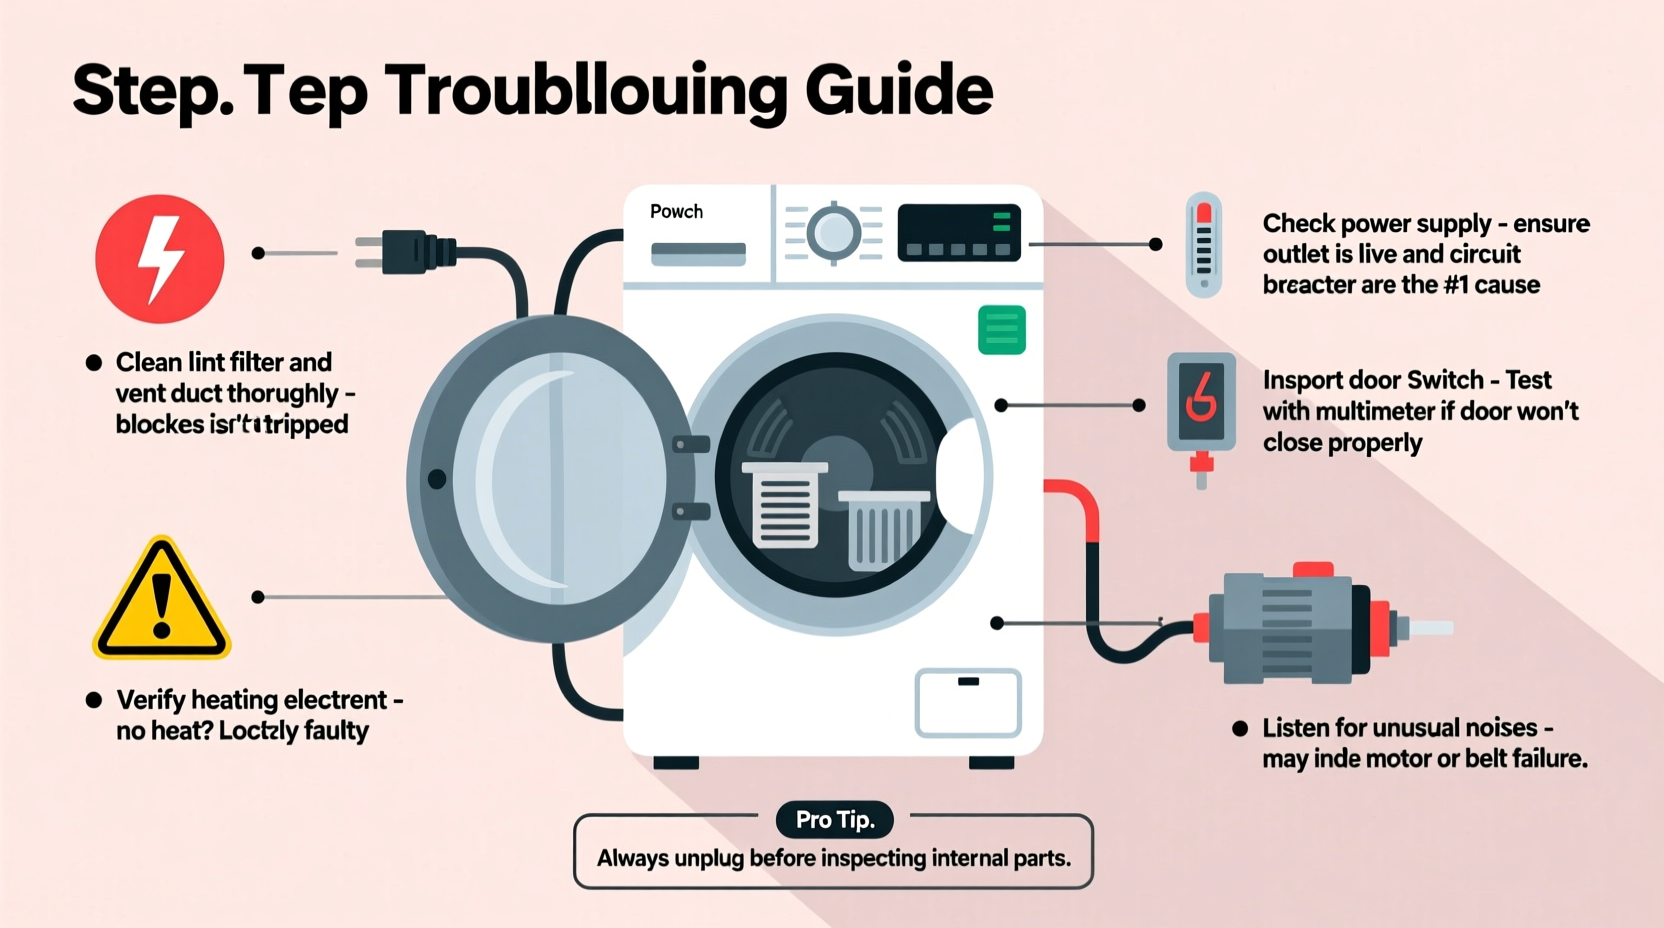
Dryers fail for a variety of reasons, ranging from minor oversights to internal mechanical faults. Understanding the root cause is essential before attempting repairs. Here are the most frequent culprits:
- Power supply failure: A tripped circuit breaker, blown fuse, or unplugged unit can prevent the dryer from turning on.
- Clogged lint filter or vent: Restricted airflow reduces drying efficiency and can trigger safety shutoffs.
- Faulty door switch: If the dryer doesn’t start when closed, the door sensor may be defective.
- Thermal fuse blown: Overheating due to poor ventilation can blow this safety component, cutting power to the heating system.
- Broken drive belt: A snapped belt prevents the drum from rotating, even if the motor runs.
- Defective heating element (electric dryers): No heat means wet clothes, often due to a burnt-out coil.
- Gas valve solenoid failure (gas dryers): Prevents gas from igniting, resulting in no flame despite proper settings.
Step-by-Step Troubleshooting Guide
Follow this logical sequence to identify and resolve the issue efficiently:
- Verify power connection: Ensure the dryer is securely plugged in and the outlet is functional. Check your home’s electrical panel for tripped breakers or blown fuses.
- Inspect the lint trap: Remove and clean the lint screen thoroughly. Even partial clogs reduce airflow and efficiency.
- Check the exhaust vent: Disconnect the vent hose from the back of the dryer and inspect for lint buildup. Use a vent brush or vacuum to clear obstructions.
- Test the door switch: Close the door and listen for a soft click. If the dryer doesn’t respond, use a multimeter to test continuity across the switch terminals.
- Examine the drum belt: Open the dryer cabinet (after disconnecting power) and visually inspect the belt around the drum. Replace if frayed or broken.
- Check the thermal fuse: Located near the exhaust duct, this small device can be tested with a multimeter. If there’s no continuity, it must be replaced.
- Assess heating function: Run a heated cycle and determine if the dryer produces heat. If not, inspect the heating element (electric) or igniter/flame sensor (gas).
Do’s and Don’ts When Fixing a Dryer
| Do’s | Don’ts |
|---|---|
| Unplug the dryer before inspection | Ignore persistent burning smells |
| Clean the lint filter after every load | Use duct tape to seal vent connections (use foil or clamps) |
| Inspect the vent line annually | Overload the dryer drum |
| Replace faulty parts with manufacturer-approved ones | Run the dryer with a damaged power cord |
| Use rigid or semi-rigid metal venting | Delay repairs when smoke or sparks occur |
Real-World Example: Resolving a No-Heat Issue
Sarah noticed her electric dryer was tumbling but not producing heat. She followed basic troubleshooting: cleaned the lint filter, checked the vent hose (which was partially blocked), and cleared it. Still, no improvement. Using a multimeter, she tested the thermal fuse and found no continuity—indicating it had blown. After replacing the $15 part, the dryer began heating normally. The root cause? Years of infrequent vent cleaning led to overheating, triggering the safety fuse. This case highlights how routine maintenance prevents expensive or inconvenient failures.
Expert Insight on Dryer Longevity
“Most dryer breakdowns stem from neglected airflow. A clean vent system not only improves performance but also prevents fire hazards.” — James Landon, Appliance Repair Technician with 18 years of field experience
Experts agree that preventive care is far more effective than reactive repairs. Regular lint removal, annual vent inspections, and timely part replacements extend a dryer’s lifespan significantly. According to industry data, dryers maintained properly last an average of 13 years, compared to just 7–8 years for neglected units.
Troubleshooting Checklist
Dryer Not Working? Run Through This Quick Checklist:
- ✅ Is the dryer plugged in securely?
- ✅ Did you check the circuit breaker or fuse box?
- ✅ Is the lint filter clean?
- ✅ Is the exhaust vent free of blockages?
- ✅ Does the door close fully and trigger the switch?
- ✅ Can you hear the motor running?
- ✅ Is the drum spinning?
- ✅ Is the dryer producing heat?
- ✅ Are error codes displayed (on newer models)?
- ✅ Have you inspected the thermal fuse and heating element?
Frequently Asked Questions
Why does my dryer run but not heat up?
This typically indicates a problem with the heating system. In electric dryers, a burned-out heating element or tripped high-limit thermostat is common. For gas dryers, a faulty igniter or defective gas valve coils prevent ignition. The thermal fuse may also be blown due to overheating from poor ventilation.
How often should I clean my dryer vent?
At minimum, clean the exhaust vent once per year. Households with heavy laundry usage—such as families with children or pet owners—should do it every 6 months. A clogged vent not only reduces efficiency but is a leading cause of dryer fires.
Can I replace dryer parts myself?
Yes, many components like the lint filter, thermal fuse, door switch, and drive belt are designed for user replacement. With basic tools and online guides, homeowners can complete these tasks safely. However, if you’re uncomfortable working with electrical wiring or gas lines, consult a licensed technician.
Final Thoughts and Next Steps
A dryer that won’t start or fails to dry clothes efficiently isn’t always a sign of major failure. Often, the solution lies in overlooked maintenance or a simple part replacement. By understanding the mechanics behind common malfunctions, you gain the confidence to troubleshoot effectively and save time and money. Start with the basics: power, lint, and airflow. Then move to component testing if needed.
Regular upkeep pays dividends. Clean filters, clear vents, and attentive monitoring help prevent emergencies and extend your appliance’s life. If you’ve resolved your issue, consider setting a biannual reminder to inspect the vent system. If problems persist after basic fixes, it may be time to consult a professional—or evaluate whether your dryer has reached the end of its service life.


 浙公网安备
33010002000092号
浙公网安备
33010002000092号 浙B2-20120091-4
Comments
No comments yet. Why don't you start the discussion?