
Paracord leashes are more than just functional—they’re reliable, customizable, and surprisingly easy to make with minimal tools. Originally developed for military use due to its strength and resilience, 550-pound test paracord has become a favorite among DIY enthusiasts. When woven into a dog leash, it creates a lightweight yet robust tether that can withstand daily walks, hikes, and even emergency situations. Whether you're looking to save money, personalize your pet’s gear, or build something practical from scratch, this guide delivers a straightforward method to craft a durable paracord dog leash in under two hours.
Why Choose a Paracord Leash?
Beyond aesthetics, paracord offers real-world advantages over traditional nylon or leather leashes. It resists fraying, dries quickly after exposure to moisture, and maintains integrity under tension. A well-constructed paracord leash can support dogs up to 100 pounds, depending on the weave and core structure. Additionally, if needed in an emergency, the outer sheath can be removed to reveal internal strands useful for repairs, tying gear, or first aid applications.
“Paracord isn’t just for survival kits—it’s a versatile material that performs exceptionally well in pet gear when properly constructed.” — Jason Reed, Outdoor Gear Designer & Tactical Equipment Instructor
Materials and Tools You’ll Need
Before beginning, gather all necessary supplies. Most items are affordable and reusable across future projects.
- Paracord (550 lb test): 50 feet total (30 ft for the main body, 20 ft for handles and loops)
- Carabiner or metal D-ring: 3/4-inch size, stainless steel recommended
- Lighter or heat source: For sealing cut ends
- Measuring tape or ruler: To ensure consistent length
- Scissors: Sharp, dedicated to cord work
- Alligator clip or clamp: To secure the carabiner during weaving
- Masking tape: Optional, for marking measurement points
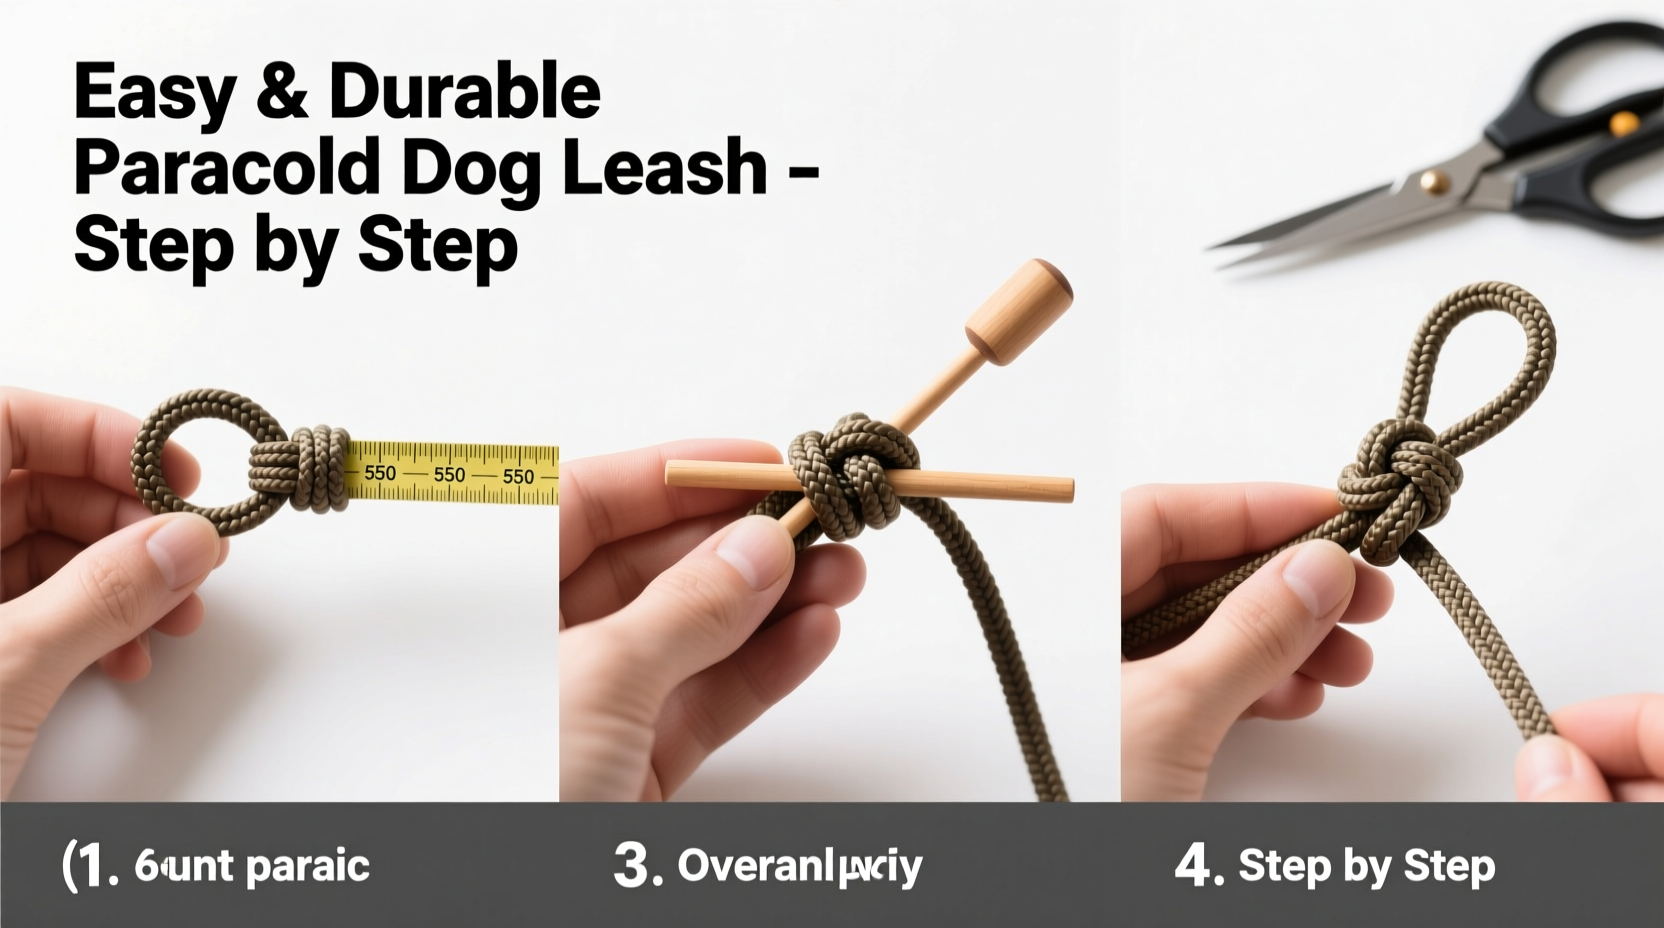
Step-by-Step Construction Guide
This method uses a modified square knot design known as the “cobra stitch,” which is both beginner-friendly and structurally sound. The final product will be approximately 4 feet long with a comfortable loop handle and secure snap attachment.
- Attach the carabiner: Secure the carabiner to a fixed surface using the alligator clip. Open the gate and thread one end of the paracord through it. Pull about 12 inches through to create a short tail; leave the rest as your working line.
- Begin the cobra stitch: Cross the long strand over the short tail to form a “V” shape. Bring the long strand behind the carabiner, then up through the V. Pull snug but not tight. This forms the first half of the knot.
- Complete the first knot: Repeat the same motion on the opposite side—cross the long strand over the standing part, pass behind, then up through the new V. Tighten evenly. This completes one full cobra stitch.
- Continue down the length: Repeat steps 2–3 along the entire length of the leash. Keep tension consistent. Aim for a flat, interwoven braid without gaps or twists.
- Maintain alignment: After every five knots, pause to adjust tension across both sides. Uneven pulling leads to spiraling or warping.
- Reach desired length: After completing roughly 300–350 square knots (about 3.5 feet), stop weaving. Trim the working line, leaving a 6-inch tail.
- Create the handle loop: Fold the remaining tail back toward the last knot, forming a 5-inch loop. Weave the tail back through the previous 8–10 knots using a lacing technique to secure it.
- Seal all ends: Carefully melt the cut tips with a lighter and press them flat against the weave to prevent unraveling. Do not burn excessively—brief exposure is enough.
- Test for strength: Gently pull on both ends and inspect the carabiner connection. Ensure no loose knots or weak spots exist.
Customization and Durability Enhancements
Once mastered, the basic design allows for personal touches. Consider these modifications:
- Color patterns: Alternate between two colors every 10–15 knots for a striped effect.
- Reflective thread: Weave in reflective paracord every few rows for nighttime visibility.
- Thicker core: Insert a central strand of para-core or shock cord inside the braid for added stiffness and load distribution.
- Swivel clasp upgrade: Replace the carabiner with a heavy-duty swivel bolt snap to reduce tangling during walks.
For larger breeds, double the paracord thickness by running two cords parallel through the initial loop and braiding them together. This increases tensile strength significantly without sacrificing flexibility.
Do’s and Don’ts: Paracord Leash Best Practices
| Do’s | Don’ts |
|---|---|
| Use high-quality 550 paracord with visible inner strands | Use thin or decorative cord rated below 500 lbs |
| Inspect regularly for wear, especially near attachments | Leave the leash exposed to prolonged UV sunlight |
| Wash gently with mild soap and air dry | Machine wash or tumble dry—heat damages fibers |
| Store coiled loosely in a dry place | Knot tightly or wrap around sharp objects |
| Replace if fraying exceeds 10% of surface area | Continue using after significant abrasion or weakening |
Real-World Example: Hiking with Max the Border Collie
Dana, an avid hiker from Colorado, built her own paracord leash after her nylon version snapped during a trail descent. She used navy and gray cords to match her backpack and incorporated a swivel snap. Over the next 18 months, the leash endured rocky terrain, river crossings, and daily use with her 45-pound Border Collie, Max. Despite minor surface scuffing, the braid held firm. During a winter camping trip, she even unraveled a few inches of the end to repair a broken tent guyline—proof of the dual-purpose value of paracord construction.
Frequently Asked Questions
How strong is a paracord dog leash?
A single strand of 550 paracord supports up to 550 pounds, but the finished leash's strength depends on the weave. A tightly braided cobra stitch distributes force across multiple strands, typically resulting in a safe working load of 300–400 pounds—more than sufficient for most dogs.
Can I make a leash for a large dog like a German Shepherd?
Yes. For dogs over 70 pounds, consider doubling the paracord at the start or adding a reinforced core. Also, opt for a wider braid pattern (such as King Cobra) to increase grip and durability.
How long does it take to make one?
For beginners, expect 1.5 to 2.5 hours. With practice, experienced crafters complete one in under 60 minutes. Much of the time involves repetitive knotting, which becomes faster with rhythm.
Checklist: Build Your Paracord Leash in Order
- ☐ Gather materials: paracord, carabiner, lighter, scissors, clamp
- ☐ Cut 50 feet of paracord (30 + 20 split for body and reinforcement)
- ☐ Attach carabiner and secure with clamp
- ☐ Begin cobra stitch, maintaining even tension
- ☐ Weave continuously for 3.5 feet
- ☐ Form and secure the handle loop
- ☐ Seal all cut ends with flame
- ☐ Test strength and inspect for flaws
- ☐ Clean hands and store properly
Final Thoughts
Crafting a paracord dog leash isn’t just a weekend project—it’s an investment in quality, safety, and self-reliance. Unlike mass-produced alternatives, a handmade leash reflects your attention to detail and care for your pet’s needs. Once completed, it serves reliably for years, whether navigating city sidewalks or mountain trails. The skills learned here extend beyond pet gear; they open doors to other survival crafts, tactical accessories, and thoughtful handmade gifts.


 浙公网安备
33010002000092号
浙公网安备
33010002000092号 浙B2-20120091-4
Comments
No comments yet. Why don't you start the discussion?